45
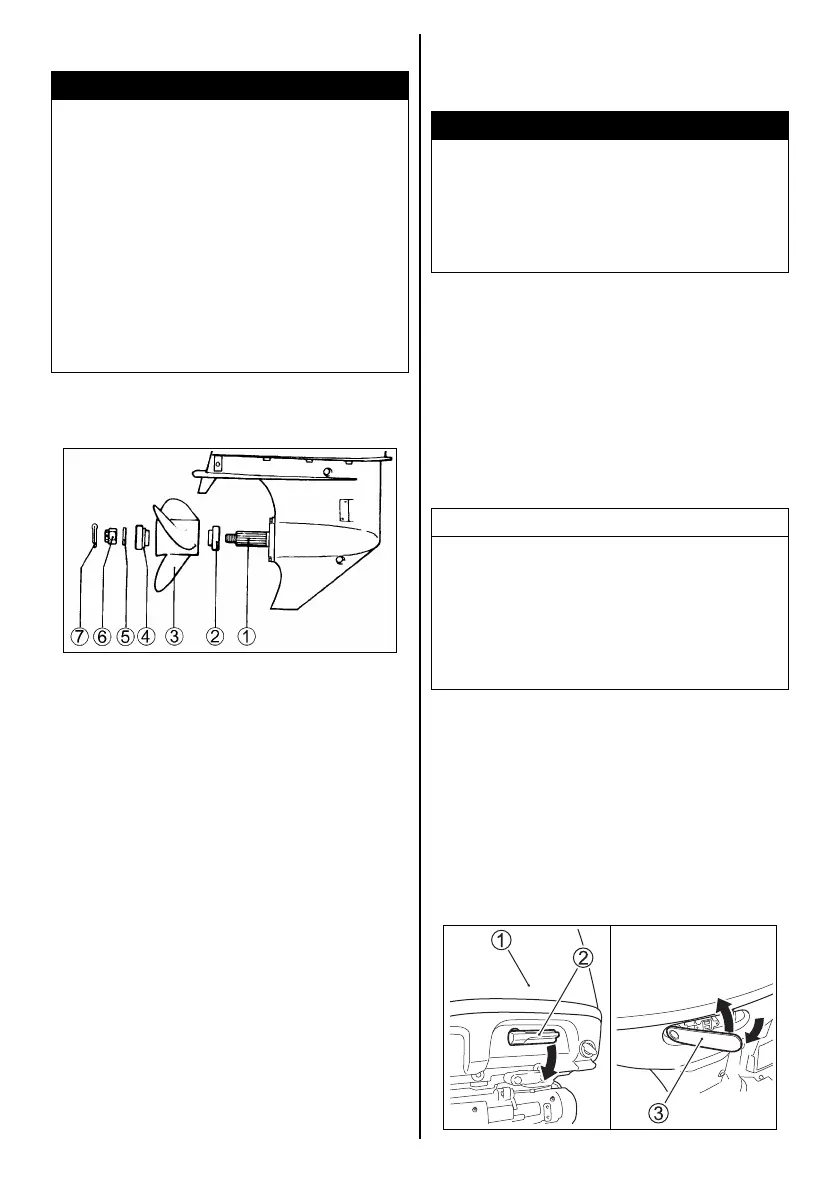
PROPELLER INSTALLATION
To install a propeller on your outboard motor,
use the following procedure:
1. Coat the propeller shaft splines 1 liberally
with Suzuki water resistant grease to help
prevent corrosion.
2. Place the stopper 2 on the shaft.
3. Align the propeller 3 with the propeller shaft
splines and slide the propeller onto the shaft.
4. Place the spacer 4 and washer 5 on the
shaft.
5. Install the propeller nut 6 and tighten it with
a torque wrench to 50 – 60 N·m (5.1 – 6.1
kgf-m/37 – 44 lbf-ft).
6. Insert the cotter pin 7 and bend it so that it
can’t come off.
To remove the propeller, reverse the above pro-
cedure.
V
WARNING
Failure to take proper precautions when
installing or removing the propeller can result
in severe personal injury.
When installing or removing the propeller:
• Always shift into “Neutral” and remove the
emergency stop switch lock plate so that
the motor cannot be started accidentally.
• Wear gloves to protect hands, and “lock”
the propeller by placing a block of wood
between the blades and the anti-cavitation
plate.
INSPECTION BEFORE
BOATING
It is important to make sure that your boat and
motor are in good condition and that you are
properly prepared for an emergency.
Always perform the following checks before you
begin boating:
• Make sure that you have enough fuel for
the intended run.
• Check the level of engine oil in the sump.
To check the oil level:
NOTE:
To avoid an incorrect assessment of engine oil
level, check the level only when the engine has
cooled.
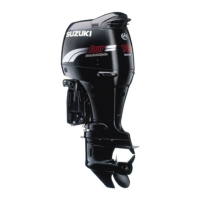
1. Place the motor in a vertical position, then
remove the motor cover 1 by unlocking the
lever 2 and 3.
V
WARNING
Failure to inspect your boat and motor before
beginning a trip can be hazardous.
Before boating, always perform the inspec-
tions described in this section.
NOTICE
Running the engine with an insufficient
amount of oil can cause serious engine dam-
age.
Always check the oil level before each trip and
add oil if necessary.