©2018 SwellPro All Rights Reserved
10
Before powering on the controller, please be sure to put all the toggle switches on the
controller (Airdrop Switch, Camera Switch, Mode Switch and Return Home Switch) in
the up position, failure to do so, will result in the controller continuously sending out a
warning tone.
Once the Splash Drone has successfully booted up, please switch the camera switch to
the Preview position.
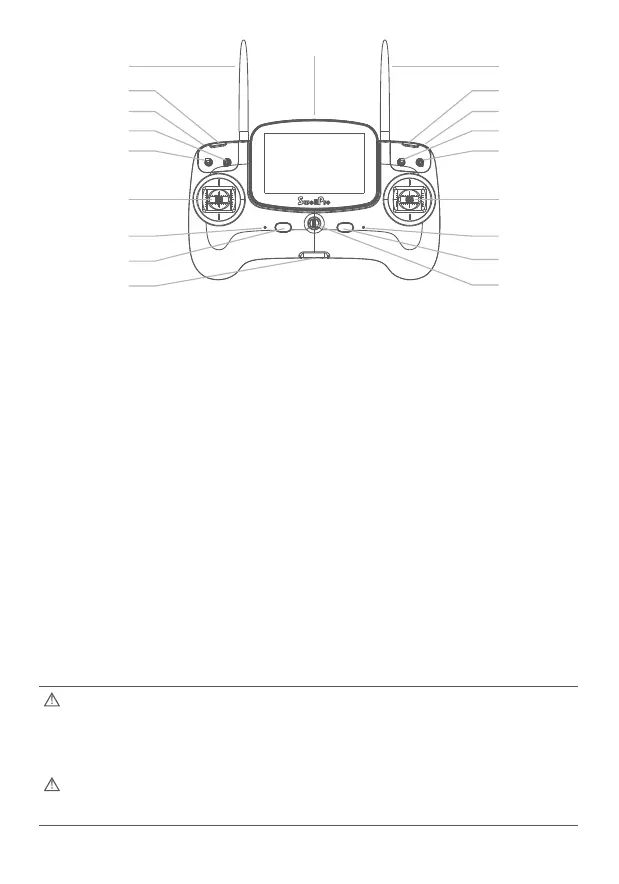
[01] Remote Antenna
For drone operation signal
[02] Left pairing button
Bind the RC with drone
[03] Gimbal Horizontal Tilt
Thumbwheel
Adjusts the horizontal tilt
of the camera
[04] Camera switch
Used for taking Pictures,
videos or previewing.
[05] Airdrop switch
Controls the payload release
[06] Left Joystick
Control the drone’s ascend
(up), descend (down) and/or
to rotate the aircraft nose to
the left or right.
[07] Working Status lights
Remote control working status
[08] Left power button
Press the left and right power
buttons simultaneously to
power on the controller
[09] USB Port /Interface
For remote control firmware
upgrade use
[10] Hanger ring
For use during remote
controller firmware upgrades
and for simulated flight
purposes.
[11] Right power button
Press the left and right power
button simultaneously, to
power on the controller.
[12] Power status lights
Displaying the remote
controller’s battery status
[13] Right joystick
Controls the drone for forward,
backward, left and right flight
[14] Return-Home switch
Commands the drone to
return automatically
[15] Flight mode switch
GPS / Cruise Flight / ATTI
[16] Gimbal Vertical Tilt
Thumbwheel
adjusts the vertical tilt of
the camera
[17] Right pairing button
Bind the RC with drone
[18] Video antenna
Transmits FPV live video
[19] FPV screen
Displays FPV live video and
On screen data from the
drone.
[01]
[03]
[02]
[04]
[05]
[06]
[07]
[08]
[09] [10]
[11]
[12]
[13]
[14]
[15]
[16]
[17]
[18]
[19]