Document Number: MKT-70-1096 Revision 1 Page 15
SYSMEX XE-5000
TM
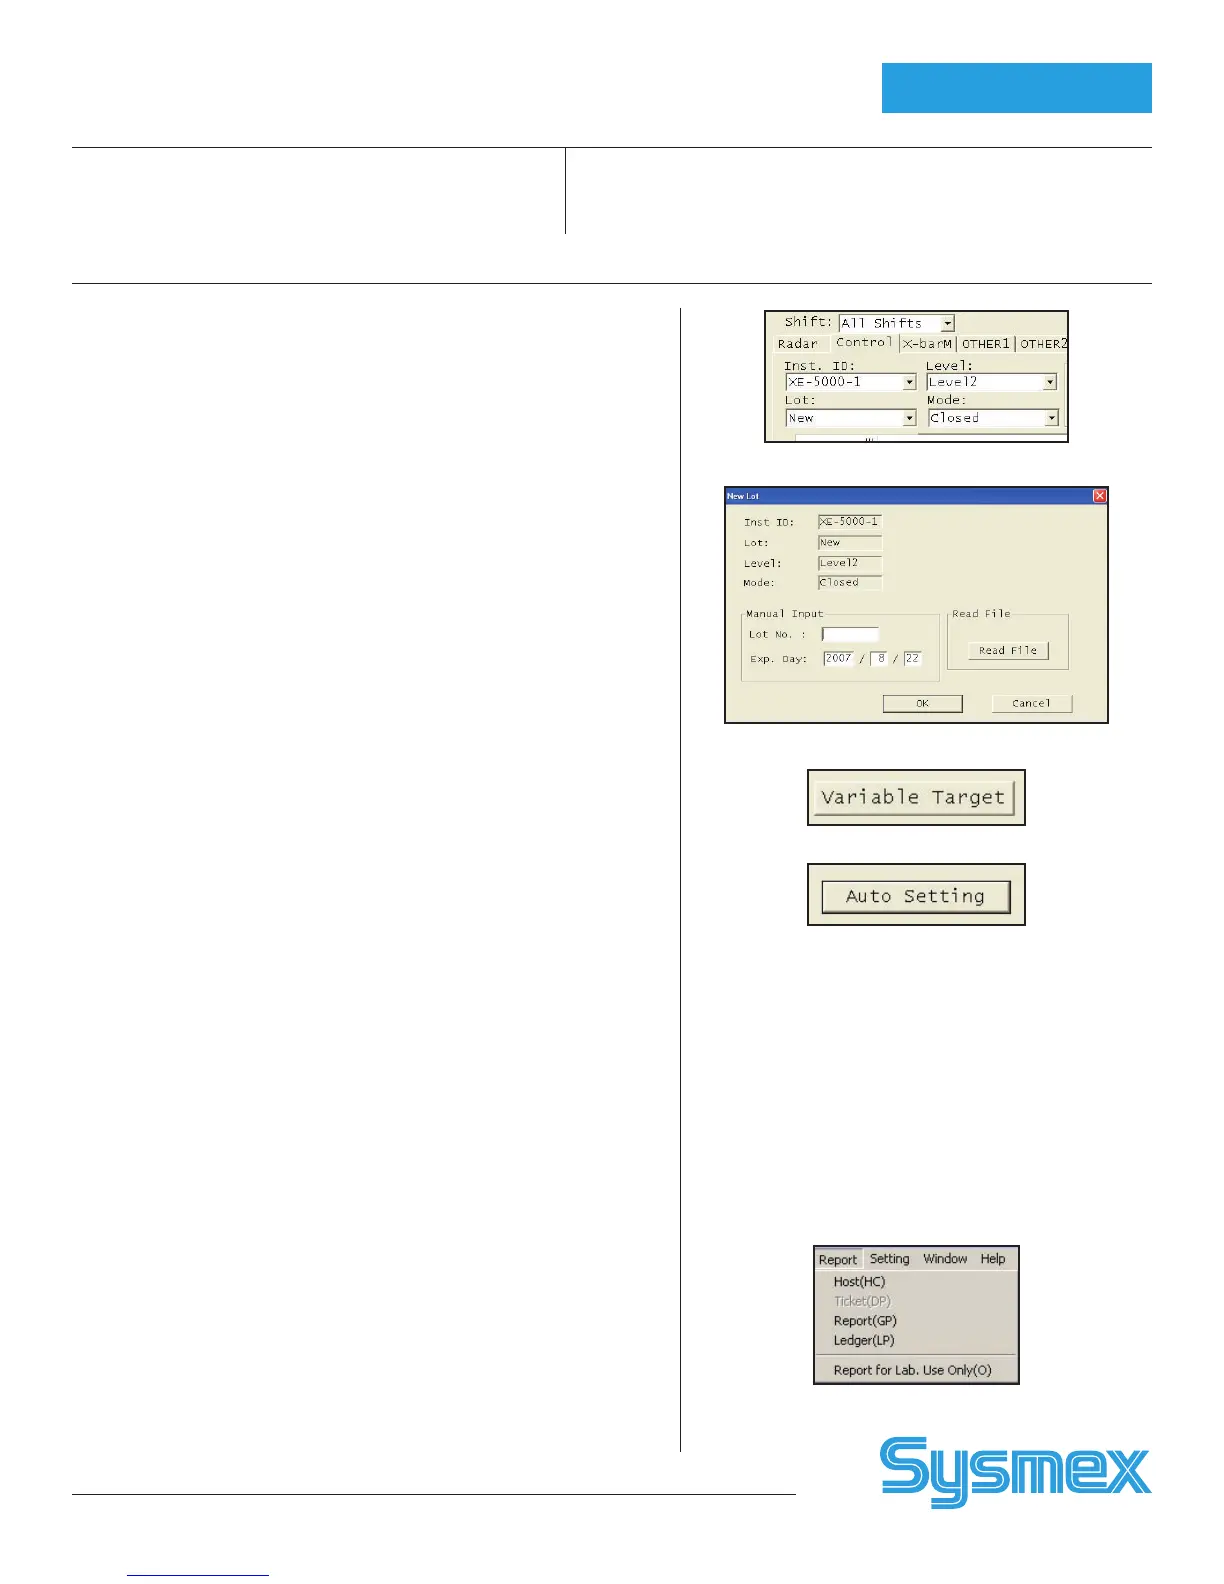
Input New Lot Number
1. Click Control tab. Select Level, Mode, and New lot.
2. Click Lot No. A box displays a window for lot information.
3. Input 8 digit lot number of new control. Click or tab to move cursor to
expiration date. Input date in Year/Month/Day order.
4. Click [OK] to save new lot. Verify new lot information is correct.
5. Lot number and date may only be edited while in NEW file.
To Set Variable Target
(Used to establish lab’s running mean for control)
1. Click QC icon. Choose Control tab. Select Level, Mode, and New lot.
QC chart is displayed.
2. Click [TARGET/LIMIT].
3. First parameter is highlighted. Click first parameter and drag cursor to
include all QC parameters.
4. Click [VARIABLE TARGET] and [OK].
To Autoset Target Values (setting mean value)
• Analyze New Lot at least10 times before auto setting target values
(preferably covering all shifts over 5 days).
• If desired, compare Current and New data before proceeding.
1. Click QC icon. Choose Control tab. Select Level, Mode, and Lot.
QC chart is displayed.
2. If using XE pro software, set range of QC data for calculating targets.
Click dark green line and drag line to left to include QC data or press
[CTRL] and [A] to select all data.
3. Observe right data column for Mean, SD, CV%.
4. Click [TARGET/LIMIT].
5. First parameter is highlighted. Click top of list of parameters and
drag cursor to include all QC parameters.
6. Click [AUTO SETTING]. Auto setting window is displayed.
7. Click [TARGET] and [OK]. Do not check limit. Observe target
column. Target values should now be displayed.
Erasing QC Data (DELETE)
1. On IPU, click QC icon. Choose Control tab. Select Lot, Level, and
Mode. QC chart is displayed.
2. Set range of QC data to delete. Click dark green line and drag line to last
set of data to delete. Click [DELETE DATA].
3. If undelete function is desired, click [UNDELETE]. This cancels the
previous Delete command.
Note: When exiting QC, a reminder displays that deleted data will be perma-
nently lost. Press YES to delete.
Printing QC Report and
Resending to LIS
1. On IPU, click QC icon. Click Control tab and select
Lot, Level, Mode. QC chart is displayed.
2. Click dark green line and drag line to include all QC
data or press [CTRL] and [A] to select all.
3. After selecting range, click [REPORT], [LEDGER
(LP)] to print QC data in line format.
4. After selecting range, click [REPORT], [GP] to print
QC Charts.
5. After selecting range, click [REPORT], [HC] to
transmit QC data to Host/LIS computer.
Report Menu
Level, Mode, Lot Boxes
Lot No screen
Variable Target button
Auto Set button
QC Setup