Do you have a question about the SYSMEX pocH-100i and is the answer not in the manual?
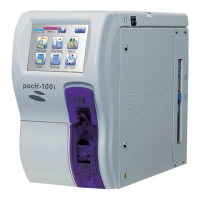
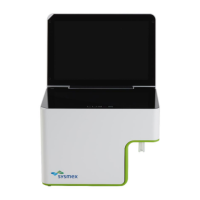
Provides a general overview of the analyzer's main components and their descriptions.
Details and labels the various parts and components of the pocH-100i analyzer.
Describes the purpose, methodology, storage, shelf life, and composition of reagents.
Presents detailed technical specifications and performance characteristics of the analyzer.
Lists key performance data including ambient conditions, dimensions, power, and analysis ranges.
Identifies potential sample conditions that may affect test results and cause interferences.
Guides the user through the initial setup and installation of the analyzer.
Lists all included parts to be checked before proceeding with instrument installation.
Details available adapters for different sample tube types, including product codes and colors.
Provides step-by-step instructions for loading paper into the instrument's printer.
Explains how to connect the reagent packs (pocH-pack 65/65XL) to the analyzer.
Describes the optional barcode reader setup and its specifications for sample identification.
Details the correct procedure for connecting the instrument's power cord.
Outlines the steps for turning on the instrument for the first time, including reagent loading.
Instructions for changing the instrument's display language from the default setting.
Procedure for setting the instrument's date and time for accurate analysis result identification.
Guidance on adjusting the LCD screen contrast for optimal viewing comfort.
Instructions for configuring the instrument for different sample collection tube types.
Explains the instrument's LCD screen layout, status indicators, and timer functions.
Describes the input method for numerical values using the instrument's keypad.
Details how to input alphabetic characters and symbols using the instrument's interface.
Covers essential pre-analysis checks, including power, paper, and instrument readiness.
Step-by-step guide for performing whole blood analysis using the close piercer method.
Step-by-step guide for performing whole blood analysis using the open pipette method.
Instructions for conducting analysis using pre-diluted blood samples.
Explains how to view analysis results, including abnormal flags and error indicators.
Details the meaning of histogram flags and suggested actions for repeat analysis.
Covers how to access, view, and manage stored analysis results on the instrument.
Procedure for printing stored analysis results from the instrument's memory.
Instructions for transmitting stored data to a connected host computer.
Details the correct sequence for shutting down the instrument to prevent damage.
Covers functions related to quality control, including chart display and data output.
Explains how to view and navigate the quality control chart display.
Instructions for printing control charts for all parameters or specific data points.
Procedure for sending quality control data to a connected host computer.
How to delete quality control data stored on the instrument.
Guides users through the steps of performing quality control analysis on the instrument.
Details how to enter control blood lot ID, expiration date, target values, and limits.
Describes how to configure automatic calculation of QC parameters like target and limits.
Provides instructions on properly preparing control blood samples before analysis.
Step-by-step guide for performing Levey-Jennings quality control with close piercer.
Step-by-step guide for performing Levey-Jennings quality control with open pipette.
Step-by-step guide for performing X Method quality control with close piercer.
Step-by-step guide for performing X Method quality control with open pipette.
Details routine cleaning procedures for maintaining instrument hygiene and performance.
Instructions for cleaning the exterior surfaces and touch panel of the analyzer.
Explains how to check operational counters, program version, and sensor status.
Procedure for safely shutting down the instrument to remove deposits in tubing.
Guides on cleaning the transducer using CELLCLEAN, performed periodically.
Instructions for cleaning the waste chamber and tubing with CELLCLEAN.
Procedure for cleaning the sample tube adapter if sample has spilled into it.
Details how to execute an auto rinse cycle to clean internal tubings and drain waste.
Steps to resolve aperture clog errors, including automatic and manual cleaning methods.
Instructions for safely emptying and disposing of the waste bottle contents.
Procedure for draining reagents before instrument relocation or shipping.
Guide on calibrating the LCD screen if panel operations are not properly aligned.
Instructions for replacing the thermal printer paper roll in the instrument.
Step-by-step process for replacing the reagent packs (pocH-pack 65/65XL).
Covers maintenance procedures that require qualified personnel.
Manual cleaning procedure for the TD chamber aperture when automated methods fail.
Instructions for safely replacing system fuses in the analyzer.
Guides on configuring instrument settings based on personal or laboratory requirements.
Details how to modify various instrument settings from the factory defaults.
Lists all configurable parameters and their available options for the instrument.
Covers system-level settings like units, language, parameter names, and alarm volume.
Procedure for setting the instrument's date and time, including format options.
Allows setting lower and upper limits for patient results to flag abnormal values.
Configuration options for quality control methods and data output methods.
Enables setting a unique name for identifying the instrument when connected to a host.
Configuration for data output to a host computer, including connection and communication parameters.
Options for configuring the instrument's built-in printer, including print format and header lines.
Details how to configure LAN settings for communication with a host computer.
Procedure for setting a password to prevent unauthorized changes to settings or calibration.
Function to print a list of the current instrument settings.
Guides on calibrating the instrument to ensure accurate HGB and HCT measurements.
Explains when instrument calibration is necessary and the recommended measuring methods.
Step-by-step instructions for performing automatic calibration using calibration samples.
Details the formula and process for manually calculating and entering calibration values.
How to print an overview of the five most recent calibration results.
Addresses common instrument startup issues and general error conditions.
Explains how to interpret and respond to error dialogs, including using the help function.
Provides a comprehensive list of error messages, their possible causes, and recommended actions.
Instructions for printing the instrument's error log for diagnostic purposes.
Contains crucial safety guidelines for operating and maintaining the instrument.
Provides fundamental safety precautions and recommendations for instrument use.
Outlines necessary precautions and training for personnel handling the instrument.
Details risks associated with electricity, including shock and fire hazards.
Information on biohazard risks, protective measures, and decontamination procedures.
Guidelines for safe handling, storage, and use of chemical reagents.
Identifies and explains the meaning of various warning labels found on the instrument.
States the instrument's compliance with EMC standards for interference and susceptibility.
Provides instructions for the proper disposal of instrument components and waste.
Recommendations for disposing of the analyzer and its accessories, emphasizing recycling.
Guidelines for the safe disposal of expired or unused chemical reagents.
Procedures for safely handling and disposing of waste fluids from the instrument.
| Throughput | 60 samples/hour |
|---|---|
| Power Supply | AC 100-240 V, 50/60 Hz |
| Parameters | WBC, RBC, HGB, HCT, PLT |
| Display | LCD |
| Sample Type | Whole blood |