[6.3] Modifications of Sampling Tubes
There may be applications where duct widths are not what is specified for
the installation. In such cases, it is permissible to modify a sampling tube
that is longer than necessary to span the duct width.
Use a 0.193-inch diameter (#10) drill and add the appropriate number of
holes so that the total number of holes exposed to the air flow in the duct is
10 to 12. Space the additional holes as evenly as possible over the length of
the tube.
NOTE: This procedure should only be used as a temporary fix and is not
intended as a substitute for ordering the correct length tubes.
[6.4] Remote Sampling Tube Installation
The detector arrangement can also incorporate remote mounting of the
sampling tube and/or exhaust tube. In this case both the detector, sam-
pling tube and exhaust tube (if included) should be rigidly mounted to
withstand the pressure and vibrations caused by the air velocity. The loca-
tion of the detector’s sampling tube should be such that there is uniform
airflow in the cross section area.
The pressure differential across the sampling and exhaust ports in the
detector housing shall be verified to be between .0015 and 1.2 inches of
water. Do so by measuring the pressure difference between the inlet and
outlet ports on the detector housing using a manometer as described in
Section 8.2.1.
[7] Field Wiring
Installation Guidelines
All wiring must be installed in compliance with the National Electrical
Code and the local codes having jurisdiction. Proper wire gauges should
be used. The conductors used to connect smoke detectors to control panels
and accessory devices should be color-coded to prevent wiring mistakes.
Improper connections can prevent a system from responding properly in
the event of a fire.
For signal wiring, (wiring between interconnected detectors or from detec-
tors to auxiliary devices), it is recommended that single conductor wire be
no smaller than 18 gauge. The duct smoke detector terminals accommo-
date wire sizes up to 12 gauge.
Smoke detectors and alarm system control panels have specifications for
allowable loop resistance. Consult the control panel manufacturer’s speci-
fications for the total loop resistance allowed for the particular control
panel being used before wiring the detector loop.
[7.1] Wiring Instructions
The D4120 and D4P120 detectors are designed for easy wiring. The hous-
ing provides a terminal strip with clamping plates. The D4S housing pro-
vides 4 wiring terminals with clamping plates. Wiring connections are
made by sliding the bare end of the wire under the plate, and tightening
the clamping plate screw. See Figure 14 on page 8 for system wiring.
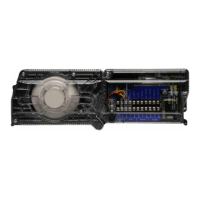
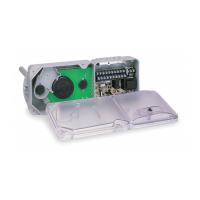
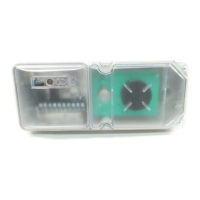
[7.2] Sensor 2 Installation/Wiring
The power board is capable of controlling a second housed sensor. The
second sensor, model D4S, can be wired to the power board per the fol-
lowing:
1. Connect wires to the four wire terminals in the corner of the D4S sen-
sor housing designated as Tamper (Y,Y), +R, and –B. Route wires
through the conduit openings in the sensor housing and D4120 power
board housing.
2. Connect the opposing ends of the wires to the terminal connections
marked “Sensor 2” on the Power board. See Figure 13 for reference.
Ensure that wires are connected to the appropriate terminal locations.
A No. 0 or 1 phillips screwdriver should be used for terminal connec-
tion. The tamper terminals are not polarity sensitive.
3. Adjust the middle dip switch on the power board to indicate (2) sen-
sors as shown in Figure 13.
[7.3] Perform Detector Check
1. Perform STANDBY AND TROUBLE TEST per Section [8.1].
2. Perform MAGNET TEST per Section [8.1.1]. The RTS451 test in Section
[8.1.2] may substitute for this requirement.
3. Perform AIR FLOW TEST per Section [8.2.1].
4. Perform SMOKE RESPONSE TEST per Section [8.2.3].
[7.4] Field Selectable Settings
There is a three position dip switch located in a corner of the power board
for field selectable settings. See Figure 13 for reference.
Refer to Table 3. Prior to installing cover, check settings for shutdown, #
of sensors and tamper delay.
[7.5] Install The Cover
Install the covers making sure that the cover fits into the base groove.
Tighten the seven screws that are captured in the covers.
[8] Duct Smoke Detector Test & Maintenance Procedures
Test and maintain duct detectors as recommended in NFPA 72. The tests
contained in this manual were devised to assist maintenance personnel in
verification of proper detector operation.
Before conducting these tests, notify the proper authorities that the smoke
detection system will be temporarily out of service. Disable the zone or
system under test to prevent unwanted alarms.
[8.1] Standby, Trouble and Alarm Tests
Refer to Table 1 on page 1 for detector status indication. The use of a
remote accessory for visible indication of power and alarm is recom-
mended.
[8.1.1] Alarm Tests
1a. Test/Reset Button - Press and hold the test button located on the power
board cover for at least 2 seconds.
OR
1b. M02-04-00 Magnet Test - Place the painted surface of the magnet onto
the MAGNET TEST location on the sensor cover of unit (Figure 1)
2. The red alarm LED on the sensor and the power board should latch
on, as should any accessories (i.e. RA400Z, RTS451). Verify system
control panel alarm status and control panel execution of all intended
auxiliary functions (i.e fan shutdown, damper control, etc.).
3. The detector must be reset by the system control panel, front cover
Test/Reset button, or remote accessory.
4. To reset using the Test/Reset button on the power board cover simply
Press and release.
[8.1.2] RTS451/RTS451KEY Remote Test Station
The RTS451/RTS451KEY Remote Test Station facilitates test of the alarm
capability of the duct smoke detector as indicated in the RTS451/RTS-
451KEY manual. The D4120 duct smoke detector can be reset by the
RTS451/RTS451KEY. If a system control panel is used, the panel itself may
also require testing.
To install the RTS451/RTS451KEY, connect the device as shown in Figure
11 ; wire runs must be limited to 25 ohms or less per interconnecting wire.
[8.1.3] SSK451 Multi-Signaling Accessory
The SSK451 Multi-Signaling accessory combines a sounder feature with a
key activated test and reset function. Green, amber and red LEDs provide
SS-300-000 4 I56-2967-000R
Designation Options Factory Default Function
TRBL SHUTDN OFF/ON OFF
Shutdown on Trouble - When “ON”, auxillary relays will switch to shutdown fans, activate
dampers, etc. upon a trouble or sensor maintenance condition.
SENSORS 1/2 1
Number of Connected Sensors - When a second sensor is wired to the power board, switch
must be set to “2”.
MIN TMPR
DELAY
7/0 7
Cover Tamper Delay - Provides a 7 minute delay in sending a trouble condition upon cover
removal while service or maintenance is being performed. If set to “0”, an instantaneous
trouble condition will occur upon cover removal.
TABLE 3. Field Selectable Dip Switch Settings
 Loading...