H PISTON FILLERS/STUFFERS
EN-27
7.1 Cleaning the Meat Barrel Exterior & Lid
1) Use a sponge, hot water and a mild cleanser to clean the machine’s exterior.
2) Thoroughly clean the underside of the lid (especially the dough exit hole), the
nozzle(s) and the nozzle nut at the end of each workday. Clean the inside of the
nozzles with a round brush.
3) Rinse the lid bolt and bearing with hot water to remove any residue (salts, spices,
etc.) that could solidify and impede proper functioning of the lid.
4) The upper part of the black piston gasket should be cleaned daily following these
steps:
a. Open the lid completely and remove the green lid gasket.
b. Push the knee lever until the piston rises to its uppermost position. Part of
the black piston gasket will now be accessible at the top edge of the barrel.
c. Wipe the gasket thoroughly with a damp sponge or cloth.
Warning:
NEVER use a stream of water to clean
any part of the machine, especially the
air holes at the base of the barrel.
NEVER wet or dampen the electrical
components (switches, cables, etc.).
DO NOT use abrasive products that
may damage or remove warning
stickers and labels.
DO NOT close the lid without the green
gasket in place since doing so could
scratch the lid and clamp.
7.2 Cleaning the Piston & Barrel Interior
We recommend that you routinely follow these steps to clean the piston and barrel interior thoroughly.
1) Open the lid completely and remove the green lid gasket.
2) Push the knee lever until the piston rises to its topmost position.
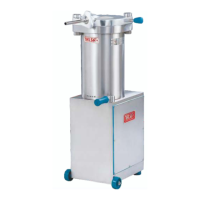
3) With the piston at its highest position, simultaneously push the knee lever and,
with the aid of the two pivots of the supplied wrench, unscrew (requires two turns)
the piston-locking bolt in the center of the piston (IMG. 17).
4) Screw the wrench completely into the piston hole. The piston will rise above the
rim of the barrel.
5) Pull the wrench up to remove the piston from the barrel (IMG. 18).
6) Unplug the machine.
7) Clean the barrel interior, DRY completely the bottom of the cylinder since residual
moisture could eventually lead to the formation of rust on the upper part of the
base
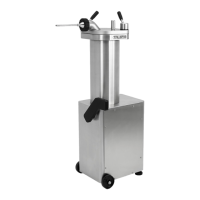
8) Clean the piston and the black piston gaskets (there may be one or two
depending on the model) with a damp sponge or cloth (IMG. 19 and IMG. 20).
9) To reduce piston noise during use, grease the piston gasket(s) with food fat or a
USDA approved shortening before reassembling the piston.
10) To reassemble the piston:
a. Make sure that the interior of barrel is completely dry.
b. Place the piston in the barrel and screw the piston-locking bolt tight, making
sure that the smaller gasket is properly placed.
c. Raise and lower the piston and tighten the piston locking bolt again. Verify
that the piston does not tilt while moving up or down.
d. Grease the threads of the piston-locking bolt before replacing it; this will
make future dismantling easier.
11) When the machine is not in use, leave the piston head at the bottom of cylinder.
This will keep the cylinder ram submerged in hydraulic oil and lengthen the life
of the ram and gaskets.
IMG. 17: Removing piston bolt
IMG. 19: Cleaning piston gaskets
IMG. 20: Cleaning the piston
www.talsaparts.com
www.davisonsbutcher.com