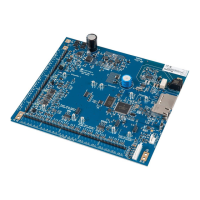
GND (x2). The board’s ground link must be removed (if fitted).
AC power input terminals. Details provided in Specifications. See
Power Input on page 15.
Earth terminal. Connect the power earth wire from the enclosure’s mains transformer to the
earth terminal. See System earthing in Appendix D: Cabling requirements.
Data cable shields can also be connected.
Battery 1 terminals. See Batteries on page 16.
Battery 2 terminals. See Batteries on page 16.
Auxiliary power output. See Auxiliary power terminals on page 18.
Siren Output. See Siren on page 19.
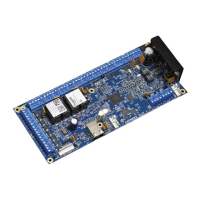
ChallengerPlus LAN interface
See: RS-485 Networks on page 20.
Appendix D: Cabling requirements
Tamper switch input.
Connect the TAMP T and TAMP C terminals to the panel tamper switch in the enclosure.
Short circuit for sealed, open circuit for unsealed. Must be sealed if not used.
Can only be used with normally closed contacts such as the panel tamper switches.
See enclosure manual for tamper switch details.
Relay and lock power connections for four doors.
Refer to Door lock relay wiring on page 25
Input terminals. See Inputs on page 25.
Bus 1 quick connect headers (x2).
See RS-485 buses on page 20.
Note: This connector is not a STU port
Bus 1 Connector
See RS-485 buses on page 20.
Four sets of Wiegand reader connections.
Ethernet port (Ethernet cable not supplied).
Bus 2 Connector
See RS-485 buses on page 20.
Bus 2 TERM link. See Terminating the RS-485 on page 24.
Bus 2 Tx LED. See LED indicators on page 29.
Bus 2 Rx LED. See LED indicators on page 29.
Ethernet 10/100 Mbps LED. See LED indicators on page 29.
Ethernet Link Active LED. See LED indicators on page 29.
ChallengerPlus LAN TERM link. See Terminating the RS-485 on page 24.
ChallengerPlus LAN Rx LED. See LED indicators on page 29.
ChallengerPlus LAN Tx LED. See LED indicators on page 29.