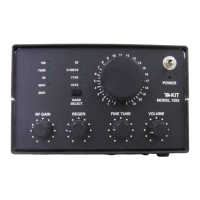
PHASE 7
Final Wiring, Connections, Mechanical Assembly
7-1. If you did not double-check all parts values, parts
orientation and solder connections as recommended after
completing each phase, NOW is most certainly the lime to do so!
We designed this receiver to be satisfying to build right the first
time, NOT to be taken apart repeatedly!
7-2. If you did not do so already, mount both "C" battery
holders to the battery shelf using four #4 self-tapping screws.
The battery holder snap connectors should line up with the two
big notches at one end of the shelf . The battery holders are on
the top of the shelf, and the mounting flange points down.
7.3. To obtain 12 volts DC, the use of 4 "C" cells in series
(6 volts) with an identical set of 4 "C" cells requires a correctly
polarized series connection between the two battery holders, as
explained in steps 7-4 through 7-7.
7-4. READ FIRST: Attach both battery snap connectors to the
matching terminals on the two battery holders. Note that a
BLACK wire of one connector is immediately across from the
RED wire of the other connector: soldering these two wires
together will place the two sets of 4 batteries in series tor 12
volts output. Proceed to Step 7-5.
7-5. Per Step 7-4, CUT the black and red wires nearest each
other from the two battery holders to about 1.5.
7-6. Strip 1/8" to 1/4" of insulation from both wires cut in
step 7-5, twist the bare conductors together and solder them.
Wrap a short piece of your own electrical tape around this solder
connection.
7-7. The remaining black (-) and red (+) wires from the
battery assembly are stripped, tinned and ready to use.. With 8
"C" batteries installed, the finished battery shelf assembly may
now serve as a 12VDC supply for any receiver tests prior to final
assembly.
7-8. Mount the DC power connector in the upper left corner
of the rear panel, using the #2-56 screws, nuts and lockwashers,
the smallest such hardware in your kit.
7-9. Prepare a 4.0" length of RED wire and solder one end to
the other pad in the "Power Switch" box outlined on the board.
(One such wire was installed in Step 1-29.)
1253 - 40
7-10. Prepare a 5.5'' length of RED wire and solder one end
to the { + } side of "Vcc Ext." (A black wire to ( - ) was installed in
Step 1-28.)
7-11. Prepare a 3.25" length of RED wire and solder one end
to the ( + ) side in the box marked "LED1 ."
7-12. Prepare a 3.25" length of BLACK wire and solder one
end to the ( - ) side in the box marked "LED1."
7-13. Secure the three wires from the Main Tuning control
with a cable tie about 1.25" from the control.
7-14. Inspect the entire circuit board for cold solder joints,
solder bridges, untrimmed wires, or scraps of wire lodged
between solder connections.
7-15. Solder the RED wire from the battery shelf assembly to
the ( + ) side of the "Vcc Batt" box outlined on the board.
7-16. Solder the BLACK wire from the battery shelf assembly
to the ( - ) side of the "Vcc Batt" box outlined on the board.
7-17. Set the bandswitch pushbutton into its rectangular hole
on the front panel. If you find it helpful temporarily hold it in
place with a small piece of tape.
7-18. Loosen the two screws holding the bandswitch board
to the subpanel, then set the board/subpanel assembly inside the
chassis/panel. Adjust the bandswitch board until all 9 LED's fit
neatly into their front panel holes. Then tighten both mounting
screws of the bandswitch board.
7-19. Notice the four slots on the bottom of the chassis:
these are designed to permit sliding of the board/subpanel
assembly for a perfect fit of the LED-9, etc., before final
tightening of screws.
7-20. Loosely mount the rear of the receiver to the chassis
using the two 1/2” #4-40 screws, the two spacers between the
chassis and the board, and #4 lock washers and #4-40 hex nuts
on the top side of the board.
7-21. Loosely mount the subpanel to the chassis using two
3/8" #4-40 screws through the chassis and subpanel, with #4
lock washers and #4-40 hex nuts on the top side subpanel
flange.
1253 - 41