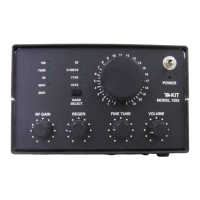
PHASE 2
DC Voltage Control and Regulation
2-1. Install diode D11, type 1N4002, making sure that its
banded cathode end is oriented as outlined on the board.
2-2. Install diode D12, type 1N4002, per step 2-1.
2-3. Install resistor R15, 3.3K (orange-orange-red).
2-4. Gently loop the 4 wires installed for the Phase 1 audio
test around the body of the R17 volume control so that their
connections will not be weakened during further assembly.
Install the following resistors:
2-5. Resistor R26, 560 ohms (green-blue-brown).
2-6. Resistor R27, 4.7K (yellow-violet-red).
2-7. Resistor R24, 22K (red-red-orange).
2-8. Resistor R9, 10K (brown-black-orange).
2-9. Referring back to Step 1-14 as needed, install Q5, the
other MPS6514 transistor supplied with your kit.
2-10. Review Step 1-15 regarding the correct installation of
ELECTROLYTIC capacitors, noting that the ( + ) side for each
capacitor is clearly marked on the board.
2-11. Install C33, 33 μF electrolytic, per Steps 2-10, 1-15.
2-12. Install C32, 100 μF electrolytic, per Steps 2-10, 1-15.
2-13. Install C29, 10 μF electrolytic, per Steps 2-10, 1-15.
2-14. Examine U2, the 3 pin type 7805 voltage regulator. It
must be installed with its imprinted side facing R27. The line
within its board outline designates the bare metal heatsink side.
2-15. Install voltage regulator U2 per step 2-14.
2-16. Referring to Step 1-22 as needed, install a bare wire
jumper at "JUMPER" near "R20A." (NOTE: R20A, R20B, and
R20C are the connecting points for the main tuning control.)
2-17. Double-check your work in Steps 2-1 to 2-16.
This completes the wiring of the DC voltage regulation circuitry.
While the output of U2 could be checked for 8 volts, no testing
is necessary at this point.
1253 - 22
PHASE 3
RF Amplifier, Regenerative Detector, Varactor Tuning
3-1. Varactor diode D10 is easy to identify; it looks like a
transistor, but with only two leads, and is clearly stamped
MV209. Before soldering D10, make sure its flat side is aligned
just like the board outline and that its body is snugly against the
top of the board.
3-2. Install Transistor Q1, FET type J310. Before soldering,
be sure that its flat side faces C2 as outlined on the board. Also,
before soldering, make Sure Q1's leads are pushed into the board
holes as far as "possible, placing the transistor's body as close to
the board as reasonably possible.
3-3. Install transistor Q2, FET type J310, per step 3-2.
3-4. Install transistor Q3, FET type J310, per step 3-2.
3-5. Referring back to step 1-15 as needed, install C5, a
1 μF electrolytic capacitor, correctly aligning its (+) side.
3-6. Install 1 μF electrolytic C31 per Step 3-5.
3-7. Press R6, 100K regeneration trimmer pot, into its
position. The preformed "legs" lock it into position for easy
soldering. Do NOT try to jam the trimmer's body flush against
the board. Solder all three legs.
As you did in Phases 1 and 2, be sure to correctly identify the
following resistors before soldering. Install the following:
3-8. Resistor R3, 10 ohms (brown-black-black).
3-9. Resistor R7, 1K (brown-black-red).
3-10. Resistor R25, 1.5K, (brown-green-red).
3-11 . Resistor R8, 470 (yellow-violet-brown).
3-12. Resistor R2, 680, (blue-gray-brown).
3-13. Resistor R19, 10K (brown-black-orange).
3-14. Resistor R4, 1 megohm (brown-black-green).
3-15. Resistor R22, also 1 megohm.
3-16. Set aside the 9 .01 1tF mylar capacitors to be used for
C20-C27 in Phase 6. These capacitors are marked 103 and are
easily recognized by their dark, shiny rectangular bodies.
1253 - 23