Product Image
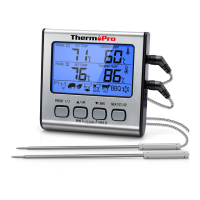
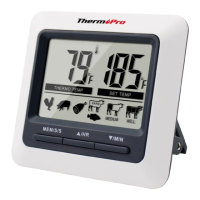
PROBE
SET TEMP
THERMO TEMP
1
PROBE
SET TEMP
THERMO TEMP
2
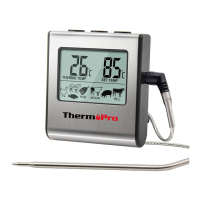
PROBE
1
MEDIUM
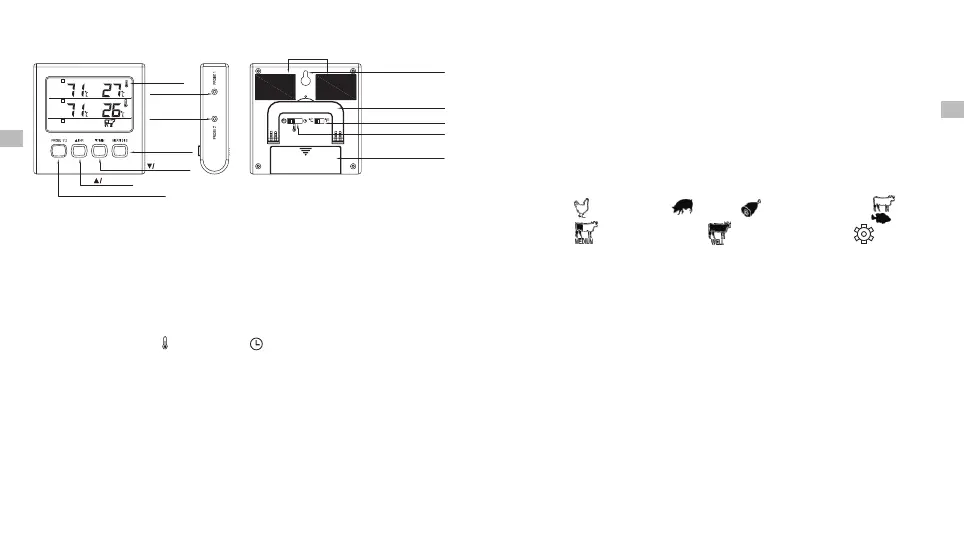
LCD Screen
Probe 1 Socket
Probe 2 Socket
MEAT/START/
STOP Button
MIN Button
HR Button
PROBE 1&2 Selection Button
Magnet
Hanging wall hole
Flip-out Counter Top Stand
° °C/ F Selector
Mode Seletor
Battery Compartment
Keys Definition
1. Probe 1/2 Socket: Insert Probe 1 and/or 2 into the corresponding socket
to measure meat temperatures.
2. LCD Screen: Displays temperatures, count up or count down timer and
other information.
3. Mode Selector (on the back of the unit): Move the position of the selector
to select Cook mode , Timer mode or power off the device.
4. C/ F Selector (on the back of the unit): Move the position of the selector
to select the temperature display unit in °C or °F.
° °
5. Probe1/2 Button: In Cook mode, press the PROBE 1/2 button to select
and enter Probe 1 or Probe 2 setting mode. The last row of the screen will
display the meat type for the corresponding probe. In timer mode, press
the PROBE1/2 button to toggle the display of the Probe 1 or 2 temperatures
in the first row of the screen.
6. /HR Button: In Cook mode, press ▲ to increase your desired cooking ▲
temperature setting if you do not want to use the pre-programmed meat
temperature setting. In Timer mode, press this button to set count down
hours. To clear count down timer setting, press the HR and MIN buttons
at the same time. Press and hold the button for fast setting.
7. /MIN Button: In Cook mode, press ▼ to decrease your desired cooking ▼
temperature setting if you do not want to use the pre-programmed meat
temperature setting. In Timer mode, press this button to set count down
minutes. To clear count down timer setting, press the HR and MIN buttons
at the same time. Press and hold the button for fast setting.
8. MEAT/S/S Button: In Cook mode, press this button to select the meat type:
Poultry ( ), Pork/Veal ( ), Ham ( ), Beef Rare/Fish ( ), Beef
( ), Beef Well Done ( ), and User-Defined ( ). The pre-Medium
doneness temperature setting for each meat type is programmed
USDA (U.S. Department of Agriculture). In Timer mode, recommended by
button to begin the count-down or count-up timer. Press the press the S/S
pause or restart the timer.S/S button to
9. Flip-out Counter Top Stand: Allows user to place device on counter for
easy viewing.
-19-
-20-
10. Magnet: Allows user to stick device to a metal surface. For example, a
refrigerator.
EN
EN
12. Backlight: Press any key to activate the back light of the screen. If there
is no key operation for 10 seconds, the backlight will be automatically
turned off. When there is alarm sound, the backlight will be turned on and
flashing.
11. Battery Compartment: Hold one AAA battery.
 Loading...