Do you have a question about the ThermoPro Lightning TP-622 and is the answer not in the manual?
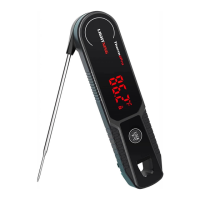
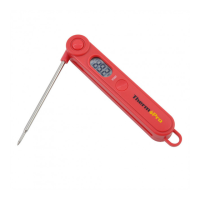
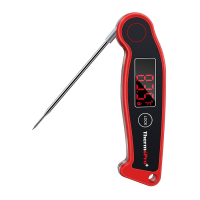
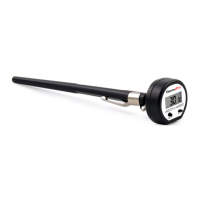
Highlights the high-precision, 1-second readout probe and 180° auto-rotating display for versatile use.
Covers motion-sensing sleep/wake modes, 90-second auto-off, and IP65 waterproof rating for convenience and durability.
Notes the presence of a calibration function for ensuring measurement accuracy over time.
Lists the items included with the thermometer: unit, screwdriver, AAA battery, and user manual.
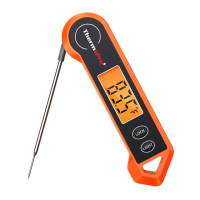
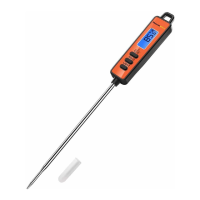
Identifies key parts of the thermometer: LED Display, LOCK/°F/°C button, probe, battery compartment, and magnet.
Details initial steps: inserting battery, washing the probe, and reading all instructions before use.
Provides steps for turning on/off, switching units, inserting probe, waiting for stabilization, and locking readings.
Guides users through recalibrating the thermometer using an ice-water mixture for accuracy.
Explains how to revert the thermometer to its default calibration settings.
Offers advice on probe cooling, cleaning between readings, usage limitations, and accurate meat temperature measurement.
Details how to clean and maintain the thermometer, including warnings about hot surfaces and extreme temperatures.
Alerts users with artificial cardiac pacemakers about potential magnetic interference.
Explains the meaning of the dustbin symbol and proper disposal of electrical equipment and batteries.
Outlines the ten-year limited warranty and how to contact Customer Service for repairs.
Provides contact information (phone, email) and operating hours for customer support.
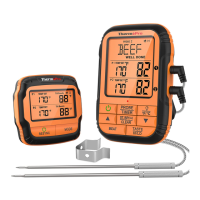
The ThermoPro Digital Instant Read Thermocouple Thermometer is a sophisticated tool designed to help users achieve precise temperature readings for various food items, ensuring professional cooking results. This device is engineered with a focus on speed, accuracy, and user convenience, making it suitable for both novice and experienced cooks.
At its core, the thermometer's primary function is to measure the internal temperature of food with exceptional speed and accuracy. It utilizes a super-fast thermocouple probe, a high-precision sensor capable of delivering a temperature readout within just one second. This rapid response time is crucial for preventing overcooking or undercooking, allowing users to make timely adjustments during the cooking process. The device features an auto-rotating LED display, which automatically adjusts its orientation by 180 degrees, ensuring that the temperature reading is always upright and easily viewable from any angle, regardless of how the thermometer is held.
The thermometer also incorporates intelligent power management features. It includes motion-sensing sleep and wake modes; if the probe is not folded in and no button has been pressed for 90 seconds, the device will automatically turn off to conserve battery life. Conversely, if the thermometer is in sleep mode with the probe unfolded and is then picked up or moved, it will automatically power on, ready for immediate use. Additionally, it has a 90-second auto-off feature when the probe is not folded in and inactive. The device is waterproof with an IP65 rating, enhancing its durability and ease of cleaning.
A key feature is its calibration function. While the thermometer is factory-calibrated for precision, users have the option to re-calibrate it if they believe the temperature readings are no longer accurate after extended use. This process involves immersing the probe in an ice/water mixture and following specific steps to adjust the calibration. There is also an undo-calibration function, allowing users to revert to the default factory settings if needed. The device supports switching between Celsius and Fahrenheit temperature units, catering to different user preferences. A "LOCK" function allows users to hold the current temperature reading on the display for 5 seconds, which is useful for noting down temperatures without having to keep the probe in the food.
Operating the ThermoPro thermometer is straightforward. To turn it on, simply pull the stainless steel probe away from the body of the thermometer. Folding the probe back into the body will turn the device off. Users can easily switch between Celsius and Fahrenheit by pressing and holding the LOCK/°F/°C button for 3 seconds; the selected unit will be remembered for future use. When measuring food temperature, the tip of the probe should be inserted into the food, and the display will show the internal temperature once it stabilizes. The 180° global viewing angle of the display ensures readability from any position.
For optimal accuracy, it is recommended to insert the probe into the thickest available portion of the meat, avoiding bones or heavy fat areas, as these can affect readings. If the tip touches bone or fat, or if it's not deep enough, taking a second reading is advised. The thermometer is designed for temporary, hand-held use and should not be left in an oven or in extremely hot foods or liquids (over 572°F) for more than 1 minute.
The device is powered by a single AAA battery, which is inserted with correct polarity. A built-in magnet allows for convenient storage, enabling users to easily attach the thermometer to a refrigerator or any other metal surface, keeping it within reach.
Proper maintenance ensures the longevity and continued accuracy of the ThermoPro thermometer. Before first use, the probe tip should be washed with a warm soapy sponge or cloth, then rinsed and dried. The device is designed to be washed under running water without fear, thanks to its waterproof design.
After each use, it is important to wash the thermometer under running water. The probe tip should be wiped clean with a damp soapy cloth or sponge and then dried. It is crucial not to place the unit in a dishwasher or immerse it completely in any liquid, as this could damage electronic parts. Users should also avoid touching the stainless steel portion of the thermometer during or immediately after measuring high temperatures, as it will be very hot.
To prevent damage to electronic parts and plastics, the thermometer should not be exposed to extreme high or low temperatures. It should also not be kept inserted in food during cooking. If the thermometer is to be stored for more than four months, the battery should be removed to prevent leakage and damage to the unit.
For users with artificial cardiac pacemakers, a warning is provided: the magnet installed inside the device may impact the functionality of their pacemaker. It is recommended that such users maintain a distance of at least 1 foot (0.3 meters) from the device.
Regarding disposal, the product is marked with a "Dustbin" symbol, indicating that electrical equipment should not be disposed of with domestic waste. Instead, it should be returned to designated collection points for recycling, contributing to environmental protection and the reutilisation of electrical and electronic equipment. Batteries, too, must be removed from the appliance and disposed of at appropriate collection points, as they contain hazardous substances like lead, cadmium, mercury, and lithium.
| Accuracy | ±0.9°F (±0.5°C) |
|---|---|
| Resolution | 0.1°F/°C |
| Display | Backlit LCD |
| Calibration | Yes |
| Type | Instant Read Thermometer |
| Temperature Range | -58°F to 572°F (-50°C ~ 300°C) |
| Battery | CR2032 button cell |
| Auto Shut-off | Yes (10 minutes) |
| Probe Length | 3.9 inches |
| Waterproof | IP65 |
| Units | °F / °C Selectable |