Diaphragm Cleaning and Replacement
Your Thinklabs One Digital Stethoscope has a patented Thinklabs Electromagnetic
Diaphragm. It operates on an elegantly simple principle of physics - a large
electric field exists between the back of the diaphragm and a conductive plate
behind the diaphragm. (Note that there is NO electric field outside your One
stethoscope.) This is a robust system and the diaphragm is strong and not easily
damaged. What is important is to keep your One stethoscope reasonably clean
and dust-free - good practice for health reasons anyway. Read below, but also
see the related section on Cleaning Inside your stethoscope.
Cleaning Outside - Wipe any external part of your Thinklabs One Digital
Stethoscope with alcohol wipes. The diaphragm can be cleaned with other
cleaning agents, but avoid allowing liquids to leak into the stethoscope. You can
also unscrew the diaphragm ring to clean inside the stethoscope and in more
inaccessible places that might need cleaning from time to time.
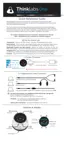
Removing and Cleaning - Unscrew the diaphragm ring (counter-clockwise when
looking at the diaphragm). You can clean both sides of the diaphragm with
alcohol. Make sure that the inside of the diaphragm does not remain with any oily
or other residue. It's important that the inside surface be clean and free of any
surface grease or other chemicals to operate well.
Attaching the Diaphragm - VERY IMPORTANT - When you replace the
diaphragm and screw on the diaphragm ring (clockwise), make absolutely sure
that you have it on straight. It's a good idea to turn it COUNTER-clockwise until
you feel it align, and then GENTLY screw it clockwise. If it feels like it's not
screwing on cleanly, start again. The reason is that the thread is intentionally
quite soft to keep the ring on, and can be easily threaded. Screw until the
diaphragm is in place and doesn't rotate freely, but DO NOT OVERTIGHTEN - firm,
not tight!
23