Motorized Filter Wheel Chapter 6: Troubleshooting and Maintenance
Rev H, October 2, 2014 Page 14
Changing Filter Wheel Types
6.2.
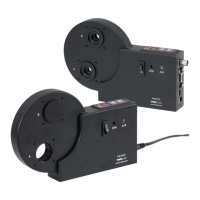
When changing filter wheel types (i.e. from a 6- to 12-position wheel), the unit will need to be set to a mode that
will correctly interpret the correct position of the wheel. To convert the unit from 6-position wheel operation to 12-
position wheel operation, follow the steps below (process is similar for the other way around):
1. Unplug the power from the unit
2. Unscrew the thumbscrew and remove housing
3. Remove the 6-position wheel and insert the 12-position wheel
4. Reinstall the housing and secure with the thumbscrew
5. Plug the power cable back into the unit
6. Turn on the unit and select a position for the wheel other than 6 or 12
7. Hold down both arrow buttons until the display shown 6 or 12. This means that the unit is in the
mode select menu.
8. The down arrow will then select the 6-position and the up arrow will select the 12-position. Press the up
arrow button and make sure the display shows 12.
9. Hold down both arrow buttons until the display shows a different number (~3 s)
10. The unit is now able to operate a 12-position wheel
Error Codes & Troubleshooting
6.3.
The following table describes some typical problems that may be encountered while using the FW102C or
FW212C and possible solutions to these problems.
Problem Solution
Unit does not turn on when switching
the power switch to the ON position.
1. Make sure the AC line cord is fully inserted into the AC input
receptacle and plugged into an outlet providing 100 to 240 VAC.
I can’t connect to the FW102C/FW212C
over the USB port.
1. Make sure the unit is turned on prior to connecting the USB.
2. Power off unit, remove AC cord, remove the USB cable,
reattach AC cord, power on unit and reattach the USB cable.
3. Make sure USB drivers are installed.
Error Code “E#”
1. Make sure the filter wheel is installed correctly, that the housing
is seated correctly, and the thumbscrew is secure.
2. Remove the housing cover and filter wheel use compressed air
to clear any dust or debris from the inside of the housing and
green circuit board. If dust or debris blocks the sensors, this will
result in erroneous filter wheel position movements or may
cause the unit to seize.
3. Remove and inspect the blunt crenulated patterns cut into the
inner rim of the wheel (opposite side of engraving). If one or
more are bent or broken off, the sensors will be unable to read
the correct position and the wheel will need to be replaced.
 Loading...