Do you have a question about the Topcon Maestro2 and is the answer not in the manual?
Register new patient or select existing patient via Maestro Desktop.
Choose scan mode and eyes on Maestro touch screen for preferred capture.
Manually align pupils and initiate scan capture when auto-alignment fails.
Review scan quality, handle errors, and proceed to next eye or export.
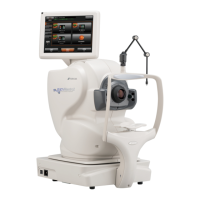
This document outlines the procedure for registering patients and capturing scans using the Maestro2 device, integrated with IMAGEnet6 software. It covers the workflow from patient registration to scan acquisition and review, providing step-by-step instructions for both new and existing patients.
The Maestro2 is an ophthalmic imaging device designed for capturing high-resolution scans of the eye, primarily for diagnostic purposes related to conditions like glaucoma and macular diseases. It integrates with IMAGEnet6, a software platform that manages patient data, scan acquisition, and image review. The device supports various scan modes, including 3D Wide, and offers both automatic and manual alignment capabilities to ensure optimal image capture.
Patient Registration and Selection: The process begins by either registering a new patient or selecting an existing one from the IMAGEnet6 main screen. To register a new patient, users navigate to the "Basic" tab on the PC, enter the Patient ID, and press Enter. If the Patient ID is new to the system, users will be prompted to enter the patient's first name, last name, birthday, and Patient ID before pressing "Register." For existing patients, after entering the Patient ID, their data will appear, and users can select the patient to proceed.
Scan Selection and Alignment: Once a patient is selected, the next step involves choosing the preferred scan type from the "Default" tab on the Maestro Touch Screen. The default setting is "OU (R/L)," which means the device will scan the right eye (OD (R)) first, followed by the left eye (OS (L)) automatically.
Patient Positioning and Centering: Accurate patient positioning is crucial for successful image capture. The first step involves adjusting the patient's chin rest up or down to ensure the pupil is positioned between the dotted blue lines displayed on the screen. Following this, the user touches the center of the pupil on the screen to center it within a blue box.
Initiating Capture: After proper alignment, the "Capture Start" button is pressed. At this point, the patient is instructed to look at the center of a green target, blink, and then stare wide. The device automatically aligns the pupil.
Special Considerations for 3D Wide Scans: When performing a "3D Wide" scan, the green fixation target will appear on the opposite side of the eye being scanned. For instance, for the right eye (OD (R)), the green target will be slightly to the patient's left, and for the left eye (OS (L)), it will be slightly to the patient's right.
Manual Alignment (if needed): If the pupils do not automatically align, users can press "Manual Mode" on the touch screen. They then tap on both pupils displayed on the screen to manually align them before pressing "Capture Start."
During Scan Acquisition: Once "Capture Start" is initiated, a countdown appears at the bottom of the screen. The patient is again instructed to blink, look at the center of the green target, and stare wide. Around the 1-second mark of the countdown, they are reminded to hold their eyes open and continue looking at the green target. A clicking sound and a flash will indicate the completion of the scan.
Reviewing and Managing Scans: After the scan is completed, if both the scan and photo are of good quality, the user presses "OK" to proceed with scanning the other eye. If there were issues such as a blink (indicated by black lines through the OCT grey image on the left of the touch panel) or a fixation error, the "Eraser" button is used to delete the scan and repeat the process.
Post-Capture Processing: Upon successful completion of a scan, a blue "P" thumbnail icon will appear at the bottom of the computer screen. This signifies that the data has been processed and is ready for viewing in IMAGEnet6.
Exporting and Reviewing Reports: Finally, users can export reports and review the captured scans using the IMAGEnet6 software.
The provided document does not explicitly detail maintenance features for the Maestro2 device. However, based on the nature of medical imaging equipment, general maintenance practices would typically include:
The document focuses primarily on operational procedures, implying that detailed maintenance instructions would be found in a separate, comprehensive user manual or service guide.
| Manufacturer | Topcon |
|---|---|
| Model | Maestro2 |
| Software | IMAGEnet 6 |
| OCT Technology | Spectral Domain OCT |
| OCT Axial Resolution | 5 μm (in tissue) |
| Lateral Resolution | 20 μm |
| Scan Depth | 2.3 mm (in tissue) |
| Fundus Image Resolution | 12 Megapixels |
| Pupil Diameter (Minimum) | 3 mm |
| Fixation Target | Internal |
| Applications | Glaucoma |
| Power Requirements | 100-240V AC, 50/60Hz |
| Connectivity | USB |