55
SOLENOID VALVE:
IMPORTANT: Before performing any
maintenance, make sure electrical power to the
coil is shut off and line pressure is relieved.
Keep all electrical connections and coil
clean at all times.
A protective coating may be applied to the
completed electrical connections if desired.
Do not apply lubricating oils or other
petroleum products to the valves, as this may
cause swelling of the rubber parts. Also, check
with the chemical manufacturer to be sure
chemicals being used are compatible with the
valve components.
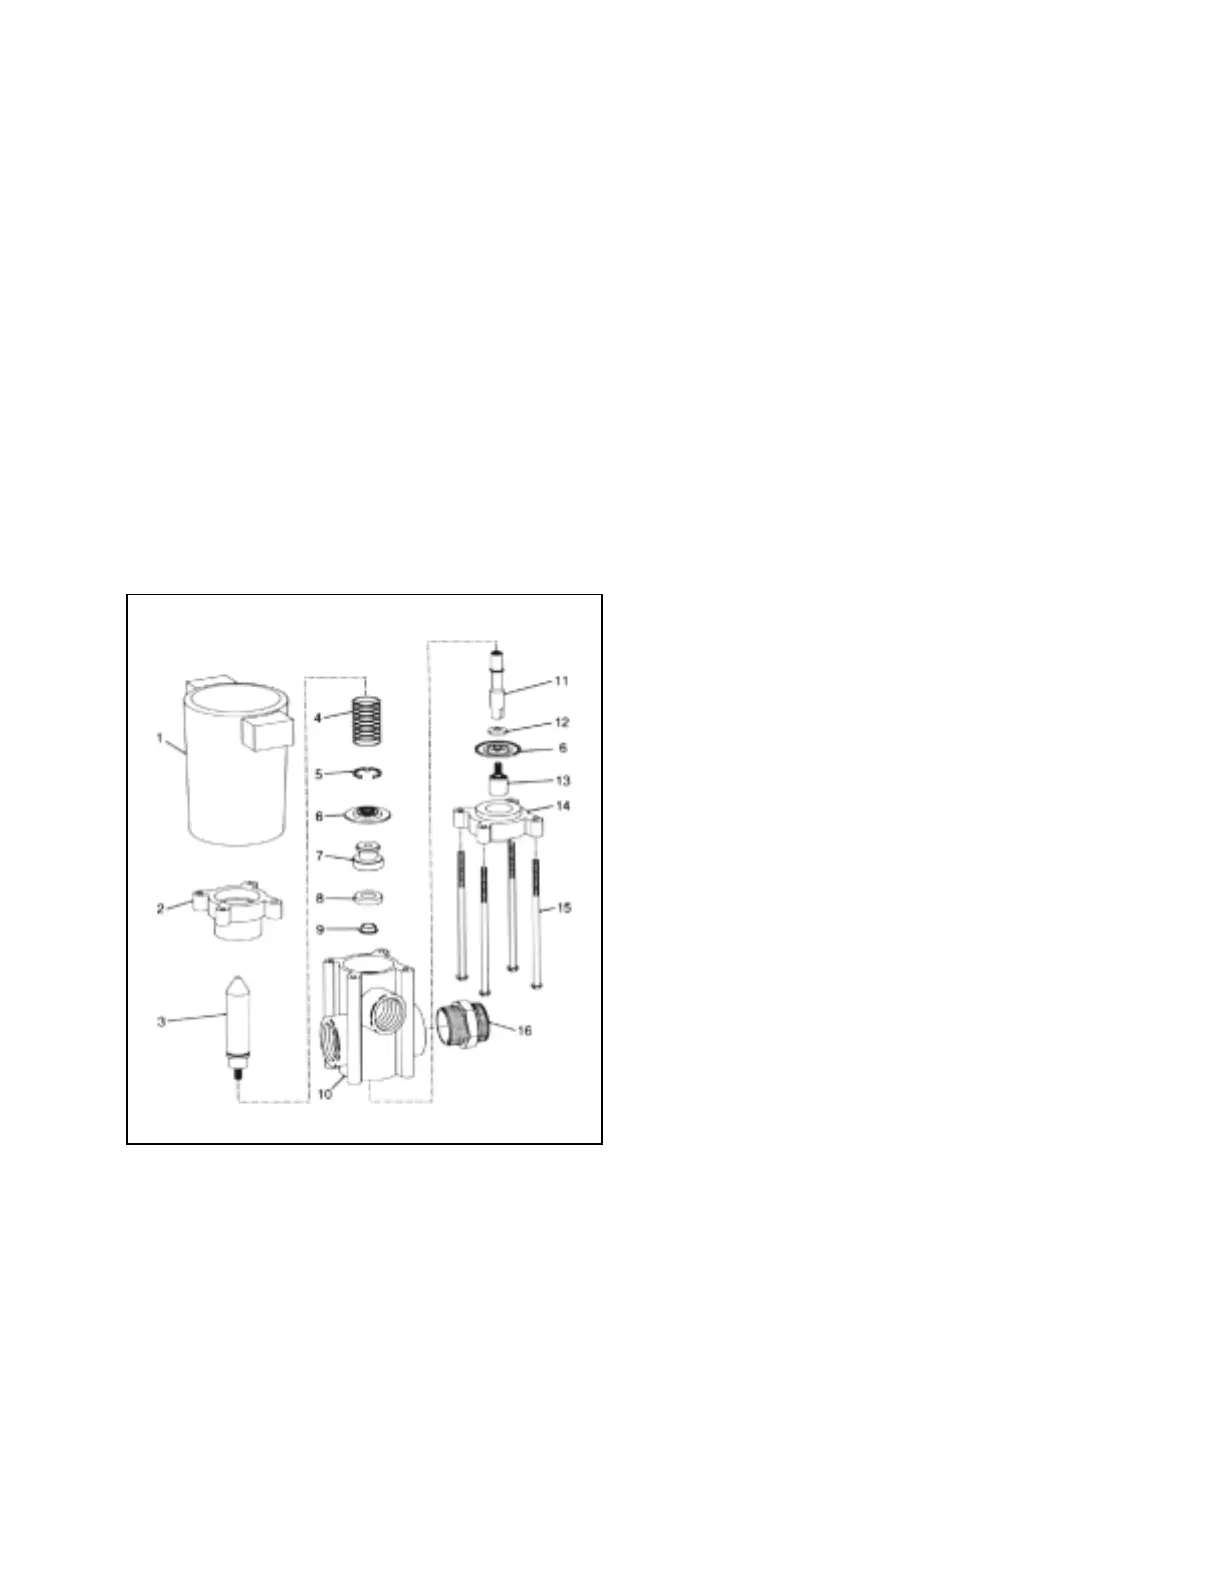
See parts drawing below for reference numbers
in parentheses( ).
TO REPLACE DIAPHRAGMS AND SEAT
WASHER:
1. Remove the four screws (15) that secure the
lower diaphragm housing and separate coil
assembly (1). Remove the lower diaphragm
housing (14).
2. Remove spring (4) from armature (3).
3. Secure hole in armature (3) with 1/4" diameter
rod or an allen wrench. Unscrew entire assembly
with screwdriver secured in slot of lower
diaphragm piston (13).
NOTE: Stem/Seat/Diaphragm/upper diaphragm
housing assembly may unscrew at lower
diaphragm piston (13) or at armature (3).
4. If lower diaphragm piston (13) unscrews,
remove diaphragm (6) and washer (12) and
inspect or replace as necessary. Remaining
seat/upper assembly may be removed from top
of polypropylene body (12) and disassembled by
securing flats on stem (11) and unscrewing
armature (3). Seat washer retainer (7) will then
slide from the stem (11). Separate the upper
diaphragm housing (2) and upper diaphragm from
the seat washer retainer (7).
5. If armature (3) unscrews, remove the upper
diaphragm housing (2) and the diaphragm (6).
The seat washer retainer (7) slides off the stem
(11) which allows the spacer (9) and seat washer
(8) to be removed. The lower diaphragm piston
(13) can be disassembled from the stem (11) by
securing the stem with a wrench and unscrewing
the lower diaphragm piston (13).
TO REASSEMBLE:
1. Reassemble seat washer retainer (7), seat
washer (8) and spacer (9) onto stem (11).
2. Reassemble upper diaphragm (6) (with Fluid
Side marking facing valve body), the upper
diaphragm housing (2) and armature (3) onto stem
end (11) and tighten securely against the seat
washer retainer (7).
3. Insert the entire subassembly into valve body
(10) from top. Screw lower diaphragm piston (13)
with diaphragm (6) and washer (12) in proper order
into bottom end of stem assembly. Tighten snugly
with screwdriver.
4. Reinstall spring (4) over armature (3). Place
coil assembly (1) on top of upper diaphragm
housing (2).
MAINTENANCE
TO REPLACE COIL ONLY:
1. Shut off power to coil.
2. Disconnect wires from terminals.
3. Loosen four screws (15) that secure body to
coil assembly.
4. Lift off coil (1) and replace with new coil.
5. Thread four screws (15) into new coil assembly
(1) and uniformly tighten to secure body.
 Loading...


