1
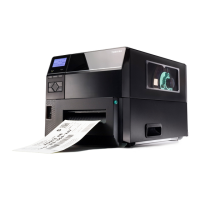
TOSHIBA Barcode Printer
B-SV4T SERIES
SUPPLY LOADING INSTRUCTIONS
This sheet contains only the supply loading procedures. Please be sure to read the Owner’s Manual in the
CD-ROM for further information about this printer.
1. Loading the Media
This section describes in detail how to load a media roll.
1. Turn OFF the printer.
2. Turn the Cover Open Levers frontward, and open
the Top Cover.
3. When the inner core diameter of the media roll is
25.4 mm (1”), remove the Media Holder Spacers
from the Media Holders. The Media Holder
Spacers are required to print media rolls with 38.1-
mm (1.5”) inner core diameter.
4. Insert the Media Shaft into the paper core so that the
print side faces up as shown below.
5. Hold the Media Holder with the smooth side facing
the media roll, align the Media Holder’s centre hole
with the Media Shaft, and then install the Media
Holder by sliding it onto the Media Shaft. Make
sure that the media roll is positioned at the centre of
the Media Shaft.
WARNING!
1. Do not touch any moving parts. To reduce the risk of fingers, jewellery, clothing, etc. being drawn
into the moving parts, be sure to load the media once the printer has stopped moving completely.
2. To avoid injury, be careful not to trap your fingers while opening or closing the Top Cover.
CAUTION!
Be careful not to touch the Print Head Element when opening the Top Cover. Failure to do this ma
cause
missing dots by static electricity or other print quality problems.
Media Holder
Media Shaft
NOTE:
When the outer roll diameter exceeds 127 mm (5”) or
the inner core diameter exceeds 38.1 mm (1.5”), an
optional External Media Roll Hanger is required.
Media Holder
Spacer
Accessor
Media Holder
(Accessory)
Media Shaft
(Accessory)
Media
Cover Open Lever
Top Cover
Cover O
en Leve
2
6. Insert the both ends of the Media Shaft into the slots
of the printer to place the Media Holder Ass’y into
the printer. Make sure that the media feeds from the
top, as shown in the picture.
7. Insert the leading edge of the media under the Media
Hold Shaft, and feed the media between the Media
Guides.
8. Pull the media until it extends past the Media Outlet.
9. Manually adjust the Media Guide position to the
media width.
10. Make sure that the media path through the printer is
straight, otherwise a skew feeding or a paper jam
may occur.
11. After loading the media, manually set the Media
Sensor to the correct position.
The Feed Gap Sensor is included in the right Media
Guide. Position of the Feed Gap Sensor can be set
by fitting the Media Guides to the media ends.
Media Holder Ass’y
Slot
NOTES:
1. The selected sensor type is the one used in the last
print job. The Feed Gap Sensor has been selected
as the factory default. To change the sensor type,
refer to Section 2.9.1 Media Sensor Calibration.
2. When the Media Guides are fitted to the media
edges, the Feed Gap Sensor is positioned at 6 mm
from the right end of media.
Media Shaft
Media Outlet
NOTE: Media path
Platen
Media Hold Shaft
Black mark sensor
6 mm
Feed Gap Sensor
Black Mark Sensor
Feed Gap Sensor
(in the Media Guide)
Media Hold Shaft
Media Guide
Media Guide
Slot