HOW TO ATTACH THE AB CRUNCH BOARDS
(b) Take hold of the Vertical Column and pull it up until it is upright. Release
the Spring Loaded Pin. You should hear it lock back into place.
IMPORTANT: Be sure the Spring Loaded Pin is locked into place
before using your unit. You will know the pin is locked into place
when you can see the end protrude through the inside of the rail bracket.
6. Position one foot on Back Crossbar to keep the product from lifting
off the floor. With one hand on either the right or left rail and the
other hand holding the Height Adjustment Quick Release Pin out, slide
the rails along the Vertical Column to desired position and release pin.
Pin will pop into place - you will hear a snap. Then turn knob to the
right to tighten and secure. Last, insert straight Safety Pin (attached
to the Height Adjustment Tube) into the hole on Vertical Column
just below the Height Adjustment Bracket.
NOTE: Insert Safety Hitch Pin in the side hole located
at the bottom of the Vertical Column.
(This is the pin you removed in step 5a).
7. STOPPER ASSEMBLY
If the Stopper at the bottom of the Vertical Column has not already been
installed, please do so now. Locate the Stopper which is packed in Miscellaneous
Accessories (See Product Specifications on page 3 of this manual). Unscrew nut
on the end of the Stopper and remove. Insert the Stopper into the hole located in
the center of the Back Crossbar. (See Fig. 1) Screw the nut back onto the Stopper
and tighten with Allen Wrenches provided. (See Fig. 2)
IMPORTANT: Proper installation of the Stopper is necessary for the Rollers to
function easily when the unit is folded and rolled into place for storage.
8. FLIP CHART/WATER BOTTLE HOLDER ASSEMBLY
1. Insert the Flip Chart Stand into the Vertical
Column then insert the Flip Chart/Water
Bottle Holder into the Flip Chart Stand.
You will hear it snap into place. See Fig. 1
2. Insert Water Bottle into holder. Be sure to
wash the Water Bottle in hot soapy water
prior to use. Rinse thoroughly. See Fig. 2.
6.
5b
Height Adjustment
Quick Release Pin
Put Safety Hitch Pin
Back Into Hole
Fig. 2
Fig. 1
7.
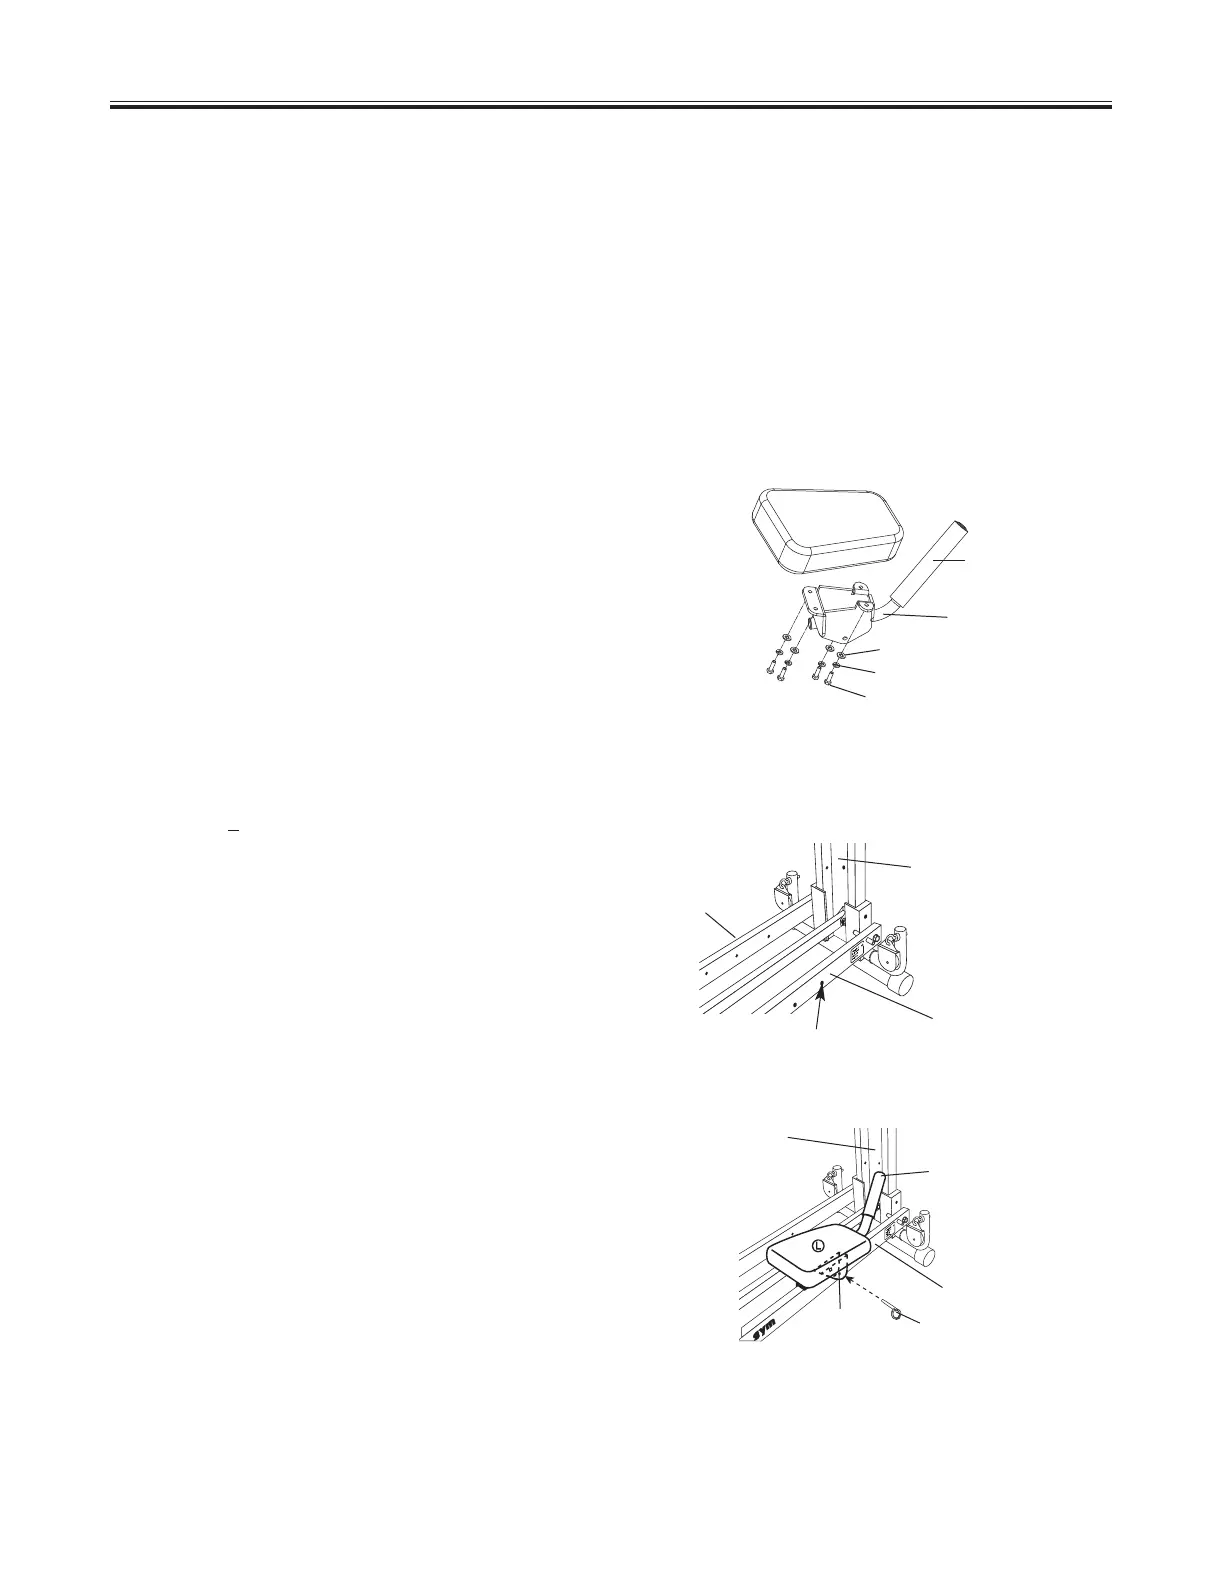
1. Locate the 3 holes at the top of the Right
and Left Rails on the Vertical Column
(see Fig. 2a). DO NOT use hole closest
to the Vertical Column. Your head could
come in contact with the Vertical Column
and could result in possible serious injury
or death.
Choose the 2nd or 3rd hole depending
on your height or comfort level.
2. Install the Ab Board labeled (L) onto the
Left side Rail with the Handle facing toward
the Vertical Column (see Fig 2b).
3. Insert the M8 x 60mm Hitch Pin through the
holes on the Attachment Brackets and through
the hole on the Left Rail as indicated by arrow.
4. Repeat for right Ab Board.
Fig. 1
Fig. 2b
ASSEMBLY
1. Remove Hex Bolts and Washers from bottom of Ab Boards.
2. With the small end of the Ab Board closest to you, securely
attach the appropriate Handle with 4 Flat Washers, Spring
Washers and Hex Bolts with Hex Wrench provided. See Fig 1.
3. Repeat on 2nd Ab Board.
M8 Flat Washer
Ab Board
Handle Grip
Handle
M6 Spring Washer
M6 x 20mm Hex Bolt
Vertical
Column
Handle facing
toward Vertical Column
Left Rail
Hitch Pin
Fig. 2a
Left Rail
Right Rail
DO NOT use hole closest
to Vertical Column
Vertical
Column
IMPORTANT SAFETY INSTRUCTIONS:
1. Be sure to give enough clearance so your head does not hit the Vertical Column when performing these
exercises. DO NOT attach the Ab Crunch Board to the Rail on the hole that is closest to the Vertical
Column, doing so could result in possible serious injury or death.
2. Remove Leg Attachment Bracket when using the Ab Crunch Board to avoid contact, which could result in
possible serious injury or death.
3. Be sure that the Hitch Pins are securely locked in place before using the Ab Crunch Board. Failure to do so
may cause the Ab Crunch Board to fall off resulting in possible serious injury or death.
4. Do not move your body to the extreme left or right when using the Ab Crunch Board to avoid falling off the
exerciser which could result in possible serious injury or death.
5. Caution should be used when getting on and off the exerciser when the Ab Crunch Board is in place. Failure
to do so could result in possible serious injury or death.
Fig. 1
Fig. 2
Flip
Chart
Stand
Vertical
Column
Flip Chart/
Water Bottle
Holder
— 5 —— 8 —
Attachment
Bracket
INSTALLATION - How to Install the Ab Crunch Boards to your Total Gym®
 Loading...