ACC-SVN215A-EN
5
Installation
1. Ensure all power to the air handler has been
disconnected and lockout.
2. Remove the end top access panel to gain access to
the unit control box.
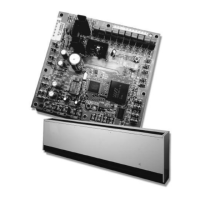
3. Install the options module in the Air handler control
box and secure the board with 4 screws (provided
in kit) (See Figure 2, p. 5).
4. On the Options Module, set the address rotary
switches to 75. This is required to integrate the
Options Module with the Symbio™ condenser.
5. Connect the two harnesses between the options
module board and the relay board per unit wiring
diagram (See Figure 2, p. 5).
NNoottee:: The unit wiring diagram is located on the
control box high voltage door.
6. Using the wire ties provided, bundle and dress any
excess wire away from sharp edges.
7. Reinstall the access panel that was removed earlier.
8. Apply the Information Label next to the unit
nameplate.
9. Reconnect all power to the unit. Refer to the
troubleshooting section in the unit installation
guide, if needed.
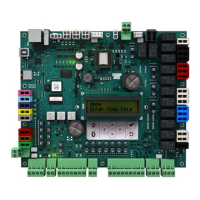
Figure 2. Symbio™™ options module installation
Harness IMC Communication
Connect to P4
Harness Electric Heat Controls
Connect to J1
Options Module
Relay Board
Harness IMC Communication
Connect to P2
Harness Electric Heat Controls
Connect to P6
Harness Electric Heat Controls
Connect to P7
 Loading...