Installation Guide
16 18-HD80D1-6E-EN
5.4 Indoor Sensor Setup
The Indoor Temperature Setup screen allows the technician
to view, edit and assign the correct temperature sensor for
each zone. It is available in the Technician Access menu.
On the left side of the screen, Zones will be displayed. On
the right side, available sensor will be shown.
IMPORTANT: Installer Setup>Zoning must be done before
assigning sensors to zones. All equipment and dampers
should already be assigned or discovered .
Assigning Sensors
To assign a sensor to a zone,
1. Select the corresponding zone on the left side of the
screen.
2. Next, select the appropriate sensor on the right side of
the screen.
3. Press ASSIGN.
The sensor will be assigned to a zone, and it will now
appear on the left side.
Multiple sensors (communicating or non-communicating)
can be wired or addressed to each zone, but only one sensor
can be assigned to a zone. To change the assignment,
select the appropriate zone, then select the desired zone
sensor and press Apply.
Note - If the 1050 is being used as a zone sensor it must be
addressed as Zone 1.
If a wired remote sensor (ZZSENSAL0400A) is connected
to the 1050 RS terminals and assigned as the indoor
temperature sensor, the onboard temperature sensor as
well as the onboard humidity sensor of the 1050 is disabled.
The onboard humidity sensor can be re-enabled in the
Installer Settings (Installer Setup > Sensors > Thermostat
Humidity Sensor settings.
5.5 Service Reminders
Reminders can be enabled to trigger a notification when
the configured reminder expires and a message will be
displayed across the top of the display. The reminder is
time-based and can be configured on system run time or
calendar days. Reminders can be configured for humidifiers,
filters, ventilation systems, UV lights and HVAC system
maintenance. The type of reminders available are based on
the accessories enabled in the installer settings.
5.6 Dealer Code
When a 1050 Control is connected to Trane Home, a Dealer
Code can be entered to auto-populate the dealer’s contact
information and logo. The code is the dealer’s registered
phone number listed on ComfortSite. A dealer can upload
a logo by selecting Tech Support from the Home page of
ComfortSite, then select Dealer Logo Management and
upload logo. File size should not exceed 3MB.
5.7 Software Updates
To take full advantage of the features and benefits of
the 1050 Control, the latest software revision should be
installed.
When the 1050 is connected to a Trane Home account,
software updates will occur automatically and do not
require user intervention.
The software may also be manually updated. This procedure
requires a computer with an Internet connection, a USB
Flash Drive and the included USB connector.
1. From your ComfortSite account, go to Tech Support >
Trane Tools > TZON1050 Firmware Upgrade.
2. Follow the onscreen notes to download the software to
a USB Flash Drive.
3. Once downloaded to your Flash Drive, connect Flash
Drive to provided USB to Micro USB connector.
4. Insert connector to 1050 Control and navigate to the
Software Upgrade screen (Menu > Settings > SW
Upgrades)
5. Follow the onscreen prompts to complete the upgrade
process.
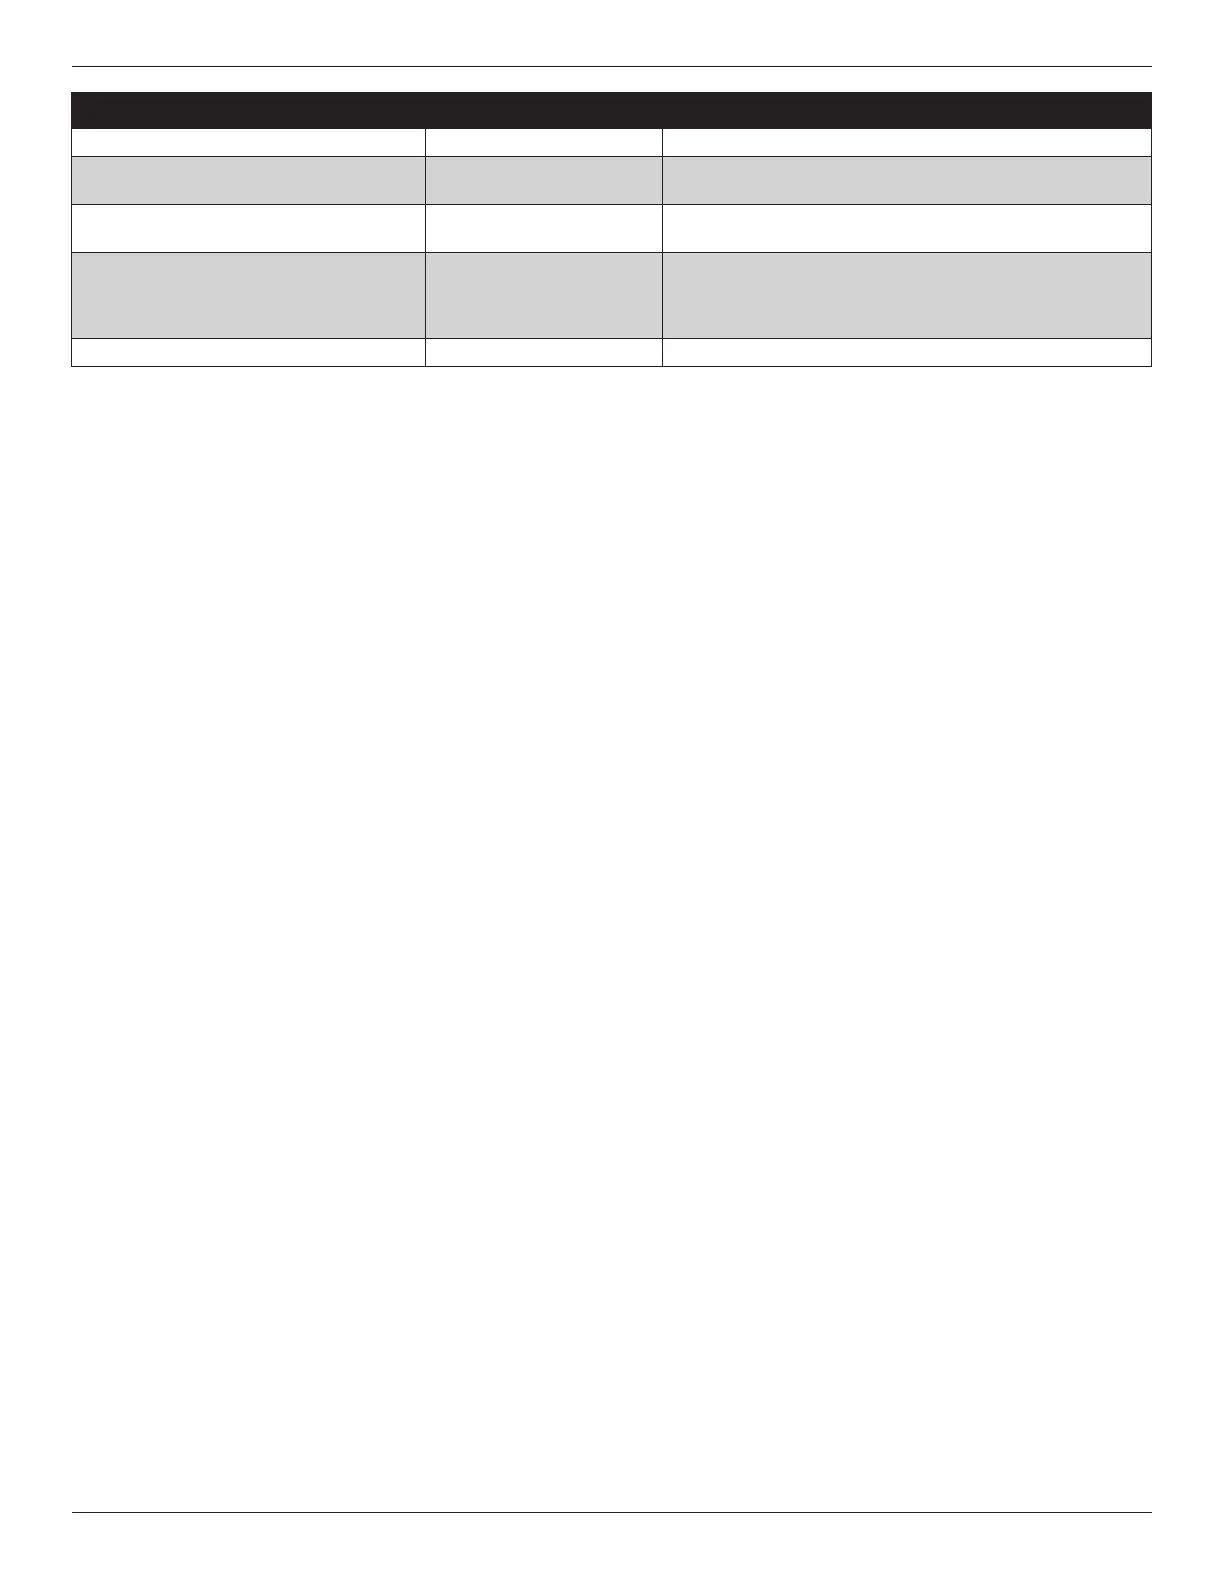
SETTING OPTIONS DESCRIPTION
Select the type of Auxiliary (Back-up) Heat Installed
Gas Furnace, Oil Furnace Select your indoor heat type
Dual Fuel Guided Wizard Electricity Cost
Enter what you currently pay per kilowatt of electricity (see most
current electric bill for current rate)
Dual Fuel Guided Wizard Fuel Oil Cost
Enter what you currently pay per gallon of fuel oil (see most
current oil bill for current rate)
Choose the furnace AFUE rating 78 – 98
Enter the AFUE rating of the installed furnace (If not know
estimate based on the age of the furnace and the type of furnace
80% - 85% for enclosed combustion chamber and 70% for open
combustion chamber)
Choose the Heat Pump HSPF rating 7.7 – 12
Enter the HSPF rating of the installed heat pump. (see AHRI ratings)
 Loading...