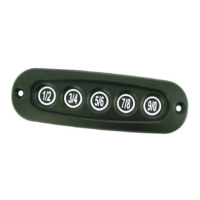
Configuration D [SW 4 off / SW 5 on / SW 6 on]:
Button (1 / 2) (1): Unlocks all entry doors
Button (3 / 4) (2): Unlocks all entry and compartment doors
Button (5 / 6) (3): Unlocks all curb side compartment doors
(relay banks C-D)
Button (7 / 8) (4): Unlocks all driver side compartment doors
(relay banks A-B)
Button (9 / 0): Toggles Aux 1 output
Interior Switch Dip Switch Setting Configurations:
The following vehicle switch assignments of connector J1 define
functional assignment of interior switches. When the switch input is
grounded, its corresponding function is specified.
Configuration A [SW 4 off / SW 5 off / SW 6 off]:
1) J1 pin 1: Unassigned
2) J1 pin 2: Unassigned
3) J1 pin 9: Unassigned
4) J1 pin 10: Unlocks all doors
5) J1 pin 11: Lock all doors
6) J1 pin 12: Unassigned
Configuration B [SW 4 off / SW 5 off / SW 6 on]:
1) J1 pin 1: Lock all compartment doors (banks A-D)
2) J1 pin 2: Unlock all compartment doors (banks A-D)
3) J1 pin 9: Unlock entry door(s)
4) J1 pin 10: Unlock all doors
5) J1 pin 11: Lock all doors
6) J1 pin 12: Lock entry door(s)
Configuration C [SW 4 off / SW 5 on / SW 6 off]:
1) J1 pin 1: Unlock bank A
2) J1 pin 2: Unlock bank B
3) J1 pin 9: Unlock bank D
4) J1 pin 10: Unlock entry door(s)
5) J1 pin 11: Lock all doors
6) J1 pin 12: Unlock bank C
5