EasyManua.ls Logo

TriMark e-ASK User Manual

Default Icon
16 pages
To Next Page IconTo Next Page
Page #1 background imageLoading...
Page #1 background image
Page 1 of 16
e-ASK
electronic Access Security Keyless-entry
e-ASK Keyless-entry System Installation and Instruction Manual
OEM / Dealer / Installer
Cargo Lock/Unlock Version
This manual provides the necessary information for the proper installation and use of
TriMark’s e-ASK system. Included in this comprehensive access, security, keyless-entry
system are the following elements:
e-FOB: keyless entry radio frequency [RF] remote FOB transmitter and receiver
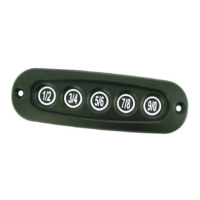
e-PAD: Convenient keypad user interface
e-ASK: I/O module
The following illustrations are provided to properly identify the contents of this system.
e-FOB with RF receiver,
2 remote transmitters FOBs,
and wiring harnesses
e-PAD keypad e-ASK I/O module
(Note: Horizontal or Vertical e-PADs are available)
UM04
18990-04
01/05-2

Other manuals for TriMark e-ASK

Question and Answer IconNeed help?

Do you have a question about the TriMark e-ASK and is the answer not in the manual?

TriMark e-ASK Specifications

General IconGeneral
Operating Voltage12V DC
Remote StartYes
Keyless EntryYes
WeatherproofYes
Operating Temperature-40°C to 85°C
CompatibilityMost vehicles with automatic transmissions
Security SystemYes
Number of Buttons5

Summary

e-ASK Keyless-entry System Introduction

System Components Overview

Introduces the main components of the e-ASK system: e-FOB, e-PAD, and e-ASK I/O module.

e-FOB Operation and Features

e-PAD Operation and Features

e-PAD Configurations

Details the different operational configurations available for the e-PAD based on DIP switch settings.

e-PAD Security Features

Explains the protective deactivating security feature for the e-PAD to prevent unauthorized access.

e-ASK I/O Module Operation and Features

e-ASK System Configuration and Controls

S2 DIP Switch Assignments

Describes the functional assignments based on S2 DIP switch settings for relay banks and system configurations.

Trim Pot Variable Resistors

Explains adjustable settings for timed outputs like dome/porch light and auxiliary compartment lighting.

S1 Learn Switch Connector

Details the use of the S1 Learn Switch Connector for resetting keypad codes and assigning new ones.

Miscellaneous I/O Module Features

Covers features like status LEDs and basic door locking/unlocking pulse outputs.

System Modes and Confirmations

Locking and Unlocking Confirmation

Describes the audible and visual feedback provided upon locking and unlocking the system.

Panic Mode Operation

Explains how to activate and the effects of the panic mode function.

Alarm Mode Activation

Details the conditions under which the alarm mode is triggered and its response.

Timed Dome/Porch Light Activation

Describes the activation of the dome/porch light via keypad or FOB, and its duration control.

Mounting e-ASK Components

General Mounting Guidelines

Provides recommendations for optimal placement and mounting of the RF receiver and I/O modules.

Automatic Locking and Unlocking

Explains the feature for automatic locking after engine start and unlocking when turned off.

Wiring Color Code Tables and Diagrams

RF Receiver Assignments

Lists wire colors and their corresponding pin assignments for the RF receiver using various harnesses.

Lock, Unlock, and Door Actuate Relay Outputs

Details the relay output connections for locking, unlocking, and actuating different door banks.

Other Vehicle Connections on I/O Board

Outlines connections for trim pots, learning inputs, keypad connectors, and power sources on the I/O board.

Wiring Diagrams

Presents visual diagrams illustrating actuator wiring, auxiliary outputs, and switch inputs.

Programming and Setup Procedures

Teaching Additional Transmitter Fobs

Step-by-step instructions for programming additional e-FOB transmitters to the system.

Teaching Keypad New Authority / Access Codes

Guide for resetting the keypad, assigning a new authority code, and programming access codes.

Assign New Access Codes

Details the process for assigning up to five different access codes to the keypad.

Troubleshooting Guide

Related product manuals