SLEEVE & SENSOR CLEANING
NETTOYAGE DU MANCHON ET DU CAPTEUR
4Regularly clean sleeve and window of optional sensor, if so
equipped. Cleaning frequency depends on water quality.
Monthly check recommended; adjust as needed.
4Nettoyez régulièrement le manchon de la lampe ainsi que la vitre du
capteur optionnel, si équipé. Fréquence du nettoyage dépend de la
qualité de l’eau. Vérification mensuel recommandée; ajustez comme
nécessaire.
LAMP LIFE
DURÉE DE VIE DE LA LAMPE
4Replace every 12 months
4Remplacez la lampe à tout
les 12 mois
Lamp Life Timer
*
(counts down 365 days)
Chronomètreur de la vie de la lampe
(compte de 365 jours vers le bas)
Mute
*
Mise en sourdine
Inactive
See Owner’s Manual.
Inactif. Vo ir Manuel de l'utilisateur.
Operating Normally
Fonctionnement normal
Sleeve
Manchon
O-ring
Joint torique
Lamp
Lampe
O-ring
Joint torique
Sleeve Bolt
Boulon du manchon
ITALIANO Ve dere il manuale per la manutenzione richiesta.
ESPAÑOL Ve r manual para condiciones de mantenimiento.
DEUTSCH Siehe Betriebs- und W a rtungshandbuch.
Blinking - Failed
See Owner’s Manual.
Échoué. Voir Manuel de l'utilisateur.
Timer Reset. Press and hold for 5 seconds.
*
Remise du chronomètre. Appuyez et tenez
pour 5 secondes.
* For models D4, E4 & F4 only (Modèles D4,E4 et F4 seulement)
If equipped
Si équipé
Cotton Swab
Coton-tige
Lint/Chemical-free cloth
Chiffon sans produit chimique
et non pelucheux
Sleeve
Manchon
Wa rning
*
See Owner’s Manual.
Av ertissement. V o ir Manuel de l'utilisateur.
Scale Remover
Detartrant
Trojan Technologies 800.265.5774 residential@trojanuv.com www.trojanuv.com/manual
SLEEVE & SENSOR CLEANING
NETTOYAGE DU MANCHON ET DU CAPTEUR
<Regularly clean sleeve and window of optional sensor, if so
equipped. Cleaning frequency depends on water quality.
Monthly check recommended; adjust as needed.
<Nettoyez régulièrement le manchon de la lampe ainsi que la vitre du
capteur optionnel, si équipé. Fréquence du nettoyage dépend de la
qualité de l’eau. Vérification mensuel recommandée; ajustez comme
nécessaire.
LAMP LIFE
DURÉE DE VIE DE LA LAMPE
<Replace every 12 months
<Remplacez la lampe à tout
les 12 mois
Lamp Life Timer
*
(counts down 365 days)
Chronomètreur de la vie de la lampe
(compte de 365 jours vers le bas)
Mute
*
Mise en sourdine
Inactive
See Owner’s Manual.
Inactif. Vo ir Manuel de l'utilisateur.
Operating Normally
Fonctionnement normal
Sleeve
Manchon
O-ring
Joint torique
Lamp
Lampe
O-ring
Joint torique
Sleeve Bolt
Boulon du manchon
ITALIANO Ve dere il manuale per la manutenzione richiesta.
ESPAÑOL Ve r manual para condiciones de mantenimiento.
DEUTSCH Siehe Betriebs- und W a rtungshandbuch.
Blinking - Failed
See Owner’s Manual.
Échoué. Voir Manuel de l'utilisateur.
Timer Reset. Press and hold for 5 seconds.
*
Remise du chronomètre. Appuyez et tenez
pour 5 secondes.
* For models D4, E4 & F4 only (Modèles D4,E4 et F4 seulement)
If equipped
Si équipé
Cotton Swab
Coton-tige
Lint/Chemical-free cloth
Chiffon sans produit chimique
et non pelucheux
Sleeve
Manchon
Wa rning
*
See Owner’s Manual.
Av ertissement. V o ir Manuel de l'utilisateur.
Scale Remover
Detartrant
Trojan Technologies 800.265.5774 residential@trojanuv.com www.trojanuv.com/manual
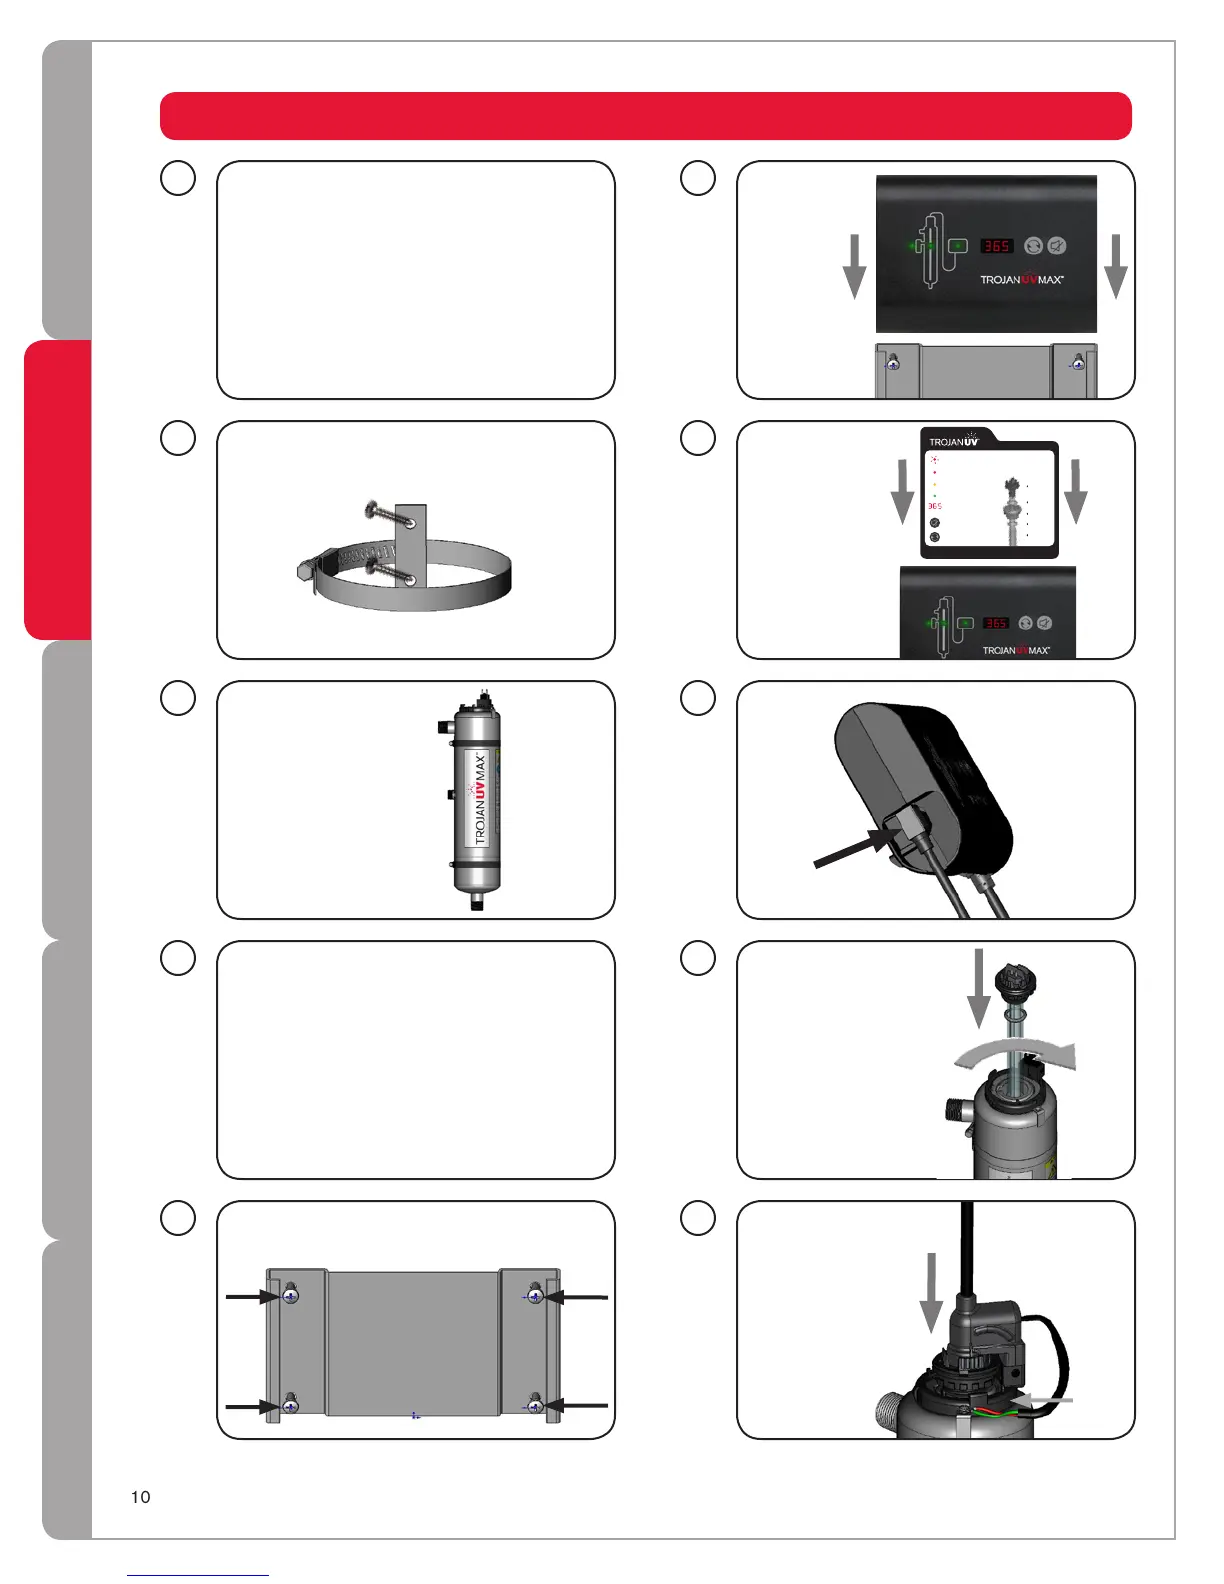
drawing. Power supply should be installed
sources. Ensure adequate clearance
drawing.
your system.
bracket.
chamber.
 Loading...