BLADE MAINTENANCE (All Models Except Models 34311, 34313 and 34328)
WARNING
• Before performing any
maintenance procedures,
stop the engine, wait for all
moving parts to stop, and
allow the engine to cool.
Disconnect the spark plug
wire and move it away from
the spark plug. Remove the
ignitionkey on Electric Start
Models.
• When working near the
blade, wear heavy leather
..............gloves to protect yourself
from the sharp edges on the
blade.
IMPORTANT: If tipping mower
during a maintenance proce-
dure, tip mower rearward rather
than forward or to either side.
To Remove Blade:
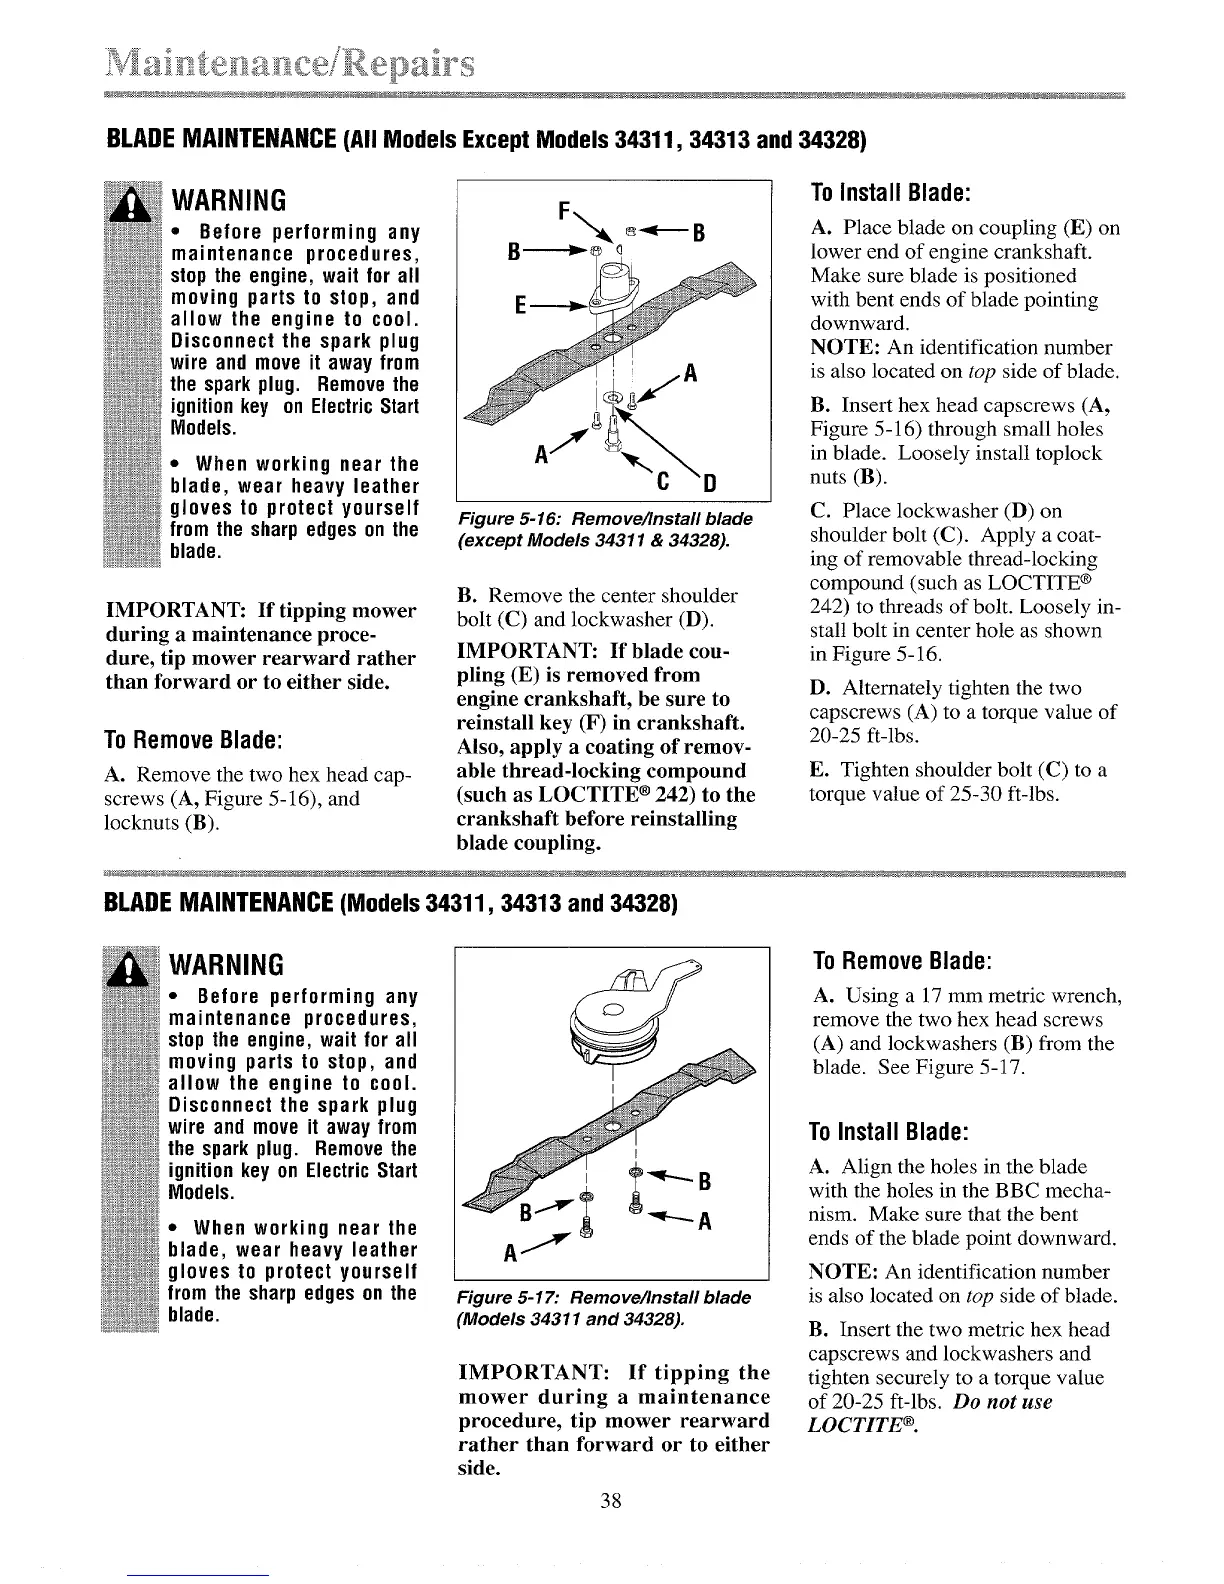
A. Remove the two hex head cap-
screws (A, Figure 5-16), and
locknuts (B).
D
Figure 5-16: Remove/Install blade
(except Models 34311 & 34328).
B. Remove the center shoulder
bolt (C) and lockwasher (D).
IMPORTANT: If blade cou-
pling (E) is removed from
engine crankshaft, be sure to
reinstall key (F) in crankshaft.
Also, apply a coating of remov-
able thread-locking compound
(such as LOCTITE ®242) to the
crankshaft before reinstalling
blade coupling.
To Install Blade:
A. Place blade on coupling (E) on
lower end of engine crankshaft.
Make sure blade is positioned
with bent ends of blade pointing
downward.
NOTE: An identification number
is also located on top side of blade.
B. Insert hex head capscrews (A,
Figure 5-16) through small holes
in blade. Loosely install toplock
nuts (B).
C. Place lockwasher (D) on
shoulder bolt (C). Apply a coat-
ing of removable thread-locking
compound (such as LOCTITE ®
242) to threads of bolt. Loosely in-
stall bolt in center hole as shown
in Figure 5-16.
D. Alternately tighten the two
capscrews (A) to a torque value of
20-25 ft-lbs.
E. Tighten shoulder bolt (C) to a
torque value of 25-30 ft-lbs.
BLADE MAINTENANCE (Models 34311,34313 and 34328)
WARNING
• Before performing any
maintenance procedures,
stop the engine, wait for all
moving parts to stop, and
allow the engine to cool.
Disconnect the spark plug
................wire and move it away from
the spark plug. Remove the
...................ignition key on Electric Start
i_i_i_ Models.
• When working near the
blade, wear heavy leather
gloves to protect yourself
from the sharp edges on the
blade.
I
Figure 5-17: Remove/Install blade
(Models 34311 and 34328).
IMPORTANT: If tipping the
mower during a maintenance
procedure, tip mower rearward
rather than forward or to either
side.
38
ToRemoveBlade:
A. Using a 17 mm metric wrench,
remove the two hex head screws
(A) and lockwashers (B) from the
blade. See Figure 5-17.
ToInstall Blade:
A. Align the holes in the blade
with the holes in the BBC mecha-
nism. Make sure that the bent
ends of the blade point downward.
NOTE: An identification number
is also located on top side of blade.
B. Insert the two metric hex head
capscrews and lockwashers and
tighten securely to a torque value
of 20-25 ft-lbs. Do not use
LOCTITE ®.
 Loading...