Maintenance
Troubleshooting
12
The machine is not
running when turned
on.
The band is not
moving and the
motor is running.
The band is not
cutting in a straight
line.
The band is not
cutting or cuts slowly.
The band is not
cutting or cuts slowly.
Dust inside the
motor cover.
The machine is not
cutting 45° or 90°
angles.
The band cannot be
positioned
adequately in the
flywheels.
• No power supply.
• Defective power cord.
• The band tension knob is not tight.
• The band got loose from the flywheels.
• The saw band is broken.
• The direction band is broken .
• The support fence is not being used.
• The feeding rhythm is too fast.
• The band teeth are dull or damaged.
• The band guides are misadjusted.
• Teeth are dull.
• The band is mounted backwards.
• This is due to normal use.
• This is due to normal use.
• The table is not set into the right angles with
regards to the band.
• The band is dull or there was too much
pressure exercised in the work piece.
• The flywheels are crooked.
• The flywheel alignment knob has not been
adequately adjusted.
• The band is defective.
• Check the cord for wear and tear.
• Go to a Authorized Service
Center to repair.
• Turn off the motor and tighten the band tension
knob.
• Open the cabinets and check the band set up.
• Replace saw band.
• Replace band.
• Use the support fence.
• Feed the work piece slowly and with moderate and
constant pressure to prevent the band from bending.
• Replace band with a new one.
Adjust the band guides (see page 8).
• Replace the band (see page 11).
• Install the band correctly.
• Clean the machine regularly. Open the cabinets and
remove dust with a vacuum cleaner and a brush.
• Clean the ventilation slots in the motor with a
vacuum cleaner. Remove dust constantly to prevent it
gets into the cover.
• Adjust the table (see page 7).
• Replace the band or exercise lower pressure on the
work piece.
• Go to a Authorized Service
Center to repair.
• Adjust the knob (see page 11).
• Replace the band with a new one.
Problem Cause Solution
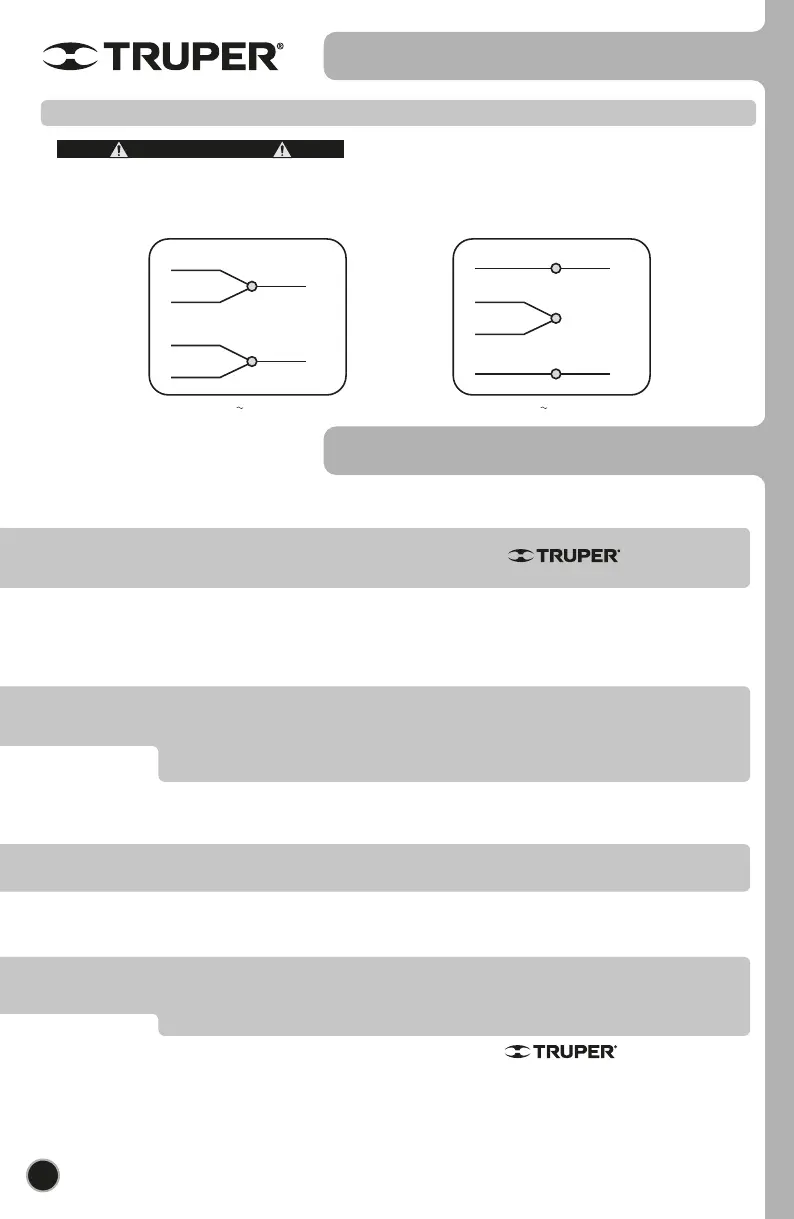
Electric connection diagram
BEFORE GAINING ACCESS TO TERMINALS ALL
FEEDING CIRCUITS SHALL BE DISCONNECTED.
WARNING
Below are the electrical diagrams to make the motor connections according to the supply voltage.
ENGLISH
120 V connection
BLACK
YELLOW
BLUE
WHITE
BLACK
WHITE
L1
L2
220 V connection
BLUE
YELLOW
WHITE
L2
BLACK
WHITE
BLACK
L1