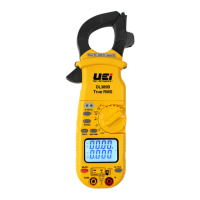
7
N. Range/Link Button:
• Press repeatedly to cycle through manual ranges.
• Press for 1 second to return to auto range mode.
• Press for 2 seconds to activate Wireless Link
• Press for 2 seconds to turn Wireless Link off
O. Power Button: Press and hold to turn on and off the meter.
P. Min/Max/ Peak Button:
• Press to enter Min/Max mode. Max is the default setting.
• Press repeatedly to cycle through Min/Max captured values.
• Press and hold to return to live readings.
• Press and hold to enter Peak mode.
• Press and hold again to return to live readings.
Q. AC/DC Volts/ Hertz (Hz)/ Duty Cycle Button:
• Press to enter AC Voltage mode.
• Press again to enter DC Voltage mode.
• Press and hold to enter Hertz (Hz)/Duty Cycle modes.
• Press to return to live readings.
R. Continuity/ Resistance/ Capacitance/ Diode Test Button:
• Press to enter Continuity mode.
• Press again to enter Resistance mode.
• Press again to enter Capacitance mode.
• Press again to enter Diode test mode.
S. DC Zero/ Inrush Button:
• Press to Zero the DC clamp reading.
• Press and hold to enter LRA Inrush mode (must be in AC Amp mode
first).
• Press and hold again to return to live readings.
T. Display:
• High contrast dual backlit display.
• Amps (AC/DC) reading will always display on upper display.
U. K-Type Temperature Probe Inputs: T1 (Upper) and T2 (Lower)
V. Input Jack Lock: Switch to use Temperature or Test lead inputs
W. Category Max Indicator: Maximum CAT Rating for input jacks.
X. Magnetic Mount: For hands-free work.
Y. Battery Cover: Easy access for replacing batteries without breaking
calibration seal.
Z. Serial Number
AA. Test Lead Input Jacks: Multifunction and Positive input jacks.
• Multifunction input port used for measuring: AC or DC volts, resistance,
continuity, diode, capacitance and AC or DC µA.
Apo: Auto power off after 30 minutes of use.
Detachable Clamp Head: Compatible with industry standard meter reads.
(ADP will appear on display). Press DC Zero button to zero the head reading.
OVERVIEW (CONT.)
 Loading...