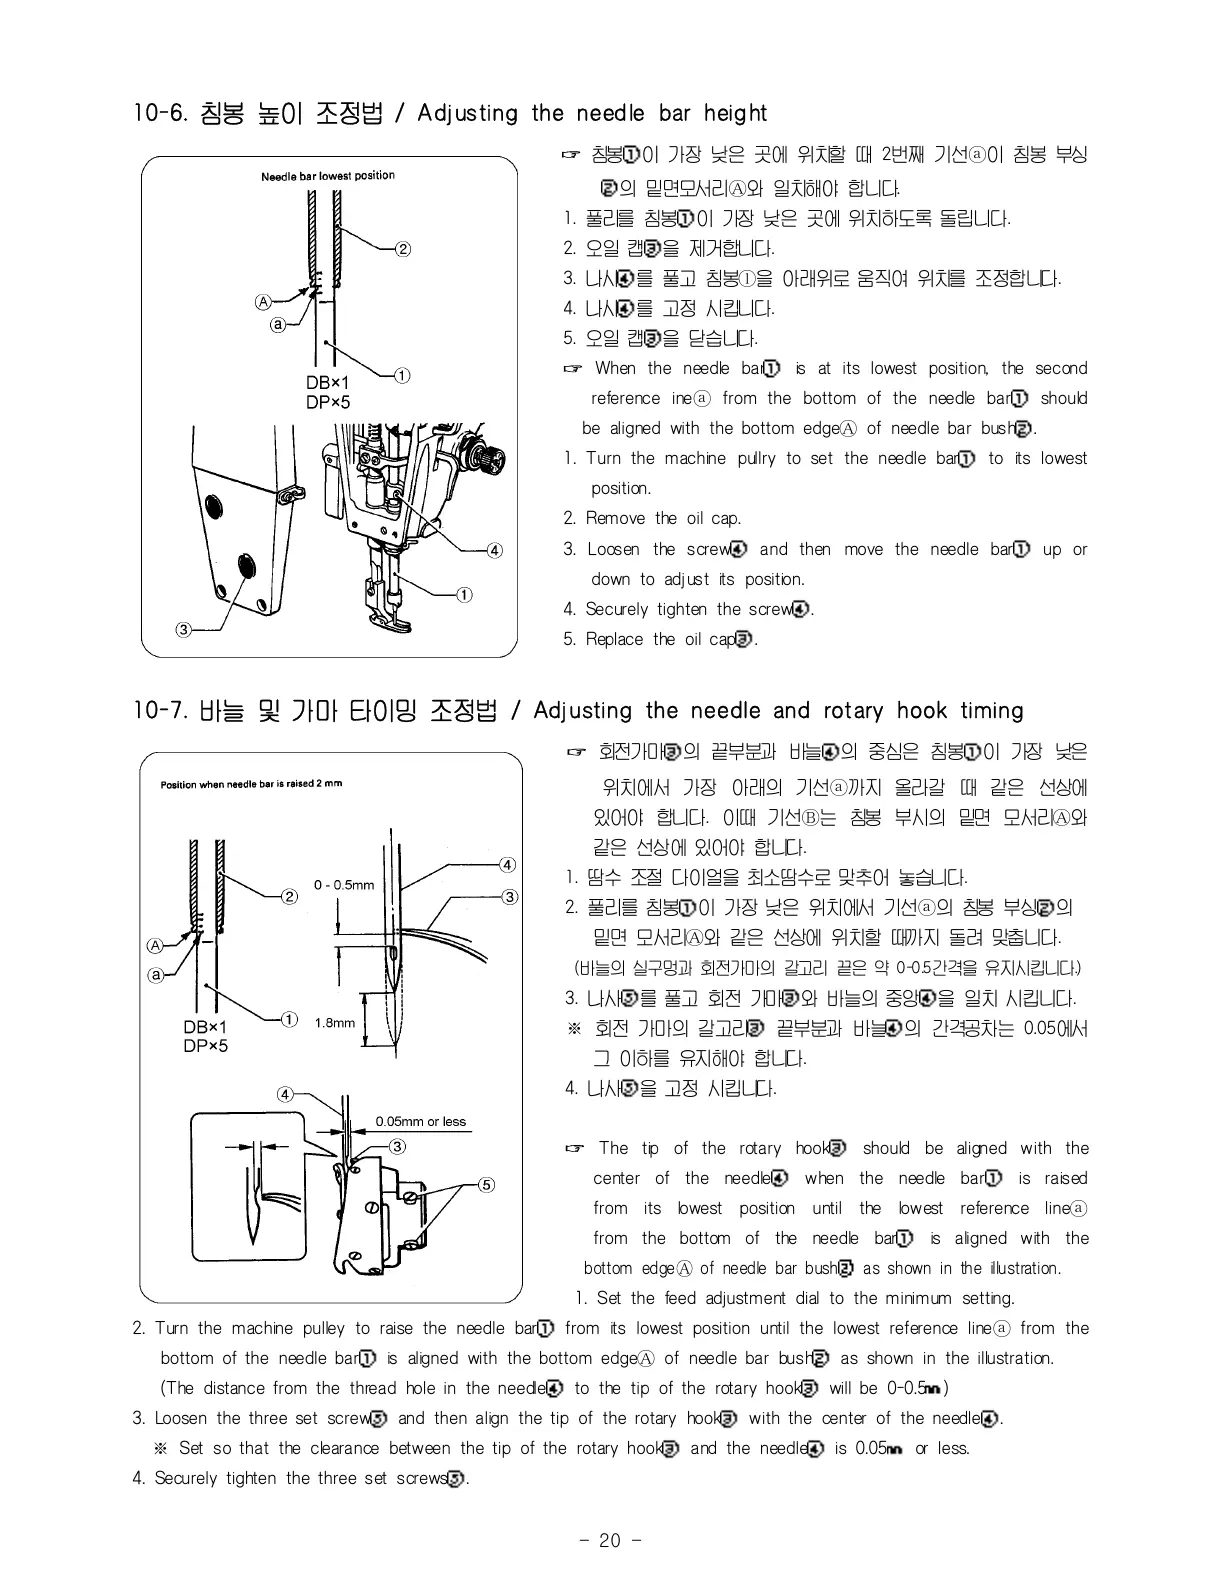
10-6. 침봉 높이 조정법 / Adjusting the needle bar heig ht
☞
침봉①
이 가장 낮은 곳에 위치할 때 2번째 기선ⓐ이 침봉 부싱
②의 밑면모서리Ⓐ와 일치해야 합니다.
1. 풀리를 침봉①이 가장 낮은 곳에 위치하도록 돌립니다.
2. 오일 캡③을 제거합니다.
3. 나사④를 풀고 침봉ⓛ을 아래위로 움직여 위치를 조정합니다.
4. 나사④를 고정 시킵니다.
5. 오일 캡③을 닫습니다.
☞
When the needle bar① is at its lowest position, the second
reference ineⓐ from the bottom of the needle bar① should
be aligned with the bottom edgeⒶ of needle ba r bus h②.
1. Turn the machine pullry to set the needle bar① to its lowest
position.
2. Remove the oil cap.
3. Loosen the screw④ and then move the needle bar① up or
down to adjust its position.
4. Securely tighten the screw④.
5. Replace the oil cap③.
10-7. 바늘 및 가마 타이밍 조정법 / Adjusting the needle and rotary hook timing
☞
회전가마③
의 끝부분과 바늘④의 중심은 침봉①이 가장 낮은
위치에서 가장 아래의 기선ⓐ까지 올라갈 때 같은 선상에
있어야 합니다. 이때 기선Ⓑ는 침봉 부시의 밑면 모서리Ⓐ와
같은 선상에 있어야 합니다.
1. 땀수 조절 다이얼을 최소땀수로 맞추어 놓습니다.
2. 풀리를 침봉①이 가장 낮은 위치에서 기선ⓐ의 침봉 부싱②의
밑면 모서리Ⓐ와 같은 선상에 위치할 때까지 돌려 맞춥니다.
(바늘의 실구멍과 회전가마의 갈고리 끝은 약 0-0.5간격을 유지시킵니다.)
3. 나사⑤를 풀고 회전 가마③와 바늘의 중앙④을 일치 시킵니다.
※ 회전 가마의 갈고리③ 끝부분과 바늘④의 간격공차는 0.05에서
그 이하를 유지해야 합니다.
4. 나사⑤을 고정 시킵니다.
☞
The tip of the rotary hook③ should be aligned with the
center of the needle④ when the needle bar① is raised
from its lowest position until the lowest reference lineⓐ
from the bottom of the needle bar① is aligned with the
bottom edgeⒶ of needle bar bush② as shown in the illustration.
1. Set the feed adjustment dial to the minimum setting.
2. Turn the machine pulley to raise the needle bar① from its lowest position until the lowest reference lineⓐ from the
bottom of the needle bar① is aligned with the bottom edgeⒶ of needle ba r bus h② as shown in the illustration.
(The distance from the thread hole in the needle④ to the tip of the rotary hook③ will be 0-0.5㎜)
3. Loosen the three set screw⑤ and then align the tip of the rotary hook③ with the center of the needle④.
※ Set so that the clearance between the tip of the rotary hook③ and the needle④ is 0.05㎜ or less.
4. Securely tighten the three set screws⑤.



 To Next Page