EasyManua.ls Logo

Uwatec MK 25 - User Manual

Uwatec MK 25
13 pages
Print Icon
To Next Page IconTo Next Page
Loading...
SCUBAPRO MK 25/MK 20 First Stages
2003 SCUBAPRO
Important note
: The following information is not designed to be a complete training guide for servicing the listed SCUBAPRO regulators. All SCUBAPRO
technicians are required to attend an annual service training program to insure safe handling and servicing of SCUBAPRO products. All SCUBAPRO technicians
must be employed by an authorized SCUBAPRO facility.
1
SCUBAPRO
Repair Guide
MK 25/MK 20
First Stages
USE THIS GUIDE AS A REFERENCE WHEN SERVICING
THE MK 25 AND MK 20 FIRST STAGES
Question and Answer IconNeed help?

Do you have a question about the Uwatec MK 25 and is the answer not in the manual?

Summary

SCUBAPRO Repair Guide MK 25;MK 20 First Stages

Tools Needed for Repair

Icon Legend

Initial Disassembly Steps

Yoke Nut and Cover Removal

Steps to remove the yoke nut and cover from the first stage assembly.

DIN Filter Retainer Loosening

Procedure to loosen the filter retainer on DIN regulators using a hex wrench.

Further Disassembly

Filter, DIN Adapter, and End Cap Removal

Instructions for removing the filter, DIN adapter, o'ring, and end cap.

Seat Retainer Removal

Steps for loosening and removing the seat retainer from the first stage.

Seat Retainer and Cap Removal Variations

MK 20 Early Model Seat Retainer

Details on loosening the seat retainer on earlier MK 20 models using a 3/8" hex wrench.

MK 25 Seat Retainer and Cap

Adjusting the seat retainer on MK 25 and disassembling the cap using a 5/32" hex wrench.

Piston and O-ring Assembly Removal

Piston Assembly and Spring Extraction

Separating the cap and removing the piston assembly and spring from the body.

O-ring and Low-Pressure Plug Removal

Using tools to remove the piston stem o'ring and low-pressure plugs.

Internal Component Reassembly

Swivel Retainer and Stem O-ring Installation

Reassembling the swivel retainer and inserting the stem o'ring assembly.

Washer Placement and Assembly Push

Ensuring correct washer placement and pushing the assembly into the regulator body.

Piston and Cap Assembly Reassembly

Piston Assembly and O-ring Replacement

Reassembling the piston assembly and replacing/lubricating piston o'rings.

Cap and Swivel Assembly Tightening

Threading and tightening the cap and swivel assembly to the regulator body.

High-Pressure Seat Reassembly and Tightening

High-Pressure Seat and O-ring Insertion

Replacing the high-pressure seat and o'ring with spring and spacer.

Seat Retainer Tightening

Tightening the high-pressure seat retainer using torque specifications.

Filter and Fitting Reassembly

Filter, O-ring, and Retainer Assembly

Assembling the filter, o'ring, and star retainer into the yoke nut and saddle.

DIN Fitting Lubrication and Assembly

Lubricating and assembling the DIN fitting to the regulator body.

Final Tightening and Fitting Procedures

DIN Fitting Tightening

Tightening the DIN fitting to the regulator body with specified torque.

DIN Filter and Retainer Assembly

Replacing the filter and assembling the spring and filter retainer in the DIN fitting.

Pressure Check and Adjustment

Intermediate Pressure Check

Checking intermediate pressure using the pneumatic adjusting tool.

Intermediate Pressure Adjustment

Making adjustments to intermediate pressure using the adjusting screw.

Final Assembly Step

Cap Replacement

The final step of replacing the cap onto the regulator body.

Overview

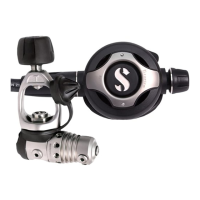
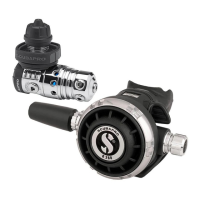
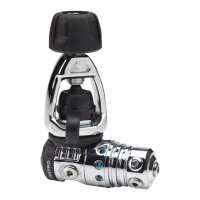
This document serves as a repair guide for SCUBAPRO MK 25 and MK 20 First Stages, providing a detailed, step-by-step approach to their maintenance and reassembly. It is intended for use by trained SCUBAPRO technicians who have completed the required annual service training program. The guide emphasizes proper tool usage, lubrication, and torque specifications to ensure the safe and effective servicing of these critical diving components.

Function Description:

The SCUBAPRO MK 25 and MK 20 First Stages are essential components of a diving regulator system. Their primary function is to reduce the high pressure from a scuba tank to an intermediate pressure, which is then supplied to the second stage regulator and other low-pressure accessories (such as an octopus or BCD inflator). This pressure reduction is crucial for delivering breathable air to the diver at a manageable and consistent pressure, regardless of the tank's remaining air supply. The first stage is designed to be robust and reliable, operating in demanding underwater environments. It typically features multiple low-pressure and high-pressure ports to accommodate various diving configurations.

Usage Features (Implied through repair process):

While this is a repair guide, the steps involved in disassembly and reassembly highlight several key usage features and design considerations of the MK 25 and MK 20 First Stages:

  • Yoke and DIN Compatibility: The guide illustrates procedures for both yoke and DIN configurations, indicating that these first stages are designed to be compatible with different types of scuba tank valves. The yoke system is common in many parts of the world, while DIN (Deutsches Institut für Normung) is prevalent in Europe and for higher-pressure tanks.
  • High-Pressure and Low-Pressure Ports: The process of removing hoses and plugs demonstrates the presence of multiple ports for connecting various diving equipment. High-pressure ports are used for pressure gauges, while low-pressure ports supply air to the second stage, BCD, and drysuit inflators.
  • Adjustable Intermediate Pressure: The guide explicitly mentions adjusting the intermediate pressure for both MK 25 and earlier MK 20 models. This feature is critical for fine-tuning the regulator's performance to the diver's preference and ensuring optimal air delivery. The MK 25 uses an adjusting screw, while older MK 20 models rely on shims for this adjustment. This adjustability allows technicians to set the regulator within a specified pressure range (e.g., 125psi to 145psi), which is vital for consistent and comfortable breathing.
  • Robust Construction: The need for specialized tools and specific torque values for various components (like the yoke nut, swivel retainer, and high-pressure seat retainer) underscores the robust construction of these first stages, designed to withstand the high pressures and stresses of diving.
  • Filter System: The presence and servicing of filters (both in yoke and DIN fittings) indicate a design feature aimed at protecting the internal mechanisms from contaminants that may come from the scuba tank, ensuring clean air delivery to the diver.

Maintenance Features:

The repair guide is essentially a comprehensive list of maintenance features and procedures for the MK 25 and MK 20 First Stages. It provides a structured approach to ensure the longevity and safe operation of the regulators:

  • Annual Replacement of Wear Parts: The "ICON LEGEND" explicitly states "Replace annually" for certain components, indicating that specific O-rings and other wear parts are designed for regular replacement to maintain peak performance and safety. This proactive replacement schedule is a cornerstone of regulator maintenance.
  • Thorough Inspection: The guide emphasizes "Inspect carefully, replace if needed" for many parts, highlighting the importance of visual inspection for wear, damage, or corrosion during servicing. This allows technicians to identify and address potential issues before they lead to failures.
  • Proper Lubrication: "Lubricate properly" and "Dynamic o'ring, lubricate properly" are recurring instructions. Lubrication with Christo-Lube (an oxygen-compatible lubricant) is crucial for the smooth operation of moving parts, preventing friction, and ensuring a good seal, especially for dynamic O-rings that experience movement during operation.
  • Specialized Tools: The "TOOLS NEEDED FOR REPAIR" section lists a variety of specialized tools (e.g., 1" Yoke Nut Socket, MK 25/MK 20 Assembly Tool, Brass O'ring picks, Lubricant syringe, Universal Tool, First Stage Handle, Torque Wrench, Hex Key Set, Pneumatic Adjusting tool, Blow Gun/Air Nozzle). This indicates that servicing these regulators requires specific equipment to perform tasks accurately and without damaging components.
  • Torque Specifications: Precise torque values are provided for critical connections (e.g., swivel retainer, high-pressure seat retainer, yoke nut, DIN fitting). Adhering to these specifications is vital for ensuring proper sealing, preventing leaks, and maintaining the structural integrity of the regulator, which operates under high pressures.
  • Step-by-Step Disassembly and Reassembly: The guide breaks down the repair process into logical, illustrated steps, covering:
    • Removing hoses and the yoke/DIN fitting.
    • Disassembling the filter system.
    • Removing the seat retainer and high-pressure seat assembly.
    • Separating the cap from the body and removing the piston assembly.
    • Removing swivel retainers and low-pressure plugs.
  • Detailed Reassembly Instructions: The reassembly steps mirror the disassembly, with specific instructions for:
    • Inserting O-ring assemblies using specialized tools.
    • Proper placement of washers.
    • Tightening components to specified torque values.
    • Reassembling the filter and yoke/DIN fittings.
    • Adjusting intermediate pressure using a pneumatic adjusting tool.
  • Safety Precautions: The caution regarding turning off supply air and purging the regulator before making adjustments highlights the inherent safety considerations during maintenance, protecting the technician from high-pressure air.
  • Component-Specific Instructions: The guide differentiates between MK 25 and earlier MK 20 models where procedures or tools vary (e.g., hex wrench size for seat retainer, method of intermediate pressure adjustment), ensuring accurate servicing for both versions.
  • Visual Aids: The extensive use of images for each step is a key maintenance feature, allowing technicians to visually confirm each action and component placement, reducing the chance of error.

In summary, this repair guide outlines a rigorous maintenance protocol for SCUBAPRO MK 25 and MK 20 First Stages, emphasizing precision, specialized tools, and a deep understanding of the regulator's internal mechanics to ensure its continued reliability and safety for divers.
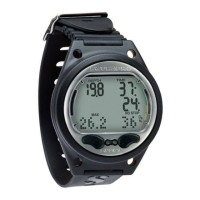
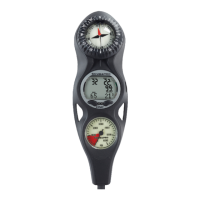
Uwatec MK 25 Specifications

General IconGeneral
TypeDive Computer
DisplayLCD
Nitrox CompatibilityYes
Water ActivationYes
BacklightYes
Water Resistance100m
Gas MixesMultiple

Related product manuals