This document outlines the operation, features, and maintenance of a Digital Clamp Meter.
Function Description
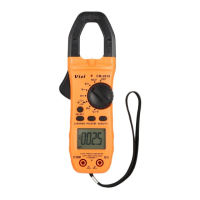
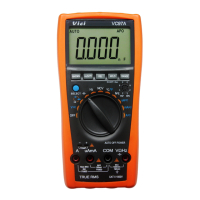
The Digital Clamp Meter is a versatile 3 5/6 digit AC/DC clamp meter designed for a wide range of electrical measurements. Its primary function is to measure various electrical parameters with good stability and reliability.
The meter can perform the following measurements:
- DC Voltage (DCV): Measures direct current voltage.
- AC Voltage (ACV): Measures alternating current voltage.
- DC Current (DCA): Measures direct current using the clamp jaw.
- AC Current (ACA): Measures alternating current using the clamp jaw.
- Resistance (Ω): Measures electrical resistance.
- Capacitance (C): Measures capacitance.
- Frequency (Hz): Measures frequency.
- Temperature (°C/°F): Measures temperature using a K-type thermocouple.
- Diode Test: Checks the forward voltage drop of diodes.
- Continuity Test: Checks for electrical continuity with an audible buzzer alarm.
- Non-Contact Voltage (NCV) Detect: Detects the presence of AC voltage without direct contact.
The clamp jaw is a key feature, allowing for non-invasive current measurement. The meter also includes a clamp gunlock to open the jaw for inserting the testing wire.
Usage Features
The meter is designed for user-friendly operation with several convenient features:
- LCD Display: Equipped with a 14mm digit LCD display, providing clear readings. It shows up to 6000 digits and includes an auto polarity display.
- Over-range Indication: Displays "OL" when the measurement exceeds the selected range.
- Data Hold: Allows users to lock the current reading on the display for easier recording. This function is activated by pressing the HOLD key.
- Relative Value Measurement (REL): Enables the measurement of relative values by clearing the current reading to zero and displaying subsequent measurements relative to that baseline. This is particularly useful for subtracting lead resistance in resistance measurements or for observing changes from a reference point.
- Sampling Rate: Measures at a rate of 3 times per second, ensuring timely updates of readings.
- Low Battery Indication: A symbol appears on the LCD to alert the user when the battery is low, prompting timely replacement.
- Auto Range / Manual Range: The meter defaults to auto-ranging, which automatically selects the appropriate measurement range. Users can switch to manual range mode using the REL/RANGE key to select specific ranges as needed.
- Auto Power Off (APO): To conserve battery life, the meter automatically powers off after 15 minutes of inactivity. This function can be canceled by pressing the SELECT key while turning on the power switch.
- Clamp Light: Features a built-in light to illuminate the tested area in dark environments, enhancing safety and visibility.
- NCV Indicator: An indicator lights up and a buzzer alarms when high voltage is detected nearby, providing a non-contact safety warning.
- Function Rotary Switch: A central rotary switch allows users to easily select different measurement functions and ranges, as well as turn the meter on or off.
- SELECT Key: Used to switch between different sub-functions within a rotary switch position (e.g., AC/DC current, resistance/diode/continuity/capacitance, °C/°F temperature).
- Hz/DUTY Key: In AC A/AC V measurements, this key switches between frequency, duty ratio, voltage, and current. In frequency measurement, it toggles between frequency and duty ratio (1-99%).
- Hand Protection: Incorporates a safe design to protect users from touching dangerous areas during operation.
- Zeroing for Current Measurement: For accurate DC current measurements, it is crucial to clear the reading to zero using the REL key before inserting the testing wire into the clamp jaw. The testing object should be placed in the middle of the clamp jaw.
- Single Wire Measurement: When measuring current, only one wire should be placed within the clamp jaw at a time to ensure accurate readings. Measuring multiple wires will result in inaccurate readings.
- Capacitor Discharge: Before measuring resistance or capacitance on a live circuit, all power sources must be switched off, and all capacitors fully discharged to prevent damage to the meter and ensure accurate readings.
- Temperature Measurement: Uses a K-type banana plug thermocouple (Nickel-Chromium Nickel-Silicon) for temperature readings.
Maintenance Features
Proper maintenance is essential to ensure the longevity and accuracy of the Digital Clamp Meter:
- Precision Instrument: The meter is a precision instrument, and users are strictly advised against making any changes to its internal circuitry.
- Environmental Protection:
- Keep the meter away from water and dust.
- Avoid dropping the meter.
- Do not expose the meter to environments with high temperatures, high humidity, flammable or explosive materials, or strong magnetic fields.
- Cleaning: Regularly clean the meter's case with a soft, damp cloth and a mild cleaner. Avoid using corrosive solvents or alcohol, as these can damage the device.
- Battery Replacement:
- When the low battery indicator appears on the LCD, replace the batteries promptly to avoid electric shock or personal injury.
- To replace batteries, unscrew the fixing screws, remove the battery cover, replace the two 1.5V AAA batteries with new ones (alkaline batteries are recommended for longer operation), and then screw the cover back on.
- For long-term storage, remove the batteries to prevent leakage and potential damage to the meter.
- Troubleshooting: If the meter malfunctions, users should follow the troubleshooting steps provided in the manual. If problems persist, contact a repairing center or local dealer.
- Safety Compliance: The meter is designed in compliance with IEC1010-I (EN61010-1), pollution 2, CAT.III 600V, and UL3111-1 standards, emphasizing user safety. Users are warned about high voltage hazards and advised to refer to the manual before operation.
- Input Limits: Do not input any value higher than the rated limit for each measurement range to prevent damage to the meter. Specifically, avoid inputting voltage when measuring resistance.
- Power Off After Use: Always turn the power switch to the OFF position after use.