IIleTA
CONTROLS
(Cent.!
3. IGNITION SWITCH
This switch is part of the battery ignition syst em and has three (3)
positions marked for OFF , ON and
START
. Th is switch is key
operated and automatically return s to the ON position when
released .
4.
LIGHT
SWITCH
ON
/OFF
toggl e switch on dash board for activating headlights.
Lights will not operate if engine is not running
(PRO
12
ONLY).
5.
AMMETER
Mounted in the dash board , it indicates the battery charging and
discharge current.
6.
BRAKE
/CLUTCH
Foot operated left hand side of the machine, depressing pedal
disengages drive belt and engages disc brake .
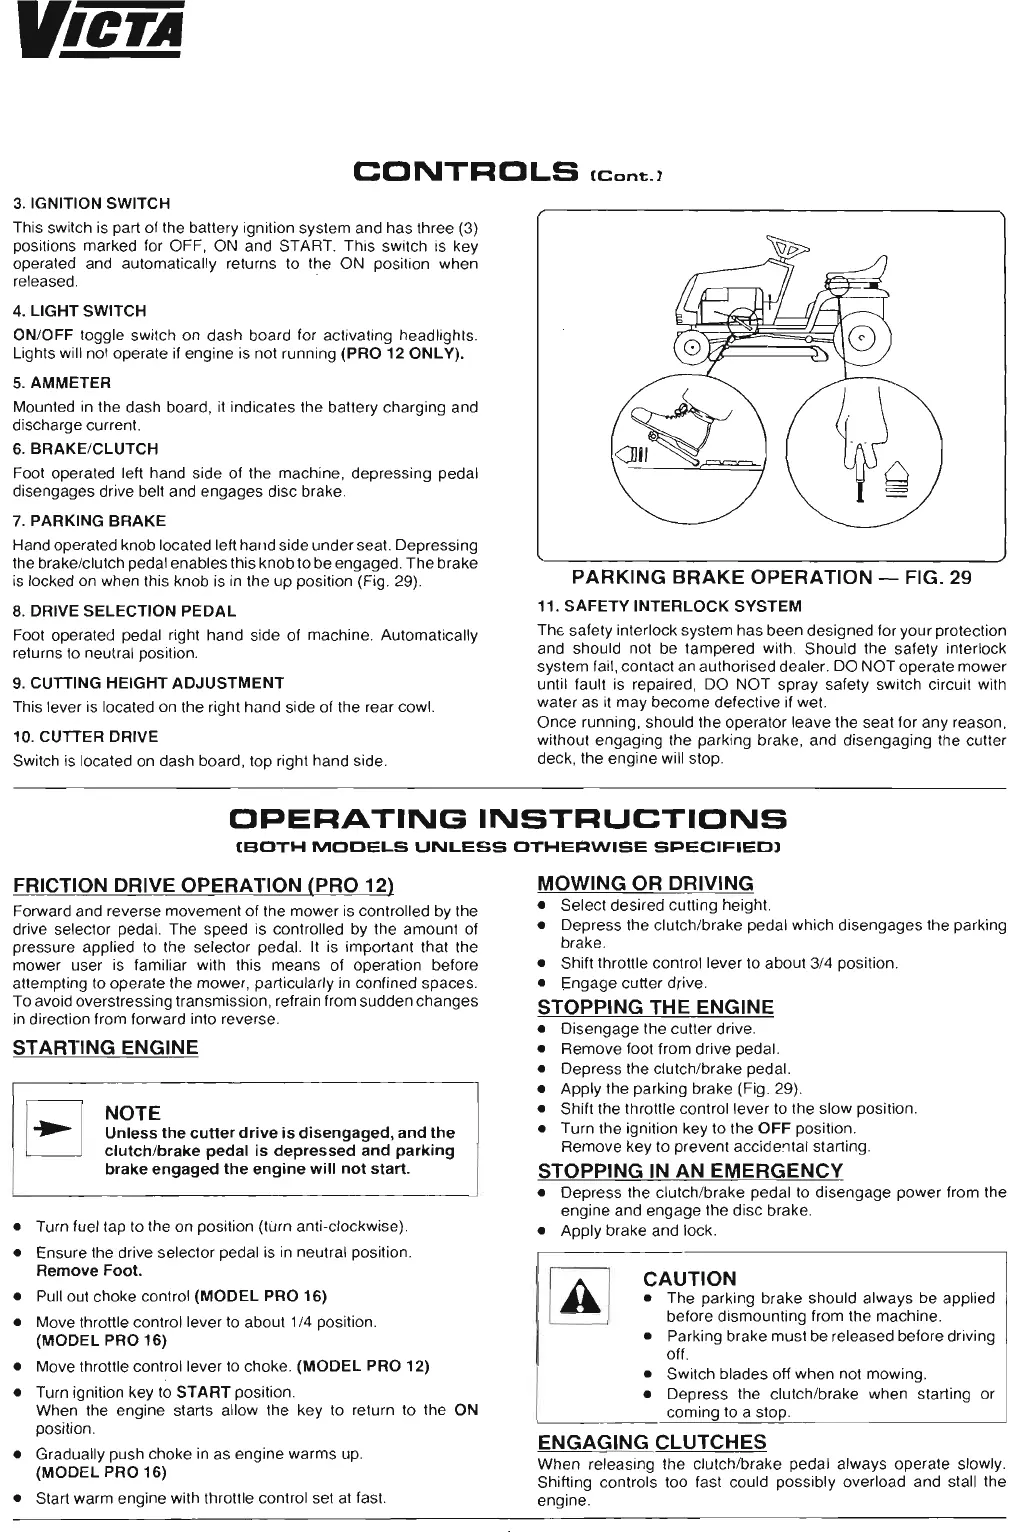
7.
PARKING
BRAKE
Hand operated knob located left
hand
side
under
seat. Depressing
the brake/clutch pedal enables this knob to be engaged.The brake
is locked on when this knob is in the up position (Fig. 29).
8. DRIVE
SELECTION
PEDAL
Foot operated pedal right hand side of machine. Automatically
returns to neutral position .
9. CUTTING
HEIGHT
ADJUSTMENT
This lever is located on the right hand side of the rear cowl.
10. CUTTER DRIVE
Switch is located on dash board, top right hand side.
PARKING
BRAKE
OPERATION - FIG. 29
11 .
SAFETY
INTERLOCK
SYSTEM
Th
E.
safety inte rlock system has been designed for your protection
and should not be tampered with .
Shou
ld the safety interlock
system fail,contact an authorised dealer. DO
NOT
operate
mower
until fault is repaired, DO
NOT
spray safety switch circuit with
water as it
may
become
defective if wet.
Once
running , should the
oper
ator leave the seat for any reason,
without engaging the park ing
brake
, and disengaging the cutter
deck
, the engine will stop.
OPERATING
INSTRUCTIONS
(BOTH
MODELS
UNLESS
OTHEAWISE
SPECIFIED)
FRICTION DRIVE OPERATION (PRO 12)
Forward and reverse movement of the
mower
is controlled by the
drive selector pedal. The speed is controlled by the
amount
of
pressure applied to the selector ped al. It is important that the
mower user is familiar with this mean s of operation befor e
attempting to operate the
mower
, particularly in confined spaces.
To avoid overstressing transmission, refrain from sudden
changes
in direction from forward into reverse.
STARTING ENGINE
EJ
NOTE
Unless
the
cutter
drive
is
disengaged,
and
the
clutch
/brake
pedal
is
depressed
and
parking
brake
engaged
the
engine
will
not
start.
• Turn fuel tap to the on position (turn anti-clockwise).
• Ensure the drive selector pedal is in neutral position.
Remove
Foot.
• Pull out cho ke control
(MODEL
PRO 16)
• Move throttle control lever to about 1/4 positi on.
(MODEL
PRO 16)
• Move throttle control lever to choke.
(MODEL
PRO 12)
• Turn ignition key to
START
position.
When the engine start s allow the key to return to the ON
positi on.
• Gradually push choke in as engine warm s up.
(MODEL
PRO 16)
• Start warm engine with throttle control set at fast.
MOWING OR DRIVING
• Select desired cutt ing height.
• Depress the clutch/brake pedal which
disengages
the parking
brake.
• Shift throttle control lever to about 3/4 position.
• Engage cutt er drive.
STOPPING THE ENGINE
• Disengage the cutter drive.
•
Remove
foot from drive pedal.
• Depress the clutch/brake pedal.
• Apply the parking brake (Fig . 29).
• Shift the throttle control lever to the
slow
position .
• Turn the ignition key to the
OFF
positi on.
Remove key to prevent accloentat start ing.
STOPPING IN AN EMERGENCY
• Depress the clutch/brake pedal to disengage power from the
engine and engage the disc brake.
• Apply brake and lock.
CAUTION
• The parking brake should alw ays be applied
before dismounting from the machine.
• Parking brake must be released before driving
off .
• Switch blades off when not mowing.
• Depress the clutch/brake when starting or
coming to a stop.
ENGAGING CLUTCHES
When relea sing the clutch/brake pedal always operate slowly.
Shifting controls too fast could possibly overl oad and stall the
engine.