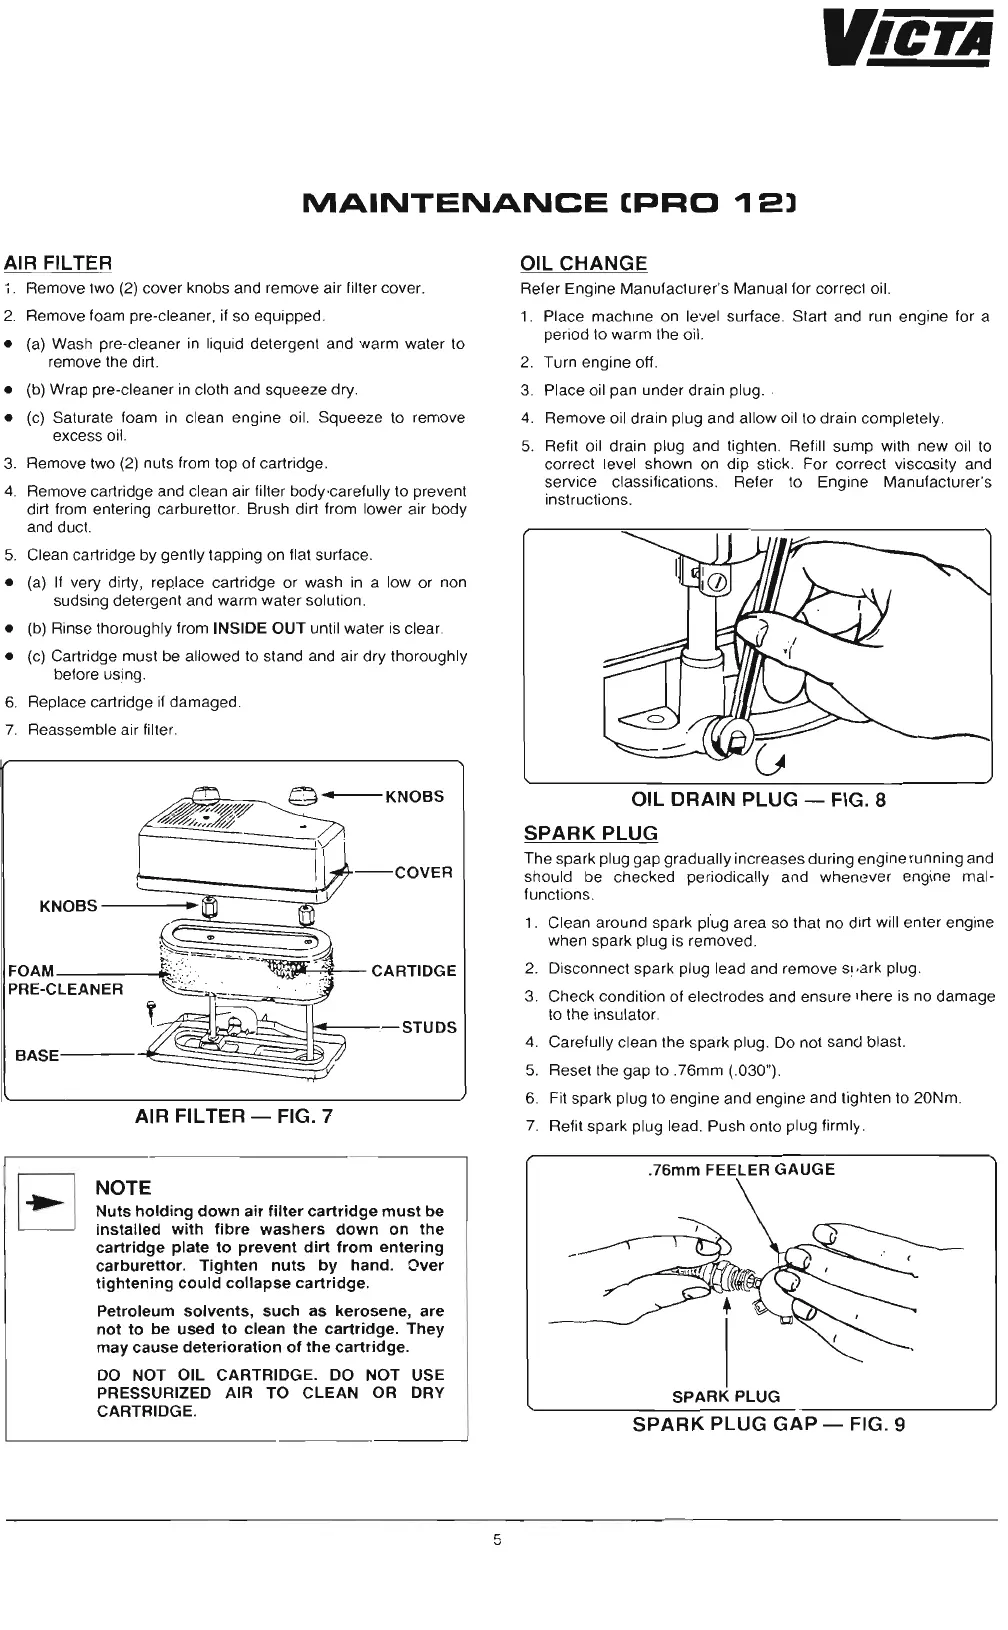
I/leTA
MAINTENANCE
[PRO
'12)
AIR FILTER
I.
Remove two (2) cover knobs and remove air filter cover.
2. Remove foam pre-cleaner, if so equipped.
• (a) Wash pre-cleaner in liquid detergent and warm water to
remove the dirt.
• (b) Wrap pre-cleaner in cloth and squeeze dry .
• (c) Saturate foam in clean engine oil. Squeeze to remove
excess oil.
3. Remove two (2) nuts from top of cartridge.
4. Remove cartridge and clean air filter body-caretully to prevent
dirt from entering carburettor. Brush dirt from lower air body
and duct.
5. Clean cartridge by gently tapping on flat surface.
• (a) If very dirty, replace cartridge or wash in a low or non
sudsing detergent and warm water solution .
• (b) Rinse thoroughly from INSIDE OUT until water is clear.
• (c) Cartridge must be allowed to stand and air dry thoroughly
before using .
6. Replace cartridge if damaged.
7. Reassemble air filter.
g-KNOBS
..
KNOBS
-~==;i~==:;;p
FOAM ....",
PRE-CLEANER
BASE
AIR FILTER - FIG. 7
EJ
NOTE
--COVER
CARTIDGE
-STUDS
Nuts
holding
down
air
filter
cartridge
must
be
installed
with
fibre
washers
down
on
the
cartridge
plate to
prevent
dirt
from
entering
carburettor.
Tighten
nuts
by
hand.
Over
tightening
could
collapse
cartridge.
Petroleum
solvents,
such
as
kerosene,
are
not
to be
used
to clean the
cartridge.
They
may
cause
deterioration
of
the
cartridge.
DO NOT OIL CARTRIDGE. DO NOT USE
PRESSURIZED AIR TO
CLEAN
OR DRY
CARTRIDGE.
OIL
CHANGE
Refer Engine Manufacturer's Manual for correct oil.
1. Place machine on level surface. Start and run engine for a
period to warm the oil.
2. Turn engine off.
3. Place oil pan under drain plug . .
4. Remove oil drain plug and allow oil to drain completely.
5. Refit oil drain plug and tighten. Refill sump with new oil to
correct level shown on dip stick . For correct viscosity and
service classifications. Refer to Engine Manufacturer's
instructions.
OIL
DRAIN
PLUG
- FIG. 8
SPARK
PLUG
The spark plug gap gradually increases during engine running and
should be checked periodically and whenever engine mal-
functions.
1. Clean around spark pfug area so that no dirt will enter engine
when spark plug is removed.
2. Disconnect spark plug lead and remove s..ark plug .
3. Check condition of electrodes and ensure there is no damage
to the insulator.
4. Carefully clean the spark plug. Do not sand blast.
5. Reset the gap to .76mm (.030") .
6. Fit spark plug to engine and engine and tighten to 20Nm.
7. Refit spark plug lead. Push onto plug firmly .
.
76mm
FEELER
GAUGE
SPARK
PLUG
SPARK
PLUG
GAP
- FIG. 9
5
 Loading...