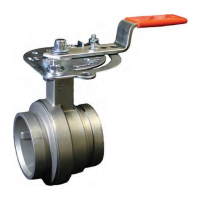
I-769N.Preaction/AC-ELEC / Victaulic
®
Series 769N FireLock NXT
™
/ Installation, Maintenance, and Testing Manual
IMPORTANT INSTALLATION INFORMATION
1. Confirm that adequate space is available for valve, trim, and
accessories. Refer to page 7 for dimensional information.
2. Flush water supply piping. Before installing the Series 769N
FireLock NXT Actuated Valve, flush the water supply piping
thoroughly to remove all foreign material.
3. Protect system from freezing temperatures. Series 769N FireLock
NXT Actuated Valves and supply piping MUST NOT be located in
an area where the valve can be exposed to freezing temperatures
or mechanical damage.
4. Confirm material compatibility. It is the system designer’s
responsibility to confirm material compatibility of the Series 769N
FireLock NXT Actuated Valve, trim, and associated accessories
when a corrosive environment or contaminated water is present.
5. Supply air or nitrogen to the system. Air or nitrogen supply to
the piping system must be clean, dry, and oil-free and must be
regulated, restricted, and uninterrupted. Refer to the “Air Supply
Requirements” section. Observe the system air pressure over a
24-hour period to confirm system integrity. If there is degradation
in system air pressure, find and correct all leaks. NOTE: NFPA
requires less than 1½-psi/10-kPa/0.1-Bar leakage in 24 hours.
6. Supply water to the system. Supply pressure to the charge line
by providing an uninterrupted source of water from upstream of
the main control valve. When an uninterrupted water flow alarm is
required, Victaulic recommends the use of a low-pressure alarm
installed on the charge line downstream of the priming manifold
assembly.
7. Pitch the water supply piping. Per NFPA 13 requirements, piping
must be pitched so that systems can drain properly. For areas that
are subject to high levels of condensation, or where piping is not
properly pitched, an optional Series 75D Water Column Device kit
is available to assist in a utomatically draining water out of the riser.
8. IF THE INLET WATER SUPPLY IS INTERRUPTED FOR ANY
REASON, AND SYSTEM SUPPLY PRESSURE TO THE VALVE
DECREASES, ENSURE THAT THE CHARGE LINE IS FULLY
PRESSURIZED BEFORE PLACING THE SYSTEM BACK IN
SERVICE.
HYDROSTATIC TESTING
WARNING
• If air testing is required, DO NOT exceed
50 psi/345 kPa/3.4 Bar air pressure.
Failure to follow this instruction could result in
death or serious personal injury and property
damage.
Maximum working pressure of valve:
• 300 psi/2065 kPa/20.7 Bar
Valve is factory tested to:
• 600 psi/4135 kPa/4.1 Bar (all sizes)
The valve can be hydrostatically tested against the clapper at:
• 200 psi/1380 kPa/13.8 Bar or 50 psi/345 kPa/3.4 Bar above
the normal water supply pressure (2-hour limited time period) for
acceptance by the authority having jurisdiction
RECEIVING THE SHIPMENT
NOTICE
• Drawings and/or pictures in this manual may be exaggerated for
clarity.
• This product and this installation, maintenance, and testing
manual contain trademarks, copyrights, and/or patented features
that are the exclusive property of Victaulic.
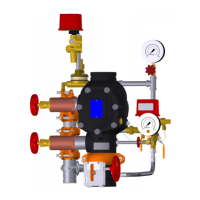
The components shaded in orange on the following page are shipped
separate from the valve and must be installed in accordance with the
trim drawing provided. NOTE: The Vic-Quick Riser (VQR) assembly is
shown.
1. Ensure that all components are included in the shipment and that
all necessary tools are available for installation. Verify that the
provided trim drawing matches the system’s requirements.
2. Remove all plastic caps and foam spacers from the valve.
CAUTION
• Ensure that all protective shipping items are removed from the
interior and exterior of the valve body before installation.
• Ensure that no foreign material gets into the valve body, pipe
nipples, or valve openings.
• If using any material other than PTFE thread sealant tape, use
extra caution so that material does not enter the trim.
Failure to follow these instructions could cause improper valve
operation, resulting in personal injury and property damage.
3. Install the valve assembly into the riser with two Victaulic rigid
couplings. Refer to the instructions, supplied with the coupling,
for complete installation requirements. SERIES 769N FIRELOCK
NXT ACTUATED VALVES MUST BE INSTALLED ONLY IN
THE VERTICAL POSITION WITH THE ARROW ON THE BODY
POINTING UPWARD.
4. For components shipped separate from the valve, apply a small
amount of pipe joint compound or PTFE thread sealant tape to
the external threads of all threaded connections. DO NOT get any
tape, compound, or other foreign material into the openings of the
threaded connections.
Compression Fitting and Tube Configuration
for Auto Drain and Alarm Manifold Assembly
Compression Fitting and Tube Configuration
for Actuator
5. Compression fittings and tubes are provided for connection
from the outlet of the auto drain, alarm manifold assembly, and
actuator to the drip cup or drain. Install the compression fittings
in accordance with the trim drawing provided. NEVER INSERT
A PLUG INTO THE OUTLET OF THE AUTO DRAIN, ALARM
MANIFOLD ASSEMBLY, OR ACTUATOR IN PLACE OF THE
COMPRESSION FITTING/TUBE.
I-769N.Preaction/AC-ELEC_5REV_A
 Loading...