The Victaulic Series 751 FireLock™ European Alarm Check Valve Station is a critical component for fire protection systems, designed to ensure reliable water flow and alarm activation in wet systems. This manual provides comprehensive instructions for its installation, maintenance, and testing, emphasizing safety and adherence to fire protection standards.
Function Description
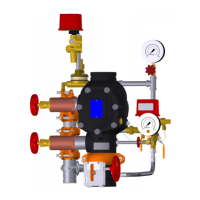
The Series 751 FireLock™ European Alarm Check Valve Station serves as a check valve in wet pipe fire sprinkler systems, preventing backflow of water from the sprinkler system into the water supply. Its primary function is to hold water under pressure in the sprinkler piping and, upon a drop in system pressure (indicating sprinkler activation), allow water to flow into the system while simultaneously activating alarms. The valve is designed to be installed in a vertical position with the arrow on the body pointing upward, indicating the direction of water flow into the system. Optional components like the Series 752 VdS Retarding Chamber and Series 760 European Water Motor Alarm enhance its functionality by preventing false alarms due to pressure fluctuations and providing mechanical alarm notification, respectively.
Important Technical Specifications
The Series 751 FireLock™ European Alarm Check Valve Station is manufactured and listed for a maximum working pressure of 232 psi (1600 kPa/16 Bar). It can be hydrostatically tested against the clapper at 200 psi (1400 kPa/14 Bar) and/or 50 psi (350 kPa/3.5 Bar) above the normal water supply pressure for a 2-hour limited time period. The valve is available in various nominal sizes, including 3-inch/DN80, 4-inch/DN100, 6-inch/DN150, and 8-inch/DN200, with corresponding actual outside diameters ranging from 3.500 inches (88.9 mm) to 8.000 inches (203.2 mm). The trim assembly drawing numbers vary by size and approval (VdS, CE, UKCA, FM, EAC, LPCB, FG, SBSC).
Key components of the valve include:
- Valve Body (Item 1): The main housing of the alarm check valve.
- Clapper Assembly (Item 4): The movable element that seals the valve, preventing water flow until activated. It includes the clapper shaft retaining bushings (Item 2), clapper shaft (Item 3), clapper spring (Item 5), clapper seal (Item 6), and clapper seal retaining ring (Item 7).
- Cover Plate (Item 10) and Gasket (Item 9): Provides access to the internal components for maintenance.
- Restricted Orifice/Alarm Line Drain (Item 10): Controls the flow of water to the alarm line.
- Alarm Line Ball Valve (Item 13): A lockable valve that controls water flow to the alarm system.
- Water Supply Main Control Valve (Item 3): Controls the main water supply to the system.
- System Main Drain Valve (Item 9): Used to drain the system.
- System Test Valve (Item 8): Used for water flow alarm tests.
- Alarm Pressure Switch (Item 12): Electrically activates alarms upon pressure drop.
- Series 760 Water Motor Alarm (Item 15): A mechanical alarm that activates with water flow.
- Series 752 VdS Retarding Chamber (Item 11): Optional component to prevent false alarms from pressure fluctuations.
- Series 752V Retarding Vent Kit (Item 16): Required when an air break is needed above the retarding chamber or when multiple alarm valves are tied to one water motor alarm.
Usage Features
The Series 751 FireLock™ European Alarm Check Valve Station is designed for use in fire protection systems that comply with current local and national fire protection standards and building codes. It is crucial to protect the valve and supply piping from freezing temperatures and mechanical damage. For proper alarm operation in a wet system, all air must be removed from the system, potentially requiring auxiliary drains. When servicing, it is essential to notify local fire companies if alarm activation is possible.
The initial system setup involves:
- Draining the system via the system main drain valve.
- Closing the system main drain valve and confirming no leaks.
- Depressurizing the system (gauges should read zero).
- Opening the remote system test valve and auxiliary drains to remove air.
- Closing the alarm line ball valve (and monitoring ball valve(s) for FG and SBSC trim) to prevent alarms during filling.
- Slowly opening the water supply main control valve to fill the system, allowing water to flow from the remote system test valve and auxiliary drains until all air is removed.
- Closing the remote system test valve and auxiliary drains, verifying system pressure equals or exceeds water supply pressure.
- Fully opening the water supply main control valve.
- Opening and locking the alarm line ball valve (and monitoring ball valve(s) for FG and SBSC trim).
- Confirming all valves are in their normal operating positions (open for alarm line ball valve, water supply main control valve, and alarm line monitoring ball valve(s); closed for system main drain valve and system test valve).
- Notifying authorities and affected areas that the system is in service.
Maintenance Features
Regular inspection and testing are vital for the proper operation of the Series 751 FireLock™ European Alarm Check Valve Station. The manual outlines daily/weekly, monthly, and annual inspection requirements, emphasizing the importance of consulting local and national fire protection standards and contacting the authority having jurisdiction for specific frequencies.
Daily/Weekly Inspection:
- Verify enclosure temperature is above 40°F/4°C in cold weather.
- Inspect the valve and trim for mechanical damage and corrosion.
Monthly Inspection:
- Record and confirm system and water supply pressures are within normal ranges.
- Inspect for mechanical damage and corrosion.
- Confirm the valve and trim are not subject to freezing.
- Confirm all valves are in their normal operating positions.
- For variable pressure systems, confirm no continuous leakage from the restricted orifice/alarm line drain.
Annual Inspection:
- Perform a main drain test (Section IV).
- Perform an internal inspection of the alarm check valve (Section VI).
Required Water Flow Alarm Test:
- Notify authorities and affected areas.
- Verify the alarm line ball valve (and monitoring ball valve(s) for FG and SBSC trim) is open.
- Open the system test valve fully, confirming mechanical and electrical alarms activate and remote monitoring stations receive a signal.
- Close the system test valve after alarm verification.
- Verify alarms stopped, alarm line drained, and remote station alarm reset.
- Push in the plunger of the restricted orifice/alarm line drain, verifying no water flow.
- Confirm all valves are in their normal operating positions.
- Notify authorities and affected areas that the valve is back in service.
Internal Inspection and Component Replacement:
The manual provides detailed instructions for internal inspection and replacing components like the clapper seal and clapper assembly. Key steps include:
- Depressurizing and draining the system before removing the cover plate.
- Loosening cover plate bolts slowly.
- Removing the cover plate and gasket.
- Rotating the clapper out of the valve body and inspecting the clapper seal and retaining ring for contaminants, dirt, and mineral deposits.
- Cleaning out plugged holes in the valve body seat ring (DO NOT use solvents or abrasives).
- Inspecting the clapper for freedom of movement and physical damage.
- Replacing damaged or worn parts with Victaulic-supplied replacements.
- For clapper seal replacement, remove the self-sealing screw and seal retaining ring, then pry out the old seal. Install the new seal, ensuring the seal ring is correctly oriented for 8-inch/DN200 valves.
- For clapper assembly replacement, remove the clapper shaft retaining bushing and clapper shaft, then the clapper assembly. Install the new assembly, ensuring holes align, and reassemble the shaft, spring, and bushing.
- Re-installing the cover plate and gasket, ensuring the gasket is in good condition and the clapper spring arms are in position.
- Torqueing cover plate bolts in an even, crossing pattern to specified values.
- Placing the system back in service.
Troubleshooting:
The manual includes a troubleshooting section for common issues such as fluctuating system water pressure, water leaking from the intermediate chamber, and the water motor gong not ringing or being weak, providing possible causes and solutions.
Safety is paramount throughout all procedures, with warnings about depressurizing and draining the system, wearing personal protective equipment, preventing back injury, maintaining clean work areas, and avoiding pinch points. The use of only Victaulic-supplied replacement parts and accessories is emphasized to ensure proper system operation and approval.