Cabinet
Counter
Top
Ceiling
Wall
Use knife and saw
to cut out drywall
to accommodate plywood
brace support.
Studs behind the wall
Placement of
Range Hood
Cabinet
Counter
Top
Ceiling
Wall
Screw on plywood
to the exposed studs
(woodscrews not included)
Prepare space for
120v outlet. Place
within chimney
wall hidden
from view.
Min Height: 76”
from the floor
(3) Use knife and saw to cut out drywall to
accommodate a plywood brace support. The
inserted plywood should be the same depth as
the drywall slab it is replacing.
(4) Screw on plywood to the exposed studs
(woodscrews not included). Prepare space for 120v
outlet. Place within chimney wall, hidden from view.
Min Height: 76” from the oor.
6” Duct
Install the plastic aps ONLY if your wall or roof cap does not come with
backdraft dampers.
The adaptor can be used to protect the aps.
NOTE: DO NOT USE threaded drywall anchors to support the hood
when mounting the hood on sheetrock. Mounting the hood on wall
studs or lumbars is highly recommended.
CAUTION: Make certain the range hood is secure before releasing!
For safety purpose, pre-drilled mounting holes are provided through the
back of the hood. For a more secure installation, use as many mounting
holes as needed to secure from the inside of hood.
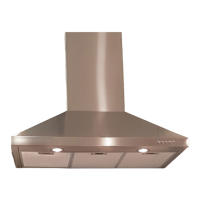
VICTORY range hoods
| CLASSIC / PLANE
14
VICTORY range hoods
CLASSIC / PLANE |
15
INSTALLATION
ROUGH
-
IN
(
Continued
)