66800012
Fig. 2Fig. 1
165 cm
Piano stradale
Ground oor
S S
D
G
B
A
B
Fig. 3
F
F
H
X
E
F
F
W
PULSANTIERE MODULARI
SERIE 8000
ISTRUZIONI DI MONTAGGIO
MODULAR PUSH BUTTON PANELS
SERIES 8000
MOUNTING INSTRUCTIONS
Murare la scatola da incasso (S) lasciando 165cm dalla parte
superiore al piano stradale (Fig. 1).
Set in back box (S) at 165 cm from ground level (Fig. 1).
IMPORTANTE!
Per evitare infiltrazioni d’acqua, prima di fissare il tet-
tuccio alla scatola da incasso, è necessario applicare del
silicone sulla superficie retrostante in modo da sigillare
il tettuccio alla superficie del muro.
Se è richiesto l’utilizzo di più scatole da incasso, collegarle uti-
lizzando gli appositi distanziali (Rif.A - Fig. 2) in dotazione.
Rifinire accuratamente e pulire se necessario i fori di fissaggio dei
supporti per moduli e i fori di riferimento (Rif.B - Fig. 2).
È possibile montare un tettuccio anti-pioggia (Rif.D - Fig. 2 e 5)
usando le viti (Rif.G - Fig. 2 e 5) in dotazione. Il tettuccio ha il
duplice scopo di proteggere dalla pioggia e di coprire eventuali
difetti di muratura.
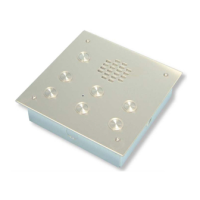
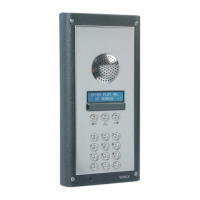
Sfilare il tappo (Rif.E - Fig.3
e 5) del supporto per modu-
li rimuovendo le viti (Rif.H -
Fig.3) se presenti.
Infilare i moduli (Rif.F - Fig.3
e 5) secondo la disposizione
desiderata.
Posizionare il microfono del
portiere elettrico nell’appo-
sita sede (X - Fig. 3).
Bloccare i moduli fissando il
tappo (Rif.E - Fig.3 e 5) tra-
mite le due viti (Rif.H - Fig.
3).
If more than one flush box are needed, connect them by using the
plastic spacers provided (Ref.A - Fig. 2).
If necessary finish and clean properly the module support fixing
holes and all other holes (B - Fig. 2).
A rainshield (Ref.D - Fig. 2 and 5) can be mounted using the fix-
ing screws (Ref.G - Fig. 2 and 5) to conceal possible wall finish-
ing defects and protect against rain.
Remove the fixing screws
(Ref.H - Fig.3) if any to re-
move the plastic cover (Ref.E
- Fig.3 and 5) of the module
support .
Insert the modules (Ref.F -
Fig. 3 and 5) according to the
required configuration.
Insert the microphone of the
door unit amplifier into its
correct place (X - Fig. 3).
Fix the modules by inserting
the plastic cover (Ref.E - Fig.
3 and 5) and using the screws
(Ref.H - Fig.3).
IMPORTANT!
To avoid water infiltrations apply silicon sealing to the
back surface of the rainshield (D) than fix it to the back
box by using the four screws (Ref.G - Fig. 2 and 5) pro-
vided.