Contents
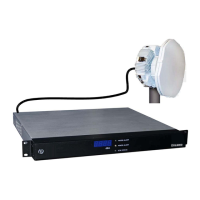
1 About the DXL8000
1.1 DXL8000 System Applications - - - - - - - - - - - - - - - - - - - - - - - - - - - - - - - - - 1-3
1.2 DXL8000 Rear Panel Connectors - - - - - - - - - - - - - - - - - - - - - - - - - - - - - - - 1-8
1.3 About the Outdoor Unit - - - - - - - - - - - - - - - - - - - - - - - - - - - - - - - - - - - - - - 1-9
1.3.1 Integrated Coupler- - - - - - - - - - - - - - - - - - - - - - - - - - - - - - - - - - - - - - - 1-10
2 Installing the DXL8000
2.1 Unpacking the DXL8000 - - - - - - - - - - - - - - - - - - - - - - - - - - - - - - - - - - - - - 2-1
2.2 Preparing to Install the DXL8000 - - - - - - - - - - - - - - - - - - - - - - - - - - - - - - - 2-2
2.2.1 Operating in Safety - - - - - - - - - - - - - - - - - - - - - - - - - - - - - - - - - - - - - 2-1
2.2.2 Calculating MPE- - - - - - - - - - - - - - - - - - - - - - - - - - - - - - - - - - - - - - - - 2-2
2.2.3 Grounding the DXL8000 - - - - - - - - - - - - - - - - - - - - - - - - - - - - - - - - - 2-4
2.2.4 Ventilating the DXL8000 - - - - - - - - - - - - - - - - - - - - - - - - - - - - - - - - - 2-4
2.2.5 Protecting the DXL8000 from Moisture - - - - - - - - - - - - - - - - - - - - - - - 2-4
2.2.6 Routing Cables - - - - - - - - - - - - - - - - - - - - - - - - - - - - - - - - - - - - - - - - 2-5
2.2.7 Power Requirements - - - - - - - - - - - - - - - - - - - - - - - - - - - - - - - - - - - - 2-5
2.3 Installing the DXL8000 - - - - - - - - - - - - - - - - - - - - - - - - - - - - - - - - - - - - - - 2-6
3 Operating the DXL8000
3.1 Powering Up and Down - - - - - - - - - - - - - - - - - - - - - - - - - - - - - - - - - - - - - - 3-1
3.2 Setting Up the DXL8000 with a PC - - - - - - - - - - - - - - - - - - - - - - - - - - - - - - 3-1
3.3 Monitoring Status (Status Tab) - - - - - - - - - - - - - - - - - - - - - - - - - - - - - - - - - 3-2
3.3.1 Status–Help - - - - - - - - - - - - - - - - - - - - - - - - - - - - - - - - - - - - - - - - - - 3-2
3.3.2 Status–Identification - - - - - - - - - - - - - - - - - - - - - - - - - - - - - - - - - - - - 3-2
3.3.3 Status–Monitor Radio - - - - - - - - - - - - - - - - - - - - - - - - - - - - - - - - - - - 3-3
3.3.4 Status–Firmware Revisions - - - - - - - - - - - - - - - - - - - - - - - - - - - - - - - 3-3
3.3.5 Status–Monitor Mod - - - - - - - - - - - - - - - - - - - - - - - - - - - - - - - - - - - - 3-3
3.3.6 Status–Monitor Demod - - - - - - - - - - - - - - - - - - - - - - - - - - - - - - - - - - 3-4
3.3.7 Status–Monitor ODU - - - - - - - - - - - - - - - - - - - - - - - - - - - - - - - - - - - - 3-5
3.4 Setting System Parameters (Setup Tab) - - - - - - - - - - - - - - - - - - - - - - - - - - 3-6
3.4.1 Setup–Identification Screen - - - - - - - - - - - - - - - - - - - - - - - - - - - - - - - 3-6
3.4.2 Setup–Radio Screen - - - - - - - - - - - - - - - - - - - - - - - - - - - - - - - - - - - - 3-6
3.4.3 Setup–Modulator Screen - - - - - - - - - - - - - - - - - - - - - - - - - - - - - - - - - 3-7
3.4.4 Setup–Demodulator Screen - - - - - - - - - - - - - - - - - - - - - - - - - - - - - - - 3-8
3.4.5 Setup–ODU Screen - - - - - - - - - - - - - - - - - - - - - - - - - - - - - - - - - - - - - 3-9
3.4.6 Determining Overall System Capacity Versus Bandwidth - - - - - - - - - - 3-10
3.4.7 Determining Optimal Data Rate Versus Error Correction - - - - - - - - - - - 3-11
3.5 Creating User Accounts (Administration Tab) - - - - - - - - - - - - - - - - - - - - - - 3-11
3.6 Upgrading Software (Downloads Tab)- - - - - - - - - - - - - - - - - - - - - - - - - - - - 3-12
3.7 Managing Alarms - - - - - - - - - - - - - - - - - - - - - - - - - - - - - - - - - - - - - - - - - - 3-12
3.7.1 Interpreting the Front Panel LEDs - - - - - - - - - - - - - - - - - - - - - - - - - - - 3-12
3.7.2 Modifying Alarm Settings (Alarms Tab) - - - - - - - - - - - - - - - - - - - - - - - 3-13
3.7.3 Standard System Configuration - - - - - - - - - - - - - - - - - - - - - - - - - - - - 3-16
3.7.4 Protected System Configuration
- - - - - - - - - - - - - - - - - - - - - - - - - - - - 3-17
DXL8000 User and Technical Manual Contents-1
 Loading...