Wiring Diagrams
Vivint Element CT200 Installation Guide
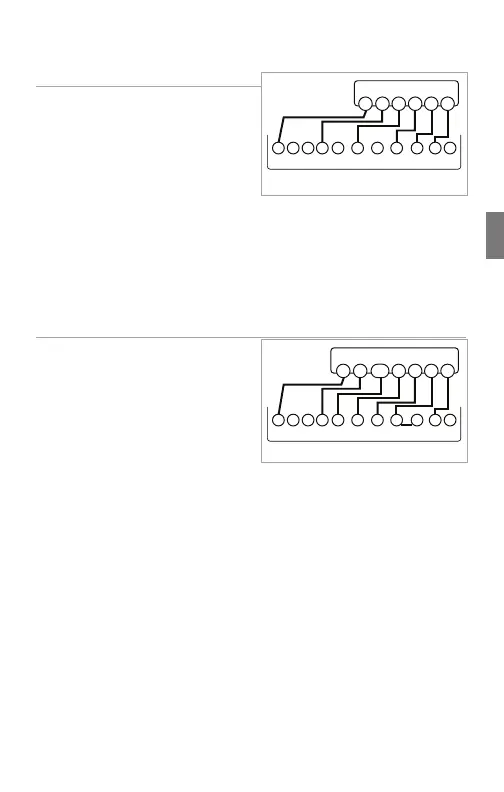
6 Wire Heat/Cool
1. Connect the W wire to the W
terminal. This connects the heat.
2. Connect the Y wire to the Y
terminal. This connects to the
cooling compressor.
3. Disconnect the RC and RH
terminals by removing the
Jumper Wire.
4. Connect the RH wire to the RH terminal and the RC wire to the RC
terminal. This connects power.
5. Connect the G wire to the G terminal. This connects the fan.
6. If available, connect the C wire to the C terminal.
7. Go to “Connect Your Wires” on page 9.
Multi-stage Heat & Multi-Stage Cool
The CT200 can handle up to 2
stages of HEAT and 2 stages of
COOL.
1. Connect the W and W2 wires to
the W and W2 terminals. This
connects the stages of HEAT.
2. Connect the Y and Y2 wires to
the Y and Y2 terminals. This
connects the stages of COOL.
3. Connect the RH or R wire to the RH terminal. This connects the
power.
4. Connect the G wire to the G terminal. This connects the fan.
5. If available, connect the C wire to the C terminal.
6. Go to “Connect Your Wires” on page 9.
POWER
HVAC SYSTEM
THERMOSTAT TERMINALS
CBOW YY2
RH
RC GAW2
W G
Y
RH
RC
C
*RC and RH disconnected
POWER
HVAC SYSTEM
THERMOSTAT TERMINALS
CBOW YY2
RH
RC GAW2
W G
Y
Y2
R
C
W2
25