This document is an instruction manual for the VIVO Single Monitor and Laptop Desk Mount, SKU: STAND-V002C. It provides detailed assembly steps, safety warnings, and contact information for customer support.
Function Description:
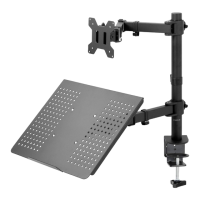
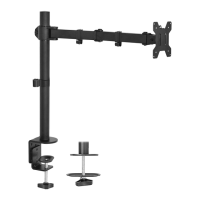
The VIVO Single Monitor and Laptop Desk Mount is designed to securely hold a single monitor and a laptop on a desk, providing an ergonomic setup for users. It offers flexibility in positioning both the monitor and the laptop, allowing for adjustments in height, tilt, and swivel to achieve optimal viewing angles and reduce strain. The mount can be installed using either a desk clamp or a grommet base, accommodating various desk types and user preferences. The design aims to free up desk space by elevating the monitor and laptop, contributing to a more organized and efficient workspace.
Important Technical Specifications:
- SKU: STAND-V002C
- Weight Capacity: Do not exceed 22 lbs (9.98 kg). Exceeding this capacity can result in serious injury.
- Mounting Options:
- Desk Clamp: Suitable for desks with varying thicknesses.
- Grommet Install: Requires a 3/8" (10mm) diameter hole for installation if one does not already exist.
- VESA Compatibility: The mount supports VESA plates (E) for attaching monitors.
- Laptop Tray: Includes a laptop tray (Q) for holding a laptop.
- Adjustments:
- Height Adjustment: The swivel arms (D) can be installed at different heights on the pole (A).
- Tilt Adjustment: The monitor can be tilted, and the tilt angle can be fixed using the supplied Allen Key (M).
- Swivel: The swivel arms allow for rotational adjustments.
- Cable Management: Includes cable clips (L1, L2) to help organize and route cables along the pole and swivel arms.
- Hardware Included: A comprehensive list of hardware is provided, including bolts (F, G, N, O, R), nuts (H, S), washers (I, J), Allen key set (M), soft pads (T1, T2), and various plates and components for assembly.
Usage Features:
- Versatile Installation: Users can choose between a desk clamp or grommet mount depending on their desk and preference.
- Desk Clamp Install (Option A): Involves attaching a clamp brace (C) to the pole (A) with M5x14 bolts (F), then attaching a soft pad (T1) to the clamp brace. The clamp (B) is then installed to the pole, adjustable for different desk thicknesses, and secured with M8x12 bolts (G) and an Allen key (M). Finally, the clamp is tightened to the desktop using a plastic knob.
- Grommet Install (Option B): If a grommet hole is not present, a 3/8" (10mm) hole must be drilled. The clamp (B) is disassembled, and the grommet base plate (K) is installed to the pole (A) with M5x14 bolts (F). A soft pad (T2) is attached to the grommet base plate. The pole is then positioned on the mounting surface and secured using the clamp plate (B2), spring washer (J), M10 washer (I), and knob (B1).
- Monitor and Laptop Attachment:
- For Laptop: The VESA plate (E) is attached to the laptop tray (Q) using M4x10 bolts (R) and M4 nuts (S).
- For Flat Back Monitor: The VESA plate (E) is attached to the monitor using M4x12 thumb bolts (N). Users are advised to hand tighten screws to avoid overtightening.
- For Curved Back Monitor: The VESA plate (E) is attached to the monitor using M4x30 bolts (O) and M4 spacers (P). Users are advised to gently tighten with a screwdriver.
- Easy Monitor Mounting: Once the VESA plate is attached to the monitor or laptop tray, it slides onto the head of the swivel arm (D). A security nut (H) is then installed to prevent accidental dislodging, especially before rotating the monitor.
- Adjustable Positioning: Swivel arms (D) are installed onto the pole (A) and fastened with the supplied Allen Key (M). This allows for height and horizontal adjustments. The tilt angle of the monitor can be adjusted and fixed using the Allen Key (M).
- Cable Management: Wire clips (L1, L2) are provided to attach to the pole (A) and swivel arms (D) to keep cables tidy and out of the way, contributing to a clean aesthetic and preventing cable clutter.
Maintenance Features:
- Regular Tightening: The manual implicitly suggests that bolts and knobs should be tightened securely during assembly and potentially checked periodically to ensure stability, especially for tilt adjustments. The use of an Allen key for fastening bolts and fixing tilt angles indicates that these components may require occasional adjustment or re-tightening.
- Soft Pads: The inclusion of soft pads (T1, T2) for both clamp and grommet installations helps protect the desk surface from scratches and provides a more stable grip, reducing wear and tear on the desk and the mount itself.
- Choking Hazard Warning: The "WARNING: CHOKING HAZARD" for small parts emphasizes the importance of keeping components away from children under 3 years, indicating a need for careful handling and storage of parts during and after assembly.
- Tipover Warning: The "TIPOVER WARNING" highlights critical safety measures:
- Never allow children to climb, stand, hang, or play on any part of the monitor or stand.
- Use tipover restraint or anchor stand to the wall. This is a crucial maintenance/safety feature to prevent serious or fatal crushing injuries.
- These restraints may reduce, but not eliminate, the risk of tipover.
- Inspection for Missing/Defective Parts: The manual advises users to "Check carefully to make sure there are no missing or defective parts" before installation. This proactive step helps prevent issues that could lead to damage or injury during use.
- Customer Support: VIVO offers dedicated customer support Monday-Friday from 7:00 am-7:00 pm CST. They can provide immediate assistance for damaged or defective parts, ensuring users can obtain replacements for a fully functioning product. This is a key "maintenance" feature as it supports the longevity and usability of the product through readily available assistance. Contact options include email (help@vivo-us.com), website chat (www.vivo-us.com), and phone (309-278-5303). Average response and resolution times are provided, indicating a commitment to efficient customer service.