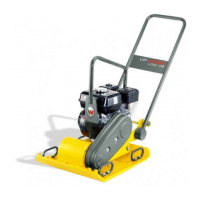
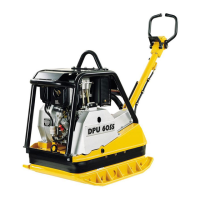
The Wacker Neuson VP1030A-CE and VP1030AW-CE are vibratory plates designed for compaction applications. This operator's manual provides comprehensive information for their safe operation and maintenance.
Function Description
These vibratory plates are designed for compacting loose, granular soils, gravel, and paving stones. Their compact design allows for efficient operation in confined areas, such as next to structures like walls, curbs, and foundations, and even in extremely narrow trenches. Models equipped with water tanks can also be used for compacting asphalt. The machine features a centrally mounted, fully closed exciter for an even spread of compactive force across the base plate. It is powered by a sturdy 4-stroke petrol or diesel engine with a recoil starter, isolated from vibration by rubber dampeners. A vibration-isolated reversible handle with throttle control enhances ease of operation and reduces operator fatigue.
Important Technical Specifications
Engine Data (VP1030A-CE / VP1030AW-CE):
- Engine make: Honda
- Engine model: GXR120UT SE3
- Maximum rated power at rated speed: 2.3 kW (3.08 hp) at 3600 rpm
- Spark plug: NGK GR5HSB, Denso U16FSR-UB
- Electrode gap: 0.6–0.7 mm (0.024–0.028 in.)
- Operating speed: 3600 rpm
- Air cleaner type: Dual element
- Engine lubrication oil grade: SAE 10W30 SJ
- Engine oil capacity: 400 ml (13.52 oz.)
- Fuel type: Regular unleaded gasoline
- Fuel tank capacity: 0.8 L (0.85 qts.)
- CO2 Emission: 674 g/kWh (value determined during engine certification without consideration of the application on the machine).
Machine Data (VP1030A-CE / VP1030AW-CE):
- Dry Weight: 52 kg (114.4 lbs.) / 56 kg (116.6 lbs.)
- Water Tank Capacity: 7.6 L (8 qts.)
- Exciter speed: 5800 ± 100 rpm
- Exciter lubrication: 150 ml (5 oz.) Motor oil
Sound and Vibration Measurements:
- Guaranteed sound power level (LWA): 105 dB(A)
- Sound pressure level at operator's location (LpA): 89 dB(A)
- Weighted effective acceleration value: Approximately 4.78 m/s² (determined according to EN ISO 5349).
- These values are based on measurements taken while the machine operates on crushed gravel at nominal engine speed.
Dimensions:
- Overall height: 914 mm (36 in.)
- Overall length: 889 mm (35 in.)
- Plate width: 300 mm (12 in.)
Usage Features
Preparation for First Use:
- Remove all packaging materials.
- Inspect for damage; do not operate if damaged.
- Verify all components and fasteners are present.
- Attach the control handle by aligning it with the bores and tightening with lock nuts.
- Add necessary fluids: fuel, engine oil, and battery acid (if applicable).
- Move the machine to its operating location.
Fuel Recommendations:
- Requires regular grade unleaded gasoline.
- Avoid gasoline containing water or dirt.
- Approved oxygenated fuels: up to 10% ethanol by volume (E10). Gasolines with higher ethanol content (E15, E85) are not recommended as they can damage the engine.
- Fuel system damage from unapproved oxygenated fuels is not covered under warranty.
Starting the Machine:
- Open the fuel valve.
- Set the choke lever (closed for cold engine, open for hot engine).
- Turn the engine switch to "ON."
- Slightly open the throttle.
- Pull the starter rope.
- If the engine oil level is low, the engine will not start; add oil.
- Open the choke as the engine warms.
- Adjust the throttle lever to the required operating velocity.
Stopping the Machine:
- Reduce engine RPM to idle by moving the throttle completely to the left.
- Turn the engine switch to "OFF."
- Close the fuel valve.
Operation:
- Run the engine at full throttle.
- Allow the plate to pull itself along at its normal speed.
- Assist the plate by pushing slightly when operating on an incline.
- Hold the plate back slightly when operating downhill if it gains speed.
- Three to four passes are recommended for best compaction, depending on the material.
- Avoid operating on excessively wet soil; allow it to dry.
- Add moisture to dry soil to reduce dust and improve compaction.
- For asphalt compaction, use a water tank to wet the asphalt and the plate underside to prevent sticking; two passes are usually sufficient.
- When compacting paving stones, attach a polyurethane pad (optional accessory) to prevent chipping.
- Do not operate on concrete or extremely hard, dry, compacted surfaces, as this can cause the plate to jump and damage the machine.
Maintenance Features
Emission Control System:
- Normal maintenance and repairs can be performed by any repair establishment.
- Warranty repairs must be performed by an authorized Wacker Neuson service center.
- Using non-equivalent service parts may impair the emission control system and affect warranty.
Periodic Maintenance Schedule:
- Daily before starting: Check fuel level, engine oil level, fuel lines, and air filter (replace as needed).
- After first 20 hours or 1 month: Clean air cleaner element, change engine oil, clean engine cooling fins, clean sediment cup/fuel filter, check and clean spark plug, check and adjust valve clearance, check external hardware, check and adjust drive belts, inspect shockmounts for damage.
- Every 50 hours or 3 months: Clean air cleaner element, change engine oil, clean engine cooling fins, clean sediment cup/fuel filter, check and clean spark plug, check external hardware, check and adjust drive belts, inspect shockmounts for damage, change exciter oil.
- Every 100 hours or 6 months: Clean air cleaner element, change engine oil, clean engine cooling fins, clean sediment cup/fuel filter, check and clean spark plug, check external hardware, check and adjust drive belts, inspect shockmounts for damage.
- Every 300 hours or 1 year: Clean air cleaner element, change engine oil, clean engine cooling fins, clean sediment cup/fuel filter, check and clean spark plug, check and adjust valve clearance, check external hardware, check and adjust drive belts, inspect shockmounts for damage, replace shockmounts as needed, change exciter oil.
- Note: When used in asphalt, shockmounts should be replaced annually or after 300 hours of use.
Servicing the Spark Plug:
- Remove and inspect the spark plug.
- Replace if cracked or chipped.
- Clean electrodes with a wire brush.
- Set the electrode gap according to technical data.
- Tighten securely; a loose plug can cause overheating and engine damage.
- Warning: The muffler becomes very hot; avoid touching it during and after operation.
Servicing the Air Cleaner:
- Periodically service the air filter element to prevent carburetor restriction, especially in dusty areas.
- Warning: Do not clean with gasoline or low-flash point detergents due to explosion/fire hazard.
- Notice: Do not run the engine without an air filter element.
- Remove air cleaner cover, foam, and paper filter elements.
- Inspect for holes/tears; replace damaged elements.
- Wash foam element in mild detergent and warm water, rinse thoroughly, and dry. Do not oil the foam element.
- Tap paper element or blow with compressed air; replace if heavily soiled.
- Wipe dirt from inside the housing with a moist rag, preventing dirt from entering the carburetor.
- Re-install elements and cover, tightening screws securely.
Changing the Engine Oil:
- Perform while the engine is warm.
- Place a plastic sheet and container to collect drained oil for proper disposal.
- Remove oil filter plug and drain plug to drain oil.
- Install drain plug.
- Fill crankcase with recommended oil to the lug opening level.
- Install oil filler plug.
Cleaning the Sediment Cup:
- Turn the fuel valve off.
- Remove the sediment cup and O-ring.
- Wash both thoroughly in a non-flammable solvent, dry, and re-install.
- Turn the fuel valve on and check for leaks.
Adjusting the Carburetor:
- Start and warm up the engine.
- Set the pilot screw two turns out.
- With the engine idling, turn the pilot screw to achieve the highest RPM.
- Adjust the throttle stop screw to obtain the standard idle speed.
- Note: Some engines have a limiter cap on the pilot screw for emission regulations; do not remove it.
Servicing the Drive Belt:
- Check belt tension after the first 20 hours of operation for new machines or new belts, then every 50 hours.
- Loosen beltguard screws and engine mounting screws.
- Slide the engine backward to tighten the belt, forward to loosen.
- Adjust belt deflection to 10-13 mm when pressed midway between pulleys.
- Ensure clutch pulley and exciter pulley are aligned (parallel).
- Torque all nuts and screws to 20.5 Nm upon reassembly.
Changing the Exciter Oil:
- Check oil level every 50 hours.
- Place the plate on a flat, level surface.
- Remove drain plug with seal ring; oil level should be at drain plug threads. Add oil as required.
- Change exciter oil every 300 hours.
- To drain, remove the plug from the end of the exciter and tilt the plate up.
- Collect drained oil for proper disposal.
- Place the plate on a level surface and add oil through the plug opening until it reaches the drain plug threads.
- Notice: Never overfill, as this can reduce performance and damage the drive belt.
Cleaning the Plate:
- After use, remove dirt, stones, and mud from under the engine console.
- If used in dusty areas, check and clean engine cylinder cooling fins to prevent overheating.
Storage:
- For storage longer than 30 days:
- Remove loose stones and dirt.
- Clean engine cylinder cooling fins.
- Clean or replace the air filter.
- Change the exciter oil.
- Change the engine oil and follow engine manual procedures for engine storage.
- Cover the plate and engine and store in a clean, dry area.