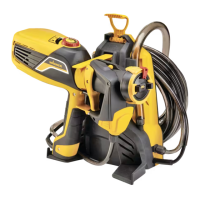
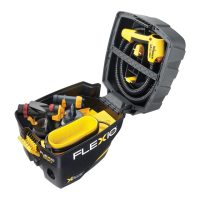
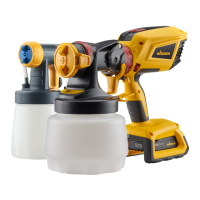
The WAGNER FinishControl 3500 is a paint spraying system designed for smaller to medium-sized projects, suitable for surfaces up to 50 m². It utilizes the XVLP (Extra Volume Low Pressure) spraying technique, which operates with a high volume of air and low air pressure. This method significantly reduces paint mist formation, minimizing the amount of material required to cover an object. The XVLP technique aims for an economical and perfect surface quality while being environmentally friendly.
Function Description
The system comprises a motor-operated turbo-blower that supplies atomisation air to the spray gun. Within the spray gun, a portion of this air pressurises the container, forcing the coating material through the uptake pipe to the nozzle, where it is atomised by the remaining air. All operational settings, such as material volume, can be conveniently adjusted directly on the gun.
Important Technical Specifications
- Voltage: 230 V~, 50 Hz
- Power Consumption: 700 W
- Atomising Output: 220 W
- Container Volume: 1000 ml
- Power Cable Length: 4 m
- Protection Class: I
- Sound Pressure Level: 74 dB (A) (Uncertainty K: 4 dB (A))
- Sound Pressure Output: 87 dB (A) (Uncertainty K: 4 dB (A))
- Oscillation Level: <2.5 m/s² (Uncertainty K: 1.5 m/s²)
- Weight (motor-operated blower and spray gun): 2.3 kg
The acoustic emission value is ascertained in accordance with EN 50144-2-7:2000.
Coating Materials
- Suitable for Use: Solvent-based and water-soluble lacquer paints, mordants, glazes, impregnations, oils, clear varnishes, synthetic enamels, coloured paints, alkyd resin varnishes, primers, radiator paints, hammer effect enamels, anti-rust paints, special-effect paints, and textured paints.
- Not Suitable for Use: Materials containing highly abrasive components, facade paint, caustic solutions, acidic coating substances, and flammable materials.
- Materials requiring specific spray attachments (accessories): Interior wall paint (dispersions and latex paint).
Preparing the Coating Material
Always observe the manufacturer's instructions for the coating material. Purity is crucial for trouble-free operation; if in doubt, filter the material through a fine sieve.
- Processing with StandardSpray spray attachment (yellow):
- Solvent-based lacquer paints: Observe manufacturer's instructions.
- Water-soluble lacquer paints: Observe manufacturer's instructions.
Usage Features
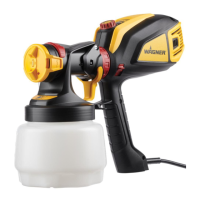
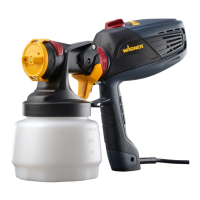
The FinishControl 3500 incorporates the WAGNER Click&Paint System, allowing for quick and easy replacement of the spray attachment (front part of the gun). This facilitates rapid material changes without extensive cleaning and ensures the correct tool is available for different materials and applications.
Available Spray Attachments:
- StandardSpray (yellow) - Order No. 2321 879: Features a slit nozzle and 1000 ml stainless steel container. Processes all standard paints.
- FineSpray (brown) - Order No. 2321 877: Equipped with a round nozzle and 1000 ml stainless steel container. Ideal for low-viscosity paints and glazes.
- WallSpray (white) - Order No. 2321 880: Designed for processing dispersions and latex paint, with a slit nozzle and 1400 ml plastic container.
Setting the Spray Gun:
- Spray Pattern: The spray jet alignment (horizontal or vertical) is adjusted by turning the black adjusting ring (Fig. 3, 1). A lever (Fig. 4, 1) allows switching between a wide and a compact spray jet.
- Material Volume: Adjusted incrementally from 1 (minimum) to 12 (maximum) using the material volume control (Fig. 5, 1).
- Air Volume: Adjusted by turning the air volume control (Fig. 6, 1) clockwise to increase or anti-clockwise to reduce the air volume. Correct air and paint flow rate settings are essential for optimal atomisation, minimal overspray, and efficient working speed.
- Feed Tube Alignment: The feed tube should be aligned for minimal residue. For lying objects, turn it forwards (Fig. 7 A); for overhead objects, turn it rearwards (Fig. 7 B).
- Filters: Use the appropriate filter for the coating material: fine filter (red) for low-viscosity materials and coarse filter (white) for viscous materials.
Starting Operation:
- Unscrew the container from the spray attachment.
- Pour in the prepared coating material (maximum 1000 ml).
- Fit the appropriate filter to the feed tube.
- Align the feed tube.
- Screw the container firmly onto the spray attachment.
- Connect the spray attachment and FC 3500.
- Secure the carrying strap (recommended for better weight distribution and reduced effort).
- Plug in the power cable.
Spraying Technique:
The FC 3500 has a two-pressure point trigger: the first point starts the turbine, and pressing further transports the material. Test the spray pattern, jet width, and material/air volume on cardboard. Maintain a constant distance of 3-20 cm from the object and move the gun evenly for a consistent finish. Start spraying away from the object and avoid stopping on the object. Adjust air/material flow or distance if excessive paint mist occurs.
Breaks in Work:
Unplug the power plug. For longer breaks, vent the container by briefly opening and closing it. Clean nozzle openings after an interruption. When using quick-drying or two-component materials, rinse the unit with a suitable cleaning agent during processing.
Transportation:
Ensure full containers are tightly closed and the case is not laid on its side. Detach the carrying strap and secure it to the case. Place the FC 3500 and accessories inside the case and secure with elastic straps.
Taking Out of Operation and Cleaning:
Thorough daily cleaning is essential for smooth operation.
- Divide the spray gun by pressing the catch (Fig. 2, A) and twisting the spray attachment and turbine in a counter-movement.
- Unscrew and empty the container.
- Pre-clean the container and feed tube with a brush and suitable cleaning agent. Clean the ventilating bore (Fig. 9, 2).
- Fill the container with a non-flammable solvent or water and screw it back on.
- Connect the spray attachment and gun handle.
- Pull the trigger to rinse the spray attachment until the emerging solvent/water is clear.
- Turn off the machine and divide the spray gun.
- Unscrew and empty the container.
- Unscrew the feed tube with the container seal (Fig. 11).
- Clean the feed tube and suction nozzle in the spray attachment with a cleaning brush (Fig. 12).
- Carefully remove the adjusting ring (Fig. 13, 1) from the union nut (2). Unscrew the union nut (2), remove the air cap (3), nozzle (4), and nozzle seal (5). Thoroughly clean all parts.
- Clean the outside of the container with a solvent- or water-soaked cloth.
- Reassemble the parts.
Maintenance Features
Air Filter (Fig. 21, 22):
Never operate the device with a soiled or missing air filter, as dirt can be sucked in and affect operation. Always check the air filter before starting work.
- Unplug the power plug.
- Release and remove the air filter compartment.
- Clean (blow out) or replace the air filter depending on the degree of soiling.
- Push the clean air filter underneath the fixtures on the left and right sides.
- Reattach and lock the air filter compartment cover.
Air Relief Valve (Fig. 23):
If paint enters the ventilation hose:
- Pull the ventilating hose (Fig. 23, 1) from the gun body. Unscrew the valve cover (2). Remove the diaphragm (3). Carefully clean all parts.
- Place the diaphragm in the valve cover with the pin facing forward.
- Turn the gun body upside down and screw on the valve cover from underneath.
- Place the ventilating hose on the valve cover and the nipple at the gun body.
Important Safety Notes:
- Never clean seals, diaphragms, or nozzle/air holes with metal objects.
- The ventilation hose and diaphragm are only solvent-resistant to a limited extent; do not immerse in solvent, only wipe.
- Never operate the device if the nozzle seal is missing, damaged, or incorrectly mounted, as liquids can enter the device and increase the risk of electric shock.
- When cleaning with flammable solvents, disconnect the device from the mains and clean thoroughly with a brush and cloth. Ensure all traces of solvents are removed and parts are completely dry before restarting.
- Do not spray flammable materials for cleaning purposes.
Correction of Malfunctions:
A detailed table is provided for troubleshooting common issues such as the unit not starting, no coating material emerging, material dripping, coarse atomisation, pulsating spray jet, material running down the object, excessive paint mist, and paint in the ventilating hose. Each malfunction is linked to its probable cause and a corresponding remedy.
Spare Parts and Accessories:
A comprehensive list of spare parts for the FinishControl 3500 and the StandardSpray spray attachment is provided, including order numbers and descriptions. Lubricating grease is also available. The FC 3500 is not compatible with the heatable TempSpray spray attachment.