14
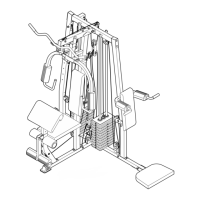
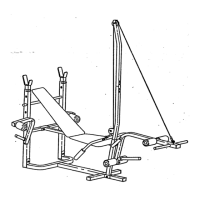
21. Insert an M6 x 50mm Carriage Bolt (38) into the
center hole in the Seat Plate (37). Attach the Seat
Plate to the Seat (13) with two M6 x 16mm
S
crews (18).
I
nsert the M6 x 50mm Carriage Bolt (38) into the
indicated hole in the Seat Frame (36). Tighten an
M6 Nylon Locknut (2) with an M6 Washer (10)
onto the Carriage Bolt.
Attach the other end of the Seat (13) to the Seat
Frame (36) with an M6 x 50mm Screw (24) and
an M6 Washer (10).
22. Lubricate an M8 x 57mm Bolt (80) with grease.
Orient the Leg Lever (29) so that the decal is on
the indicated side. Attach the Leg Lever to the
Seat Frame (36) with the M8 x 57mm Bolt (80)
and an M8 Nylon Locknut (3). Do not overtight-
en the Nylon Locknut; the Leg Lever must
pivot freely.
Insert an Eyebolt (35) into the Leg Lever (29) from
the direction shown. Attach the Eyebolt with an
M10 Nylon Locknut (21) and an M10 Washer (9).
23. Insert a Pad Tube (28) into the Seat Frame (36).
Next, wet the Pad Tube with soapy water. Then,
slide two Small Pads (30) onto the Pad Tube.
Assemble the other Pad Tube (28) to the Leg
Lever (29) in the same way.
24. Rest the Seat Frame (36) on the indicated pin in
the Front Upright (42). Attach the Seat Frame to
the Front Upright with an M8 x 67mm Carriage
Bolt (86) and the Seat Knob (40).
21
80
Lubricate
Decal
35
21
9
29
22
3
36
23
24
30
30
29
28
28
36
10
2
24
36
13
38
37
18
36
40
42
86
Pin