7
Technische Änderungen vorbehalten | Technische wijzigingen voorbehouden | We reserve the right to make technical changes | Sous réserve de modifications techniques
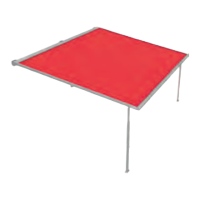
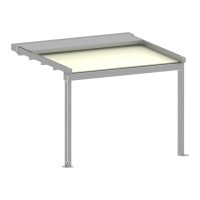
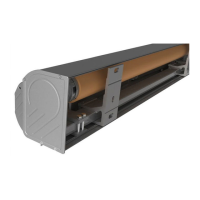
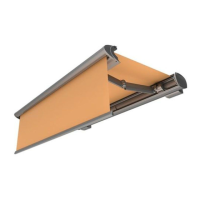
Intended use
Plaza Viva is a sun protection awning that can primarily be used for this purpose.
Plaza Viva can be used as rain protection contingent on the instructions for cont-
rolled rain drainage*. Misuse of the awning, as well as any alterations, changes or
additions to the awning that are carried out without weinor‘s written permission
can lead to damage, hazards or the collapse of the awning. These are not permit-
ted and will result in the voiding of the guarantee claims.
(* Use of the Plaza Viva as rain protection only under supervision and only when the
rain drainage is guaranteed to prevent damage to the system due to pooling in the
fabric. Water drainage is guaranteed for systems with a pitch of >14° or for systems
with a pitch of >4° and a telescopic post completely lowered on one side (option).
Rain drainage is not guaranteed with over 56 l/h/m
2
precipitation (rain class 2)!
If the awning fabric is retracted while still wet, mould and stains may form! Only
retract a wet awning in the event of an emergency (e.g. with the risk of a storm,
frost or snowfall)! Wet fabric must be dried out as quickly as possible when the
awning is open!
CE mark
Weinor GmbH & Co. KG declares that the Plaza Viva is
in compliance with the basic requirements and relevant
provisions of the EN standards. Plaza Viva meets the
requirements of the wind resistance class indicated in
the CE conformity marks. The requirements shall only be
deemed as having been met once the manufacturer's
instructions have been adhered to.
Qualifications
These instructions are addressed to trained fitters and require qualification and
knowledge of installation techniques:
- Occupational safety at work, operating safety and accident prevention regulations
- Handling of ladders, scaolding, tools and machines,
- Transport of long, heavy components and glass panes,
- Estimation of the building structure and fitting the fixing materials,
- Installation, start-up and operation of the product.
• Employ a professional installation company if you do not possess these qualifi-
cations!
Safety symbols
Warning! Risk of electric shock! Danger level III
Careful! Personal injury! Danger level II
Caution! Product and property damage!
Danger level I
Safety instructions
Warning! Risk of electric shock!
• Electrical fixed installation may only be carried out by electrically skilled person
according to VDE 100!
• Observe the installation instructions for the electrical devices included in the
delivery!
• Separate the electrical connections from the mains during the installation!
• Only connect electrical termination to mains system with all-pole disconnecting
device and with min. 3 mm contact opening width!
• Only connect the construction if indications on product relating to voltage,
frequency and output match those of the power source!
Caution! Personal injury!
• Follow safety instructions in order to prevent personal injury!
• Observe the instructions for installation and setting from the manufacturer of
the drive, commutator and control!
• Keep packaging, sheeting and small parts away from children (choking hazard)!
• Disconnect current supply when working within the movement range of the
construction (disconnect connector coupling on driver or install controlled
power interruption from the outside)!
• Switch off fuses and automatic control in order to prevent risk of crushing or
falling due to uncontrolled movements of the construction!
• If awnings are operated by several users: a priority locking device must be
activated (controlled interruption of the power supply from outside), making it
impossible to open or retract the awning at all!
Ladders and anti-fall guards:
• Do not lean ladders against the awning or fix them to the awning!
• Ladders must be on a firm base and provide adequate support!
• Only use ladders with adequate load-bearing capacity!
• Use appropriate anti-fall guards to prevent the danger of falling especially
when working at considerable heights!
Mounting brackets:
• Check that the type and number of the mounting brackets supplied are compli
-
ant with the order!
• Check that the information provided in the order about the installation surface
tallies with the actual installation surface on site! Installation is inadmissible in
case of safety-relevant deviations!
Fixing material:
• Use suitable installation and fitting materials (plugs, glue, etc.) corresponding
to onsite conditions and loads! In doing so, the extraction forces specified by
the manufacturer must be observed and taken into account!
• The awning must be fitted with the type and number of brackets recommen
-
ded by the manufacturer.
Crushing and cutting zones:
• Crushing and shearing zones exist between movable components and moving
awning parts (projection profile, housing, folding arms, profiles) which could
catch and draw in clothing or body parts!
• Only activate awnings up to 2.5 m installation height if the moving parts are
within your line of vision! Electrical controls, radio controls with latch switches,
stand-alone latch switches, etc. are not permissible in this case!
• The key switch must be fitted in the line of vision of the projection profile, but
far enough removed from the movable parts, at a height of 1.5 metres (natio
-
nal regulations relating to disabled people must be observed)!
Partly mounted awnings:
• In awnings which are partly mounted in the factory, secure the spring-tensi
-
oned parts (designated by the manufacturer) against unintentional opening.
Caution! Do not remove this locking device until the installation of the awnings
has been completed in order to prevent the high risk of injury that could result
from unintentional opening of spring-tensioned parts!
Test run:
• When ascending the awning for the first time, make sure that the working
range of the awning and the area below it is kept clear!
• A visual inspection of the fixing material and brackets must be performed after
the awning has been extended for the first time.
• When carrying out test runs, never use automatic system control or switches if
the awning is not in the operator's line of vision!
• Use test cable for the motor input!
Caution! Product and property damage!
• Secure cargo properly and safely!
• Protect the packaging from moisture (dampened packaging can come loose
during transport)!
• Seal open packaging for further transport!
• The awning must be carried to the place of installation the right way round so it
does not have to be turned round again in a confined space.
Raising the awning to a higher level using ropes:
• Remove awning from the packaging and secure tightly with hauling ropes!
• Lift the awning horizontally and evenly!
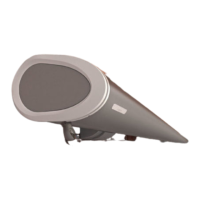
Fitting the Tempura heating system :
• For safety reasons, the fitting of the weinor Tempura to wall brackets or the
Plaza Viva's bottom profile is not permitted!
• When fitting a Tempura under the Plaza Viva on a wall or with roof mounting
(corners) the safety distances in the Tempura instructions for assembly must be
taken into account!
Note on the generation of noises (creaking) on the system
in the event of temperature changes!
Noises which occur on the system after proper assembly and/or maintenance
are unavoidable and are mostly due to the expansion of components due to the
eect of heat.
• Ensure stress-free assembly when screwing the individual components together
in order to minimise subsequent noise generation, particularly in the event of
temperature influences!
Technische Änderungen vorbehalten | Technische wijzigingen voorbehouden | We reserve the right to make technical changes | Sous réserve de modifications techniques
General
Weinor GmbH & Co. KG
Mathias-Brüggen-Straße 110
50829 Cologne (Germany)
17
EN 13 561
Awning for use in exterior
area
Wind resistance class:
Class 3
Plaza Viva | 127027-0000 w | v8 | 2021-03-03 | Montageanleitung | Montagehandleiding | Instructions for assembly | Instructions de montage
 Loading...