MAINTENANCE
SPARK ARRESTOR MAINTENANCE
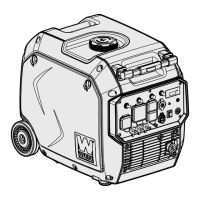
It is recommended to inspect and clean the spark arres-
tor (Fig. 26 - 1) every 100 hours of operation.
1. The spark arrestor is located outside the muffler,
which gets very hot during operation. Allow the engine
to cool completely before servicing the spark arrestor.
2. Unscrew the two Phillips-head screws that hold the
spark arrestor (Fig. 26 - 1) to the muffler.
3. Remove the spark arrestor screen.
4. Carefully clean and remove the carbon deposits from
the spark arrestor screen with a wire brush. Replace the
spark arrestor if it is damaged (part no. DF680iX-124.1,
available for purchase at wenproducts.com).
5. Reinstall the spark arrestor in the muffler and secure
it in place with the screws.
DRAINING THE FUEL TANK
1. Prepare an approved gasoline-storage container.
Make sure the engine switch is turned to OFF.
2. Open the right side panel to access the carburetor, as
instructed on the previous page.
3. Open the carburetor drain screw and turn the 4-in-1
switch to “RUN”. This will allow gasoline to drain from
the gas tank through the carburetor.
NOTE: It may take a few hours for your tank to drain
completely, depending on the amount of gasoline in the
tank.
4. Once drained fully, close the carburetor drain screw,
turn the engine switch OFF, and close the side panel.
CAUTION! Running the engine with a dirty, dam-
aged, or missing air filter will result in possible dan-
ger and cause the engine to wear out prematurely.
Fig. 26
1
BATTERY MAINTENANCE & STORAGE
The battery (part no. DF475-041) shipped with the gen-
erator has been fully charged. The battery will receive
charge when the engine is running. Remember to run
the generator once a month for 20-30 minutes to charge
the
battery. A charged battery will allow you to start the gen-
erator using the electric start switch during your next
time of need. If the battery is out of charge, you can still
manually start the generator using the recoil start with
gasoline as your fuel source.
WARNING! It is best to store the battery indoors
at room temperature. Do not store your battery out-
side in the winter, where temperatures may go below
25°F (-5°C), or in any location where temperatures
may exceed 104°F (40°C), such as in direct sunlight
or inside a vehicle or metal building during the sum-
mer.
32
IMPORTANT: If the generator is not used for a long pe-
riod, it is recommended to disconnect the battery quick-
connectors to protect the battery from losing charge. Af-
ter disconnecting the quick-connectors, cover the ends
with an insulator such as electrical tape. You may can
also connect the battery to an automatic trickle charger
to keep the battery charged.
To reinstall / replace the battery:
1. Open the side panel (to the right of the control panel)
by twisting the panel lock knobs a quarter turn counter-
clockwise.
2. Disconnect the battery quick-connectors.
3. Unhook the rubber strap from the bottom of the bat-
tery compartment. Gently remove the battery.
4. Replace with an identical new battery
(part no. DF475-041).
5. Use a Phillips-head screwdriver to remove the quick-
connector wires from the old battery. Install them on the
new battery in the same orientation, making sure the red
wire is installed on the positive (+) battery terminal, and
the black wire is installed on the negative (-) battery ter-
minal.
6. Place the battery in the battery compartment. Secure
it with the rubber strap.
7. Connect the battery quick-connectors. Replace the
side panel.