04 05
THE FLOAT
The oat consists of a white plastic
cylinder which hangs on two arms.
The oat rests on the surface, so it is
lifted when the water level rises. When
the oat reaches a certain height, the
dehumidier responds to this and shuts
down automatically to prevent ooding.
When you have emptied the water
reservoir and are to replace it in the
dehumidier, this is the simplest
method:
1. Push the water reservoir in until it
touches the oat.
2. Raise the forward edge of the water
reservoir from below so that the
whole water reservoir is slightly
slanted.
3. Push the water reservoir home. The
oat should now be in the reservoir
instead of being stuck
behind it.
NOTE: It is important that
the oat moves freely, since
its purpose is to respond to the
water level and ensure that the
dehumidier is turned o when it
is high. A wrongly placed oat may
allow the water reservoir to ood.
DRAINAGE OF WATER
The dehumidier is tted with a hose
connection. By attaching a hose to the
dehumidier the dehumidied water
can be drained directly away.
Using the hose:
1. Disconnect the dehumidier from the
power source and remove the water
reservoir to give access to the drip tray.
2. Attach the hose coupling to the thread
on the dehumidier and lead the hose
to a drainage outlet. Check that the
hose is not above the level of the drip
tray.
3. Connect the dehumidier to the power
source.
Without hose, direct to a drain
outlet:
1. Disconnect the dehumidier from the
power source and remove the water
reservoir.
2. Place the dehumidier directly over the
drain so that the dehumidied water
can drip through the hole at the base of
the dehumidier and into the drain.
3. Connect the dehumidier to the power
source.
THE HYGROSTAT
Wood’s dehumidier is tted with a
built in hygrostat, or humidity controller,
which is set to the desired level of
humidity. The hygrostat registers the
current level of humidity and ensures
that the dehumidier is turned on and
o automatically.
How to set the hygrostat:
1. Set the hygrostat knob to the
Maximum position.
2. Set the fan to position II
(does not apply to DS12).
3. When the desired level of humidity is
reached, the hygrostat knob is turned
counterclockwise until the dehumidier
is turned o.
NOTE: The ambient
relative humidity is most
simply measured with a wood’s
hygrometer, and the most suitable
range is between 40% and 50%.
SHUTTING OFF AUTOMATICALLY
When the water reservoir is full, the
dehumidier is shut o automatically.
The warning light at the front of the
dehumidier comes on to show that the
water reservoir should be emptied.
1. Disconnect the dehumidier from the
power source.
2. Empty the water reservoir.
3. Put the empty water reservoir back and
check that the oat moves freely. See
the section on the Float.
4. Connect the dehumidier to the power
source.
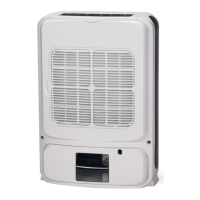
THE AIR FILTER
The air lter at the rear of the
dehumidier ensures that the cooling
coils are kept free of dust. It is important
that the lter is kept clean so that air can
ow freely through the dehumidier.
The lter should thus be cleaned when
required.
1. Loosen the lter by squeezing it lightly
in the middle. This releases the xings
on the sides of the lter.
2. Lift the lter out and wash it with warm
water and a mild cleansing agent.
Alternatively the lter may be vacuum-
cleaned.
3. Let the lter dry and put it back.
AUTOMATIC DEFROSTING
Wood’s dehumidiers are tted with a
timer which ensures that the cooling
coils are defrosted once an hour. The
timer shuts down the compressor,
which causes the cooling of the coils
to stop. The fan continues to draw the
air at room temperature through the
dehumidier and thus melts the ice, and
the water runs down into the reservoir.
This defrosting system means that the
dehumidier works at temperatures as
low as +5˚C.
FAN
The fan ensures that air ows through
the dehumidier. Moist air is sucked in
from the rear and goes via the cooling
coil and the vaporizer to come out dry
at the front of the dehumidier. Wood’s
dehumidiers are tted with two fan
speeds, except model DS12, which has
only one.
• Position II – gives a high air ow with
maximum dehumidifying of air.
• Position I – gives a lower air ow
which causes quieter operation and
somewhat
lower dehumidifying capacity.
CLEANING AND MAINTENANCE
Wood’s dehumidiers require cleaning
to maintain their high dehumidifying
capacity.
- The front grid can be vacuum-cleaned
or cleaned with a brush.
- The cooling coils are best cleaned with
a rag and warm water.
- The air lter may be washed or
vacuum-cleaned.
- The fan motor is permanently
lubricated and requires no
maintenance.
NOTE: Always disconnect
the cord before cleaning.
HINTS:
- When the dehumidier is used in
extremely damp environments or when
the temperature is below +10˚C, the
dehumidier may stop working. A large
amount of ice builds up on the cooling
coil. Turn o the dehumidier and place
it a little above oor level so that the ice
will melt away.
- Sometimes it may be useful to use a
frost guard or heater fan to make sure
that the temperature does not fall
below +5˚C.
- For maximum dehumidifying power in
a room, it is recommended that the air
supply from outside and from adjoining
rooms is minimized – close doors and
ventilators.
- Put in the center of the room
- Increase temp. for faster
dehumidication ( warm air carries
more water.)
- Use frost Guard if possibility
temperature is below +5°C
- Higher dehumidication in Autumn /
Summer because outside air is warm
and humid.
WHEN THE DEHUMIDIFIER
REQUIRES SERVICING
If the dehumidier requires servicing,
you must rst contact the retailer. Proof
of purchase is required for all guarantee
claims.
GUARANTEES
5 years’ guarantee against faults in
manufacture applies to the compressor
and 2 years’ guarantee against faults
in manufacture applies to the other
components.
Note that the guarantee is valid only on
production of a receipt.
This machine complies with EEC
directives 76/889 + 82/499
Recommended limits for use
Temp. DS & ED: +5˚C to +35˚C
Relative humidity: 0% to 80%
Recommended
humidity level: appr. 50% RH
IMPORTANT! - Wood’s
dehumidiers must be connected
to an earthed power source.
 Loading...