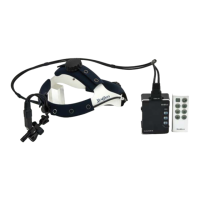
The L2S15 is a portable LED headlight system designed for medical use, particularly for illuminating wounds or surgical sites. It utilizes a lithium-ion battery and an LED light source, offering co-axial and shadow-free illumination with consistent brightness and excellent color rendering. As a portable device, it eliminates the need for supplementary holders or fiber optic cables.
Function Description:
The L2S15 operates by delivering DC voltage from its battery to an LED device via a step-down circuit, generating light through a lens. This design ensures consistent brightness even as the battery voltage decreases. The system includes a main control unit, a battery pack, an LED lens module, and a remote controller for ease of use. It is designed with a latching power switch circuit and protection circuits for overcurrent and overvoltage, ensuring safe charging and operation.
Important Technical Specifications:
Electrical Specification:
- Input Voltage: DC5.0V 600mA
- Operating Power: 3.0W
- Operating Time:
- 1st step mode (Minimum intensity): About 23 hours
- 2nd step mode: About 11 hours
- 3rd step mode: About 8 hours
- 4th step mode (Maximum intensity): About 5 hours
- Charging Time (Full charge): 5 hours
- Power of Charger:
- Input: DC5V 2A
- Output: DC4.2V 1.5A
- Power of Power Supply:
- Input: AC100~240V, 50-60Hz, 0.3A
- Output: DC5V 2A
- Light Source: High Power LED (White Color)
LED Illumination (at WD400mm):
| Type |
LLM1582 |
LLM1574 |
LLM1566 |
| 1st step |
12,000 lx |
13,000 lx |
17,000 lx |
| 2nd step |
22,000 lx |
24,000 lx |
32,000 lx |
| 3rd step |
30,000 lx |
32,000 lx |
44,000 lx |
| 4th step |
39,000 lx |
43,000 lx |
59,000 lx |
- Field of View (at WD400mm):
- LLM1582: Ø82mm
- LLM1574: Ø74mm
- LLM1566: Ø66mm
- Weight (LED Lens Module):
- LLM1582: 35.1 g
- LLM1574: 32.8 g
- LLM1566: 34.2 g
- Color Temperature, Wavelength Range: 6000 K, 400 ~ 700 nm (Visible)
- Uniformity: More than 80% @WD400mm
- LED Operating Power: 2.4 W (max.)
- LED Life Span (Guaranteed Time): 50,000 hours
Dimensions & Weight:
- LED Control Unit (LCU15): 45 g
- Battery Pack (BTP15): 130 g (3.7V / 5200mAh Li-ion)
- Charger (LCH15): 20 g
- Remote Controller (RC15): 56 g (including 2 AAA batteries)
- Power Supply (BPM010S05): 95(L)x53(W)x33(H) mm, 176 g
- Power Cord (LPC): 1.8 m, 90 g
Environmental Conditions for Storage & Transportation:
- Ambient Temperature: 10℃ ~ 40℃ (50°F ~ 104°F)
- Relative Humidity: 30% ~ 85% (excluding condensation)
- Pressure: 860 hPa ~ 1060 hPa
Usage Features:
Preparation before usage:
- Component Check: Verify all components are present as listed in the manual.
- Battery Charging & Assembly: Fully charge the battery pack before first use. Connect the power supply to the charger. A green light on the charger LED indicates a full charge. Assemble the control unit with the charged battery, then connect the LED lens module wire to the circular connector of the control unit.
Operating Instructions:
- Placement: Secure the main body to a waist belt or inside a pocket.
- Headband/Glasses Attachment: When using a headband, connect the LED lens module to the headband attachment and adjust it to your head. For surgical telescopes, connect the LED lens module to the glasses nose bridge.
- Wire Management: Use gown clips to fix the wire and remove the protection cap from the LED lens module.
- Power On & Adjustment: Turn on the control unit to activate the light. Adjust the LED lens module's position as needed. The external LED lens module's temperature can reach up to 54℃ during use, so caution is advised.
- Intensity Change: Press the intensity change button on either the control unit or the remote controller to adjust the light intensity (1st to 4th step).
- Battery Status: The control unit displays the remaining battery percentage (0-99%) or "FU" for fully charged. A "Beep" alarm sounds when the remaining charge is below 10%, indicating the need for recharging. The device will shut down 10 minutes after the "Beep" sound.
- Battery Pack Release: To release the battery pack, align the two charging terminals of the control unit and battery pack. Press the battery release button with one hand while holding the sides of the battery pack with the other, then pull the battery pack downward to disassemble.
Remote Controller (RC15):
- Power On/Off Button: Turns the LED lens on/off.
- Intensity Change Button: Changes LED intensity from 1 to 4.
- Battery Entrance: Requires two 1.5V AAA batteries.
- Pairing: The control unit and remote controller are pre-paired. Instructions are provided for setting up or releasing pairing if needed. To pair, turn on the control unit, push the pairing switch for one second (blue light blinks), then push and release the On/Off button of the remote controller (blue light lingers and turns off). To release pairing, turn on the control unit, push and hold the pairing switch for more than 5 seconds (blue light blinks), then push and release the On/Off button of the remote controller (blue light lingers and turns off).
LED Lens Module Attachment Examples:
The LED lens module can be attached to various platforms, including headbands, TTL loupes, flip-up loupes, usual glasses, and protective goggles.
Maintenance Features:
After Use:
- Power Off: Press the power ON/OFF button to turn off the device.
- Storage: Store the device in its case after cleaning any dirt or blood.
- Battery Removal (for long-term storage): If not used for a long time, remove the battery from the battery pack to prevent discharge.
Cleaning Instruction:
- LED Lens Module: Clean the surface of the LED lens module regularly with a soft cloth and neutral detergent to remove dirt, then dry it.
- Chemical Avoidance: Do not use volatile chemicals such as benzene, alcohol, thinner, or acetone for cleaning. If contact occurs, clean immediately with a soft cloth dipped in neutral detergent. The manufacturer is not responsible for defects caused by these chemicals.
- Sterilization/Cleaning Process: Do not expose the equipment to sterilizing or cleaning processes involving excessive temperature and humidity, as this can damage the equipment and void the warranty. Liquid contact with internal parts of the main body is strictly prohibited.
Battery Storage:
- Half-Charged Condition: For immediate non-use, store the Li-ion battery in a half-charged condition to prolong its lifespan.
- Separated Storage: For long-term non-use, store the battery separated from the main body.
- Dry Condition: Keep the battery in a dry environment with an ambient temperature range of +15℃ ~ +25°C. Avoid extremely hot or cold places.
- Service Life: The provided battery can be charged and discharged approximately 300 times at room temperature. If the operating time shortens after a full charge, it is recommended to replace the battery as it is an expendable item.
General Storage & Transportation:
- Storage Environment: Store the LED light in an area free from air pressure, temperature, humidity, wind, direct light, dirt, salinity, and ions.
- Stability: Store the L2S15 in a place free from declination, shock, and vibration.
- Chemicals: Store the L2S15 away from gas, smoke, and chemical fluids.
- Power Cord: Do not pull, twist, or bend the power cord excessively. Wind it loosely and secure it with a rubber bandage or cable tie.
- Main Body Protection: Do not expose the main body to excessive shock, direct sunlight, or high temperatures, which can cause defects.
Troubleshooting:
- No light from LED lens module: Check if the battery pack is properly installed, if the battery is discharged, and if the cable connection is secure.
- Light comes on briefly then turns off: Check the battery's remaining quantity and recharge.
- Insufficient light intensity after battery exchange: Adjust the intensity step.
- Short discharging time: Check if the battery is fully charged. If the running time is still short, replace the battery.
- Light flickers intermittently: Check the wire connection for loose contact.
Warranty:
- Period: L2S15 (except battery pack) has a 1-year warranty. The battery pack has a 6-month warranty.
- Coverage: Warranty is effective from the sales date for material, production defects, or defects under normal use. It does not cover abuse, improper use, negligence, improper installation, operation, remodeling, adjustment, or modification by unauthorized personnel.
- Repair: If a defect occurs that cannot be resolved by troubleshooting, return the device to the manufacturer or distributor. Repair costs will be notified if the defect is due to abuse or improper use.
- Parts: Exchanged or broken parts after repair become the property of Xenosys Co., Ltd.
- No Extension: The warranty period is not extended or renewed after repair or replacement.
- Voided Warranty: Warranty is void if the product is modified, personalized by the customer, or if the serial number is missing or undetectable.
- Serviceable Parts: There are no user-serviceable parts in this product; send it to the distributor for servicing.