EasyManuals Logo

Yale Assure Lock 2 Plus User Manual

Yale Assure Lock 2 Plus
36 pages
To Next Page IconTo Next Page
To Previous Page IconTo Previous Page
Page #21 background imageLoading...
Page #21 background image
21
P/N YRD450-N-MNL-0039 Rev A
It is recommended to complete the last step after your lock
is calibrated with the app to ensure you are able to retrieve
accurate door state readings before modifying your frame.
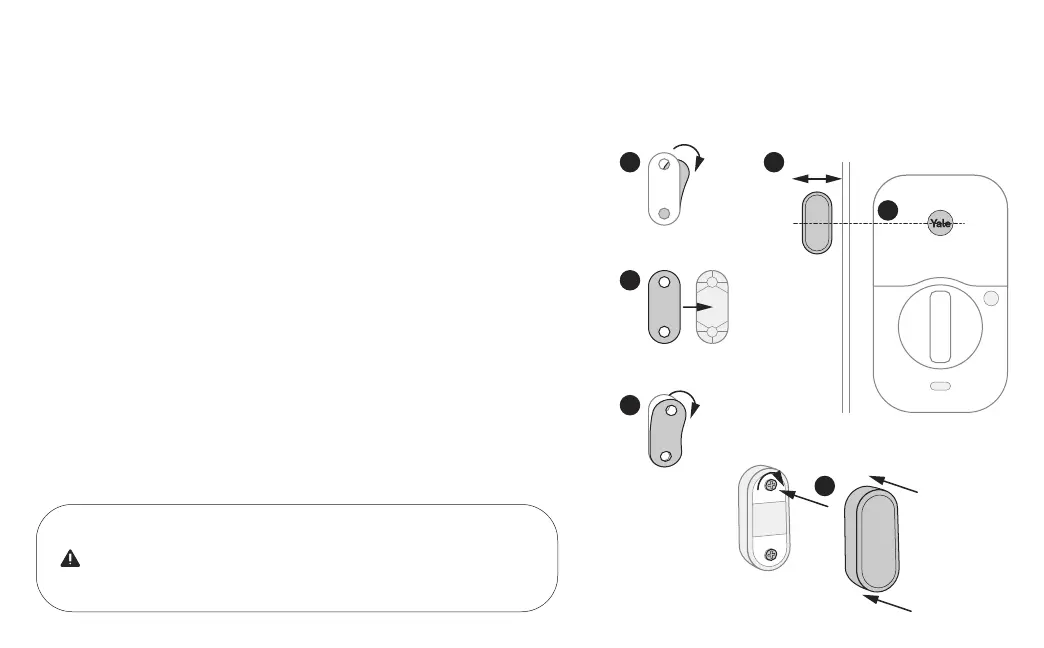
9b
DoorSense Surface Mount
1 4
5
2
3
6
11/2”
1. Remove one side of the backing from the adhesive.
2. Attach tape to the back of the DoorSense, ensuring it is aligned with the
edges of the device and the screw holes.
3. Remove the remaining backing from the adhesive.
4. Determine mounting location. For optimal performance, DoorSense
should be mounted within 11/2” from the edge of your door frame.
Note: DoorSense will still work if placed on curved or angled trim moulding around
the door frame as long as it is within 11/2” from the edge.
5. Ensure DoorSense is in proper position by center aligning it with the Yale
logo on the battery cover, and adhere it to the door frame.
6. Tighten pre-installed screws and attach cover.

Questions and Answers:

Question and Answer IconNeed help?

Do you have a question about the Yale Assure Lock 2 Plus and is the answer not in the manual?

Yale Assure Lock 2 Plus Specifications

General IconGeneral
Lock TypeDeadbolt
Power Source4 AA Batteries
Finish OptionsSatin Nickel, Oil Rubbed Bronze, Black Suede
Battery LifeUp to 1 year
Door Thickness1-3/8" to 2-1/4"
Bump Key ProofYes
ConnectivityBluetooth, Wi-Fi
CompatibilityAmazon Alexa, Google Assistant, Apple HomeKit
KeypadYes, touchscreen
Smartphone AppYale Access App
Weather ResistanceYes
Backset2-3/8" or 2-3/4"
Auto-LockYes
Backup Power9V Battery Terminal
User CodesUp to 25 (unlimited with app)

Related product manuals