Front panel unit
フロントパネル ユニット
Support
サポート
Support
サポート
SP unit
SP ユニット
POWER (1) P.C.B.
POWER (2) P.C.B.
AWCD2A P.C.B.
INPUT (4) P.C.B.
CB4
CB7
CB7
CB915
CB916
INPUT (1) P.C.B.
DAMP P.C.B.
CB905
CB907
CB904
CB909
⑯
⑱
⑲
㉓
⑳
㉑
㉑
㉒
⑲
⑱
㉓
㉓
㉓
⑰
⑳
㉒
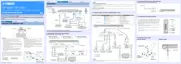
11. POWER(2)P.C.B. の外し方
a. ⑯のネジ 7 本、⑰のネジ 2 本を外します。(Fig.5)
b. CB4、CB7(POWER(1)P.C.B.)、CB7(INPUT(1)P.C.B.)、
CB904、CB905、CB907、CB909、CB915、CB916 を
外します。(Fig.5)
c. ⑱のネジ 4 本を外します。(Fig.5)
d. POWER(2)P.C.B. を外します。(Fig.5)
12. フロントパネルユニットの外し方
a. ⑲のネジ 10 本、⑳のネジ 10 本、㉑のネジ 4 本を
外します。(Fig.5)
b. ㉒のネジ 2 本をサポートと一緒に外します。(Fig.5)
c. フロントパネルユニットを外します。(Fig.5)
13. AWCD2AP.C.B.、INPUT(4)P.C.B. の外し方
a. ㉓のネジ 6 本を外します。(Fig.5)
b. AWCD2AP.C.B. を INPUT(4)P.C.B. と一緒に外します。
(Fig.5)
11. Removal of POWER (2) P.C.B.
a. Remove 7 screws (
⑯
) and 2 screws (
⑰
). (Fig. 5)
b. Remove CB4, CB7 (POWER (1) P.C.B.), CB7 (INPUT
(1) P.C.B.), CB904, CB905, CB907, CB909, CB915
and CB916. (Fig. 5)
c. Remove 4 screws (
⑱
). (Fig. 5)
d. Remove the POWER (2) P.C.B. (Fig. 5)
12. Removal of Front Panel Unit
a. Remove 10 screws (
⑲
), 10 screws (
⑳
) and 4 screws
(
㉑
). (Fig. 5)
b. Remove 2 screws (
㉒
) together with the support.
(Fig. 5)
c. Remove the front panel unit. (Fig. 5)
13. Removal of AWCD2A P.C.B.
and INPUT (4) P.C.B.
a. Remove 6 screws (
㉓
). (Fig. 5)
b. Remove the AWCD2A P.C.B. together with the INPUT
(4) P.C.B. (Fig. 5)
Fig. 5
29
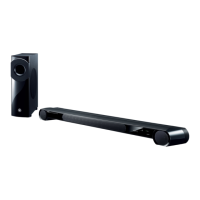
YSP-CU4300/YSP-CU3300/NS-WSW160
YSP-CU4300/YSP-CU3300/
NS-WSW160