<7. Operation>
7-1
IM 01C25B01-01E
7. Operation
7.1 Preparation for Starting
Operation
This section describes the operation procedure for
the EJ110, EJ120 and EJ130 as shown
ingure7.1a(verticalimpulsepipingtype,high-
pressure connection: right side) when measuring
theliquidowrate,andEJ430, EJ440 and
EJ310asshowningure7.1bwhenmeasuring
pressure.
NOTE
Check that the process pressure tap valves,
drain valves, and 3-valve manifold stop valves
on both the low pressure and high pressure
sides are closed, and that the 3-valve manifold
equalizing valve is opened.
(a) Follow the procedures below to introduce
process pressure into the impulse piping and
transmitter.
■ Dierential Pressure Transmitters
1) Open the low pressure and high pressure tap
valvestolltheimpulsepipingwithprocess
liquid.
2)Slowlyopenthehighpressurestopvalvetoll
the transmitter pressure-detector section with
process liquid.
3) Close the high pressure stop valve.
4) Gradually open the low pressure stop valve and
completelyllthetransmitterpressure-detector
section with process liquid.
5) Close the low pressure stop valve.
6) Gradually open the high pressure stop valve. At
this time, equal pressure is applied to the low
and high pressure sides of the transmitter.
7) Check that there are no liquid leaks in the
impulse piping, 3-valve manifold, transmitter, or
other components.
■ Gauge/Absolute Pressure Transmitters
1)Openthetapvalve(mainvalve)tollthe
impulsepipingwithprocessuid.
2) Gradually open the stop valve to introduce
processuidintothetransmitterpressure-
detector section.
3)Conrmthatthereisnopressureleakin
the impulse piping, transmitter, or other
components.
Venting Gas from the Transmitter Pressure-
detector Section
• Sincethepipingintheexampleofgure7.1
is constructed to be self-venting, no venting
operation is required. If it is not possible to
make the piping self-venting, refer to subsection
7.5 for instructions. Leave the equalizing valve
open even after venting gas.
(b) Turn ON power and connect the communicator.
Open the terminal box cover, and connect
the communicator to the SUPPLY + and
– terminals.
(c) Usingthecommunicator,conrmthatthe
transmitter is operating properly. Check
parameter values or change the setpoints as
necessary.
See IM 01C25T03-01E (BRAIN
communication) or IM 01C25T01-06EN (HART
communication) for communicator operation.
If the transmitter is equipped with an integral
indicator,itsindicationcanbeusedtoconrm
that the transmitter is operating properly.
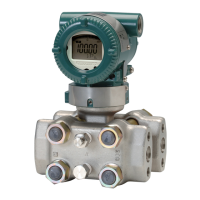
F0701.ai
Orifice
Tap valve
(high pressure)
Tap valve
(low pressure)
3-valve manifold
Drain valve
(high pressure)
Stop valve
(low pressure)
Stop valve
(high pressure)
Equalizing valve
Figure 7.1a Liquid Flow Measurement
 Loading...


