YORK INTERNATIONAL
34
Operation
OPERATION
STARTUP CHECKLIST
❏ Unit received undamaged
❏ Equipment received as ordered
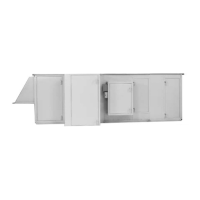
❏ Unit located properly for service
❏ Isolators and thrust restraints properly adjusted
(See Figures 8 - 13)
❏ Shipping restraints removed (See Figures 8 - 13)
❏ Check electrical supply voltage and control supply
❏ Check tightness of all electrical terminations
❏ Check fan wheel and drive sheaves for tightness
of set screws and bushing bolts
❏ Check sheave alignment (See Figure 21, page 23)
❏ Check bearings and locking collars (See details in
“Fan Shaft Bearings” pages 47 - 50)
❏ Manually rotate wheels and motors to assure free-
dom of movement
❏ Check condensate drain traps (pages 22 & 23)
(See Figures 22 - 25)
❏ Check air filters (pages 52 - 58 for details)
❏ Check proper fan rotation. Energize momentarily
❏ Check belts for tightness (page 45)
(See Figures 33 & 34)
❏ Check damper operation
❏ Check doors and latches for air leaks
❏ Check fan motors
While it is a common practice to op-
erate the fan as soon as possible (air
movement during construction is al-
ways preferred by contractors) on the
job site, the incomplete ductwork and
missing diffuser grilles will greatly
reduce air resistance and will allow
the fan to operate beyond design pa-
rameters. This practice may result in
water carry over and flooding of the
unit. Also, the motor may overamp
and become damaged.
PRE-OPERATIONAL CHECK
1. Lock out the electrical power to prevent accidental
fan operation. Check inside of the unit and duct
work to make sure that no loose nuts, bolts, trash,
sheet metal parts, etc., have been left which may
be sucked into the fan and result in permanent dam-
age. At the same time, check to make certain that
the air filters have been installed in the filter sec-
tion, with end seals in place.
2. Remove the shipping hold down bolts and shims at
the spring isolators. Note: Do not remove func-
tional bolts from seismic isolators.
3. Recheck the tightness of the isolator mounting hard-
ware, set screws and locking collars on the bear-
ings, and the motor mount adjusting nuts.
4. Rotate the fan by hand to make sure that it is free
and no obstructions have been incurred during ship-
ment or installation.
5. Check the bearings for proper lubrication by refer-
ring to the bearing manufacturer’s instructions, and
page 41 of this manual. At the same time, if bear-
ings contain locking collars, make sure that the lock-
ing collars have been locked (pages 47 - 50).
6. Be sure that the adjustable motor sheave adjust-
ment is locked. (See Figure 40)
7. Remove the various damper linkages from the op-
erators and operate them by hand to ensure that
movement is free and correct. Where variable inlet
vanes are installed in the units, the information given
in the Installation Section should be adhered to with
corrections made as necessary. Check the actua-
tors of the various linkages to make sure that they
do not overdrive the connected dampers in such a
way as to cause damage (page 24).
8. Refer to the fan motor manufacturer’s instructions
attached to the fan motor and check each item for
compliance prior to startup.
9. After the above items have been checked, remove
lockout and apply power to the motor for a short
interval to observe that the fan is rotating in the
proper direction as indicated by the arrow on the
side of the fan.
While the impeller is coasting to a stop, see if it is
rotating in the proper direction. Make certain the
impeller is of the correct rotation for the housing
and not installed backwards. Note blade configura-
tions (See Figure 39).
Fan manufacturers describe the rota-
tion of the fan impeller as being
“clockwise” or “counterclockwise”
for centrifugal fans when viewing the
drive side (see AMCA Standard 2406).
 Loading...