RC PROJECTION CLOCK AND WEATHER STATION
WITH COLOUR CHANGING DISPLAY
Model: YC9370
USER MANUAL
Thank you for purchasing this delicate color changing projection
clock. Utmost care has gone into the design and manufacture
of the product. Please read the manual carefully and keep it well
for future reference.
PRODUCT OVERVIEW
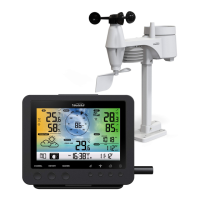
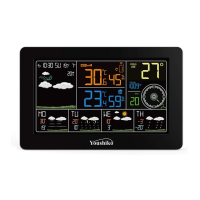
Main Unit
1.
[ REVERSE ]
button
2.
[ SNOOZE / LIGHT ]
button
3. Projector
4. LCD
5.
[ TIME ]
button
6.
[ ALARM ]
button
7.
[ +/CHANNEL ]
button
8.
[ -/MEM ]
button
9.
[ HISTORY ]
button
10.
[ °C / °F ]
slide switch
11.
[ RCC ]
button
12.
[ BARO ]
button
13.
[ SENSOR ]
button
14.
[ RESET ]
button
15.
[ FORECAST/DEMO ]
slide switch
16.
[ PROJECTION ON/OFF ]
slide switch
17.
[ LIGHT ON/OFF ]
slide switch
18.
[ L / H ]
slide switch
19. DC jack
20. Battery compartment
21. FOCUS knob
Function Modes
Normal time mode
1. Time
2. 12+Hour forecast
3. Barometer reading
4. rel/abs indicator
5. Baro unit (hPa/inHg/mmHg)
6. Histogram of Baro
7. Low battery indicator for sensor
8. Ice alert
9. Sensor signal indicator
10. Outdoor temperature
11. Indoor temperature
12. Date-Month
13. Day of the week
14. Daylight saving time
15. RC signal indicator
Alarm time mode
1. Time of alarm 1
2. Alarm 1 on
3. Alarm 2 on
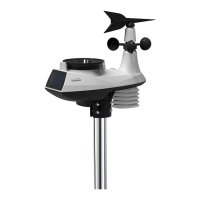
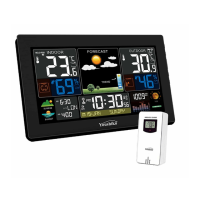
Outdoor Sensor
1. Red LED indicator
2. Wall Mount Hole
3.
[ RESET ]
button
4.
[ CH 1/2/3 ]
Slide Switch
5. Battery compartment
GETTING STARTED
1. Remove battery door of main unit and sensor.
2. Insert 3 new AA size batteries to the main unit, and 2 new
AA size to the sensor, matching the polarities “
+ / -
“ Replace
the battery door.
3. For the main unit, user can plug the DC adaptor to power it.
4. The main unit will automatically receive 433 MHz signal in
8 seconds. And after 5-minute sensor signal test, it will turn
to RC signal reception.
NOTE:
Powered by batteries, display of main unit without backlight is
quite dark, and its backlight lasts for 5 seconds. But powering
by DC adaptor enables long lasting backlight for easy viewing.
HOW TO PAIR MAIN UNIT AND SENSOR
1. Press
[ + / CHANNEL ]
button on main unit to select a channel.
2. On sensor, slide channel switch to corresponding channel.
(For additional sensors, select a different channel). Press
[ RESET ]
button.
3. Press
[ SENSOR ]
on main unit to initiate search for 433 MHz
reception.
WIRELESS SENSOR RECEPTION
If the main unit receives wireless sensor signal successfully,
the signal icon “ ” displays. While if it cannot receive sensor
signal or signal is lost, icon “ ” displays.
MSF SIGNAL RECEPTION (AUTOMATICALLY TIME SET)
● The MSF signal is a signal broadcast within 1500 km
(932 miles) of Anthorn, England. This RC clock includes a
built-in receiver which picks up the signal from the MSF
station. Therefore, the clock automatically sets the time,
date and weekday.
● The clock automatically carries out four periodic
synchronization procedures (at 2:00 AM, 8:00AM,2:00 PM
and 8:00 PM daily) with the MSF signal to correct any
deviations to the exact time.
● Once the unit synchronizes successfully to the MSF signal,
the signal icon “ ” will show up. Each synchronization
process will take between 6 to 16 minutes. When the
reception stops, signal icon displays as “ ”.
● To manually start or stop the MSF signal reception, press
[ RCC ]
button.
NOTE:
1. The strength of radio-controlled time signal from the
transmitter tower may be affected by geographical location
or building around.
2. Always place the unit away from interfering sources such
as TV set, computer, etc.
3. Avoid placing the unit on or next to metal plates.
4. Closed areas such as airport, basement, tower block, or
factory are not recommended.
SIGNAL STRENGTH INDICATOR
When the wave segment is ashing this means time
the signals are being received.
The signal icon could be classied into 3 types:
No signal / Reception stopped
Signal is being received
Signal received successfully
Disable / Enable RCC Signal Reception
1. Press and hold
[ RCC ]
button for 8 seconds to disable the
reception.
2. Press and hold
[ RCC ]
button for 8 seconds to enable
automatic RCC reception.
RC off RC on
TO MANUALLY SET THE TIME AND CALENDAR
To manually set the time and calendar, rst press and hold
[ RCC ]
button for 8 seconds to disable RCC reception.
1. In normal time mode, press and hold
[ TIME ]
button for 2
seconds, “12 H” or “24 H” digit ashes.
2. Press
[ + / CHANNEL ] / [ - / MEM ]
button to set 12/24 hour
format.
3. Press
[ TIME ]
button again to proceed to hour setting.
Press
[ + / CHANNEL ] / [ - / MEM ]
button to set the value.
4. Repeat 3 to complete setting in this sequence:12/24 Hour
format>Hour>Minute>Year>M&D/D&M>Month>Date>Zone
(+/-23 Hour offset)>Language
5. Press
[ TIME ]
button to conrm and exit setting.
NOTE:
1. The range of Zone is between -23 and +23 hours.
2. The language options are GB(English), FR(French),
DE(German), ES(Spanish) and IT(Italian).
3. DST (Daylight Saving Time) feature is set to Auto (factory
set). The clock has been programmed to automatically
switch when the daylight saving time is in effect.
TO SET ALARM
1. In normal time mode, press
[ TIME ]
button to select Alarm
1 or Alarm 2 mode.
2. In alarm 1 or alarm 2 mode, press and hold
[ ALARM ]
button for 2 seconds, hour digit ashes. Press
[ + / CHANNEL ] / [ - / MEM ]
button to set hour.
3. Press
[ ALARM ]
button to proceed to minute setting,and
press
[ + / CHANNEL ] / [ - / MEM ]
button to set minute.
C8416B-PD16151M-Youshiko-A3-2016.7.15.indd 1 2016/7/15 15:30:10