5
3D Systems, Inc.
7
A
8
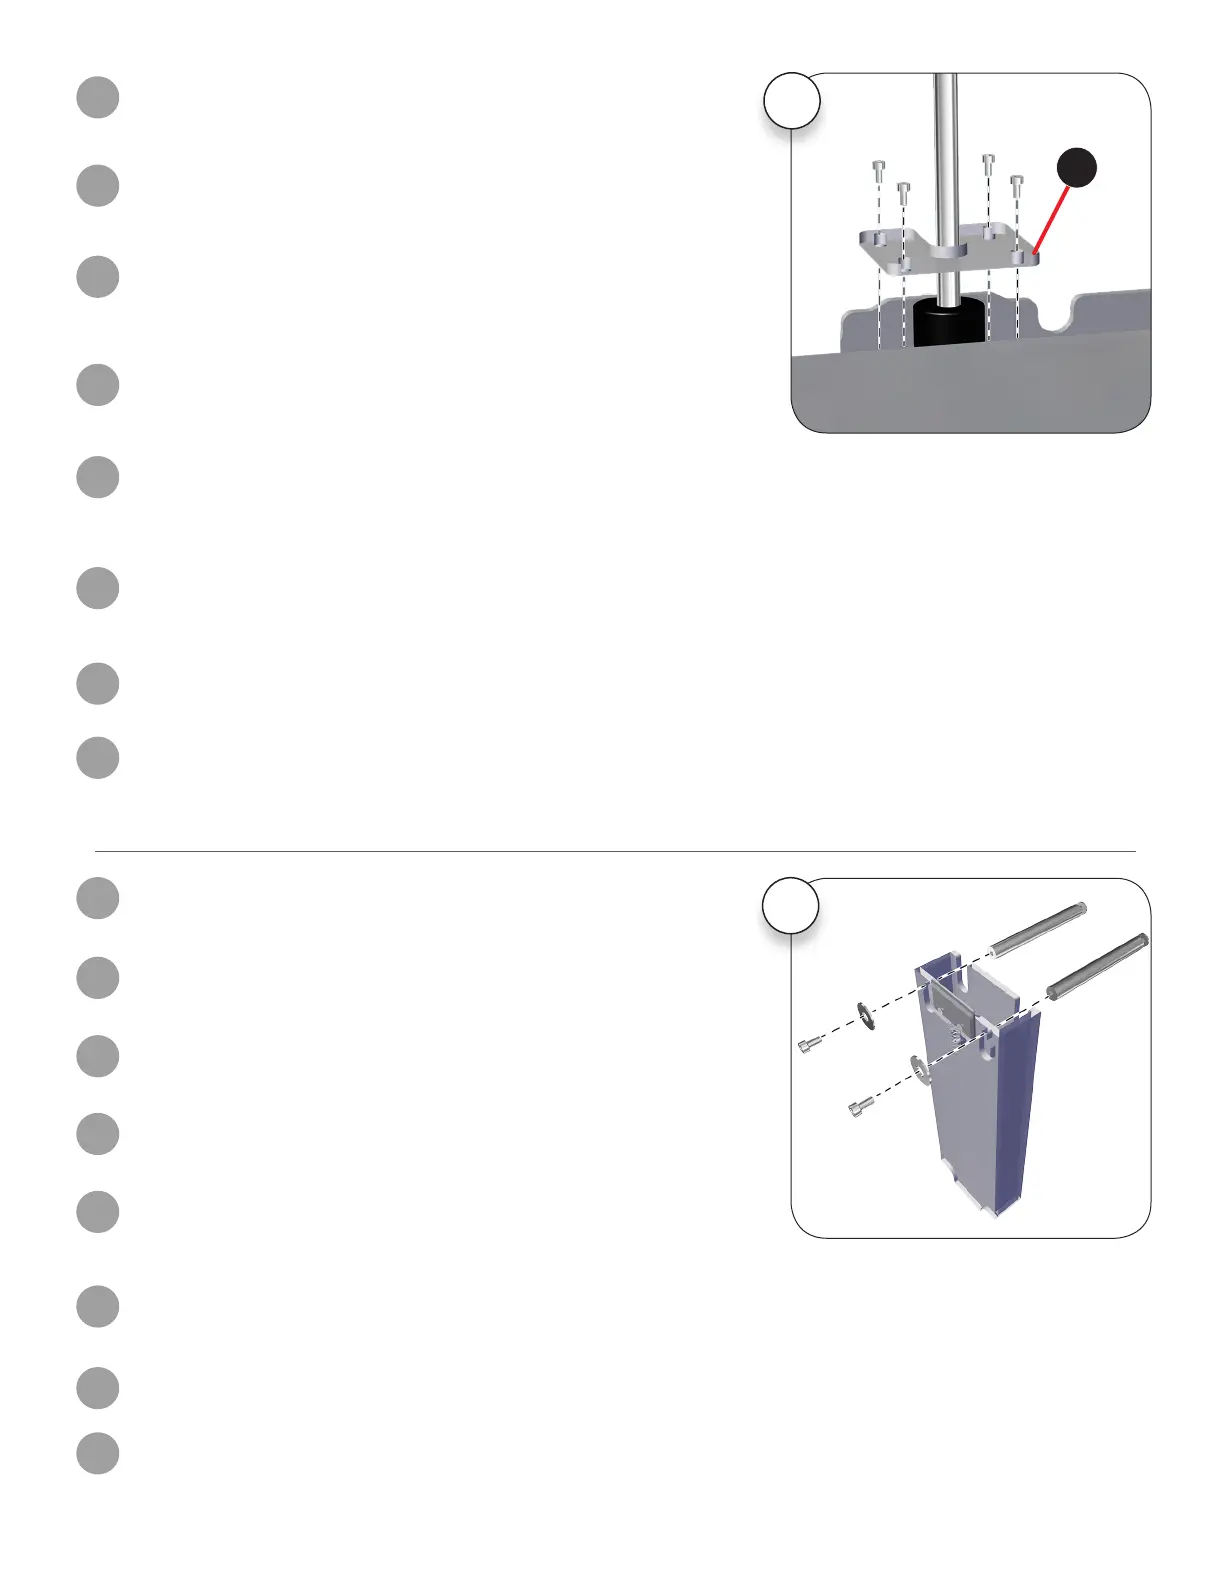
Install jet wiper (1)
Using a 4mm hex head driver, attach the mounting posts to the jet wiper assembly with
the supplied screws and washers.
EN
Installation du nettoyeur de buse (1)
En utilisant un tournevis à tête hexagonale de 4 mm, xez les tiges de montage à
l’ensemble du nettoyeur de jet, à l’aide des vis et des rondelles fournies.
FR
Instale el limpiador de inyectores (1).
Con un destornillador de punta hexagonal de 4 mm, coloque los postes de montaje en el
conjunto del limpiador de inyectores usando los tornillos y las arandelas suministradas.
ES
Druckstrahl-Wischer einbauen (1)
Schrauben Sie mit einem 4mm Sechskantschlüssel und den mitgelieferten Schrauben
und Unterlegscheiben die Montagestangen an den Druckstrahl-Wischern fest.
DE
Установка очистителя сопел (1)
Используя 4-миллиметровую шестигранную отвертку, прикрепите опорные
штифты к узлу очистителей сопел с помощью поставляемых в наборе винтов и
шайб.
RU
제트 와이퍼 설치 (1)
4mm 육각머리 드라이버를 사용하여, 제공한 나사와 와셔로 장착 포스트를 제트 와이퍼
어셈블리에 고정합니다.
KO
安装喷头擦洗器 (1)
使用 4mm 内六角扳手及附带的螺钉和垫圈将安装杆安装到喷头擦洗器总成上。
ZH
ジェットワイパー(1)の取り付け
4mmの六角ドライバーを使って、付属品のネジとワッシャでマウンティングポストを
ジェットワイパーアセンブリに取り付けます。
JA
Remove guard screws
Using the 4mm driver supplied in the tool kit, loosen and remove the four (4) 4 mm hex head
screws securing the clear Z-Axis guard (A) and remove the guard. Save the guard and screws
for repacking.
EN
Retrait des vis de protection
À l’aide du tournevis de 4mm fourni avec le kit d’outils, desserrez et retirez les quatre (4) vis
de 4mm à tête hexagonale qui maintiennent la protection (A) de l’axeZ transparente, puis
retirez la protection. Conservez la protection et les vis en cas de besoin ultérieur.
FR
Retire los tornillos del protector.
Con el destornillador de 4 mm incluido en el kit de herramientas, aoje y retire los cuatro (4)
tornillos de cabeza hexagonal de 4 mm que sujetan el protector transparente del eje Z (A), y
retire el protector. Guarde el protector y los tornillos para volver a embalar.
ES
Sicherungsschrauben entfernen
Lösen Sie die vier(4)4-mm-Sechskantschrauben, mit denen der durchsichtige
Z-Achsenschutz(A) befestigt ist, mit dem im Werkzeugsatz mitgelieferten 4-mm-
Schraubendreher, und entfernen Sie den Schutz. Bewahren Sie den Schutz und die Schrauben
für ein eventuelles Wiederverpacken auf.
DE
Удаление предохранительных винтов
Используя отвертку 4 мм, поставляемую в наборе инструментов, открутите и удалите
четыре (4) 4-миллиметровых шестигранных винта, которые закрепляют прозрачный
предохранитель оси Z, а затем удалите предохранитель. Сохраните винты и
предохранитель для последующей упаковки.
RU
안전장치 나사 제거
도구 키트와 함께 제공된 4 mm드라이버를 사용하여 Z축 안전장치(A)를 고정하는 4 mm
육각머리 나사 4개를 풀어서 제거하고 안전장치를 제거합니다. 재포장을 위해 안전장치와
나사를 보관합니다.
KO
取下防护装置螺钉
使用工具箱中提供的 4mm 扳手,旋松并取下用于固定透明 Z 轴防护装置 (A) 的四 (4) 个
4 mm 六角螺钉,然后取下防护装置。保留防护装置和螺钉以供重新包装使用。
ZH
ガードネジの取り外し
ツールキットに同梱の4mmドライバを使って、クリアなZ軸ガード(A)を固定してい
る4箇所の4mm六角ネジを緩めて外し、ガードを取り外します。再梱包のために、ガ
ードとネジは保管しておきます。
JA